39
Déballage
Assurez-vous d’avoir sous la main tous les éléments de l’imprimante montrés
ici. S’il manque un élément, communiquez avec le magasin de détail ou le
revendeur où vous avez achetez l’imprimante.
Unpacking
2
9
2. Unpacking
Make sure you have all the printer components shown here. If any component is
missing, contact the retail store or dealer where you purchased the product from.
Reference
14
44
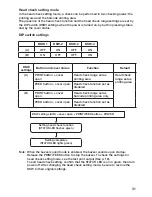
Head check setting mode
In the head check setting mode, a check can be performed in two checking areas: the
printing area and the barcode printing area.
The presence of the head check function and the head check range settings are set by the
DIP switch (DSW) settings when the power is turned on, by button pressing status, and by
the cover status.
DIP switch settings
Setting head check function
(STATUS LED flashes green)
DSW settings (A/B) + cover open + PRINT/FEED POWER
Setting completes
(STATUS LED lights green)
Note: When the buzzer sound mode is enabled, the buzzer sounds upon startup.
Release the PRINT/FEED button to stop the buzzer. To check the settings for head
check setting mode, see the test print output (See P. 23).
To end head check setting, confirm that the STATUS LED is on in green, then turn
power off. After changing the head check setting mode, be sure to restore the DSW
to their original settings.
(A)
(B)
DSW-1
OFF
ON
DSW-2
ON
OFF
DSW-3
OFF
OFF
DSW-4
ON
ON
DSW
settings
(A)
(B)
Button and cover status
PRINT cover open
FEED cover open
PRINT cover open
FEED cover open
Function
Head check range set as printing
area
Head check function set as disabled
Head check range set as barcode
printing area only
Head check function set as disabled
Default
Head check
range set as
printing area
Garantie
Guide rapide
Imprimante
Bloc-pile
Bandoulière
* L’apparence des matériaux de rembourrage fournis (p. ex., les tampons protecteurs
sur le support d’imprimante) peut différer en fonction des lots de production.

