


125
Operação com o opcional Bluetooth ou
LAN sem fio
Para imprimir usando uma interface Bluetooth ou LAN sem fio, faça o
seguinte:
➊
Remova a cobertura do USB/DIP
switch e coloque o DIP switch
(DSW) nas posições DSW-1, 2, 3, 4
= (OFF, ON, OFF, OFF).
Oper
ation via Infr
ared Comm
unication
9
26
9. Operation via Infrared Communication
To print using infrared communication, perform the following operations.
30°
30°
2
3
4
1
ON
2
Place the printer within 20 cm of
the PC or handheld terminal for
infrared communication.
1
Remove the USB/DIP switch
cover, and set the DIP switch
(DSW) to DSW-1, 2, 3, 4 = (ON,
OFF, OFF, OFF).
3
Adjust the printer position so that the PC or handheld terminal is within a
30° area vertically and horizontally (cone shape) from the center of the
infrared communication sensor.
The maximum usage distance for infrared communication is 15 to 20 cm.
* However, this differs with the usage environment and the communicating
equipment. Communication may not be possible in direct sunlight or
under powerful illumination. In such cases, either shield the infrared
communication sensor from harsh light, or place the infrared
communication sensor in contact with the communicating equipment.
Oper
ation with Bluetooth or
Wireless LAN Options
10
27
10. Operation with Bluetooth or Wireless LAN Options
To print using a Bluetooth interface or a wireless LAN interface, perform the
following operations.
2
3
4
1
ON
1
Remove the USB/DIP switch
cover, and set the DIP switch
(DSW) to DSW-1, 2, 3, 4 = (OFF,
ON, OFF, OFF).
* Note that the effective distance varies with the usage environment,
computer, or handheld terminal in use.
* Note que a distância eficaz varia de acordo com o ambiente de uso, o
computador ou o terminal de mão usado.
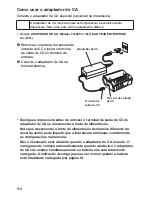
Impressão
➊
Os dados são enviados de um PC .
Oper
ation with an RS-232C Cab
le
7
24
4
Connect the other end of the
RS-232C cable to the connector
on the PC or the handheld
terminal.
For the connector on the PC or the
handheld terminal, see the manuals
provided with that equipment.
3
Insert the RS-232C cable into
the connector.
Match the arrow on the RS-232C cable
connector with the arrow beside the
printer connector, and insert it firmly.
2
Remove the RS-232C connector
cover.
7. Operation with an RS-232C Cable
To print with an optional RS-232C cable connected to a PC or a handheld
terminal, perform the following operations.
1
Remove the USB/DIP switch
cover, and set the DIP switch
(DSW) to DSW-1, 2, 3, 4 = (OFF,
OFF, OFF, OFF).
2
3
4
1
ON
RS-232C cable
RS-232C cover
Printing
11
29
■
When the next label is not printed
12345
67
ABCDEF
G
abcdefg
1
ABC
abcd
1234567
ABCDEFG
abcdefg
1234567
ABCDEFG
abcdefg
1
With the printer online, press the
PRINT button to take the printer
offline (STATUS LED turns off).
2
Press the FEED button to feed
the labels.
3
When the paper stops, pull it in
the direction of the arrow to cut
the label.
4
Press the PRINT button to put
the printer online (STATUS LED
lights green).
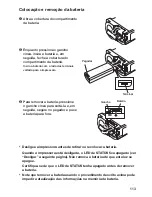
➋
Quando a impressão terminar,
segure o canto direito ou esquerdo
da etiqueta, puxe-a na direção da
seta e destaque-a .
* O número de etiquetas que podem ser impressas com uma bateria varia entre o
modo de impressão contínua e a impressão no modo de dispensa .
* Quando as etiquetas não separadas são cortadas em outra posição que não seja
na linha perfurada e a próxima etiqueta não for impressa, siga os procedimentos
descritos na página 23.


