


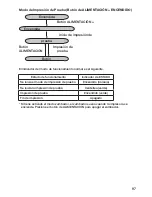


89
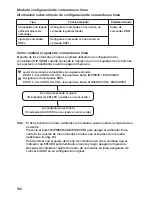
Funcionamiento con el cable USB
Utilice el siguiente procedimiento para imprimir con el cable opcional USB
(tipo mini B) conectado a una PC o a un terminal portátil.
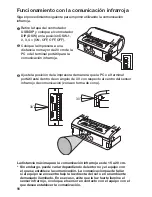
➊
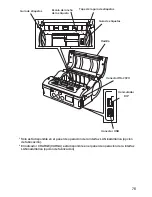
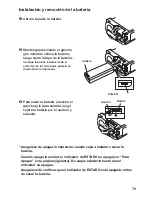
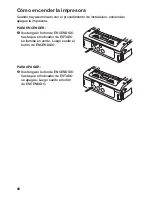
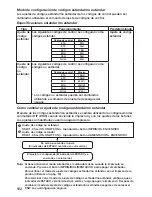
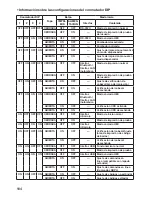
Retire la tapa del conmutador
USB/DIP y coloque el conmutador
DIP (DSW) en la posición DSW-1,
2, 3, 4 = (ON, ON, OFF, OFF).
Oper
ation with a USB Cab
le
8
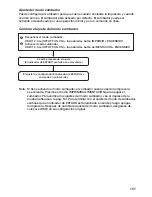
25
3
Connect the other end of the
USB cable to the connector on
the PC or the handheld terminal.
For the connector on the PC or the
handheld terminal, see the manuals
provided with that equipment.
8. Operation with a USB Cable
To print with an optional USB cable (mini B type) connected to a PC or a
handheld terminal, perform the following operations.
1
Remove the USB/DIP switch
cover, and set the DIP switch
(DSW) to DSW-1, 2, 3, 4 = (ON,
ON, OFF, OFF).
2
Insert the USB cable into the
connector.
Match the arrow on the USB cable
connector with the arrow beside the
printer connector, and insert it firmly.
2
3
4
1
ON
USB cover
USB cable
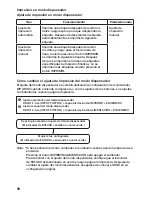
Printing
11
28
11. Printing
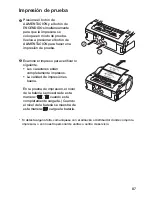
1234567
ABCDEFG
abcdefg
1234567
ABCDEFG
abcdefg
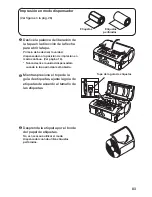
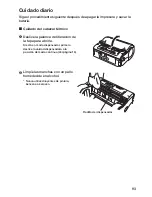
1
Data is sent from a PC.
2
When printing is complete, hold
the right or left corner of the
label, pull it in the direction of the
arrow, and tear the label.
* The number of labels that can be printed with one battery pack differs between
continuous printing mode and dispense mode printing.
* When the non-separated labels are severed somewhere other than the perforated line,
and the next label is not printed, perform the operations on page 29.
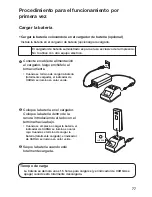
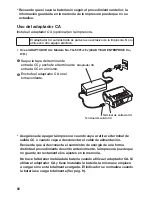
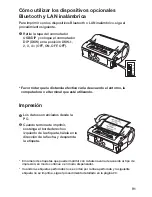
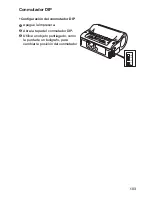
➋
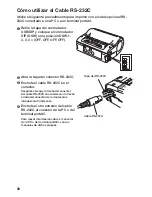
Enchufe el cable USB en el
conector .
Asegúrese de que la flecha del conector
del cable USB concuerda con la flecha
al lado del conector de la impresora e
introduzcalo firmemente.
Oper
ation with a USB Cab
le
8
25
3
Connect the other end of the
USB cable to the connector on
the PC or the handheld terminal.
For the connector on the PC or the
handheld terminal, see the manuals
provided with that equipment.
8. Operation with a USB Cable
To print with an optional USB cable (mini B type) connected to a PC or a
handheld terminal, perform the following operations.
1
Remove the USB/DIP switch
cover, and set the DIP switch
(DSW) to DSW-1, 2, 3, 4 = (ON,
ON, OFF, OFF).
2
Insert the USB cable into the
connector.
Match the arrow on the USB cable
connector with the arrow beside the
printer connector, and insert it firmly.
2
3
4
1
ON
Printing
11
28
11. Printing
1234567
ABCDEFG
abcdefg
1234567
ABCDEFG
abcdefg
1
Data is sent from a PC.
2
When printing is complete, hold
the right or left corner of the
label, pull it in the direction of the
arrow, and tear the label.
* The number of labels that can be printed with one battery pack differs between
continuous printing mode and dispense mode printing.
* When the non-separated labels are severed somewhere other than the perforated line,
and the next label is not printed, perform the operations on page 29.
Tapa de USB
Cable USB
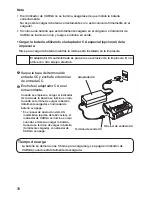
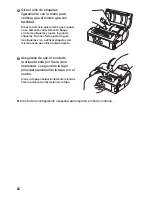
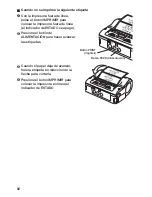
➌
Enchufe el otro extremo del cable
USB al conector de la PC o del
terminal portátil.
Para mayor información sobre el conector
de la PC o del terminal portátil, vea los
manuales de dichos equipos .


