


54
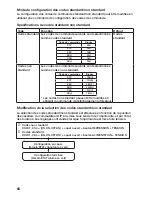
Utilisation avec un câble RS-232C
Pour imprimer en utilisant un câble RS-232C optionnel raccordé à un
ordinateur ou à un terminal, procédez comme suit.
➊
Retirez le capot du connecteur
USB/commutateur DIP, et réglez les
quatre cavaliers du commutateur
DIP DSW-1 comme suit : 1, 2, 3, 4 =
OFF, OFF, OFF, OFF .
Oper
ation with an RS-232C Cab
le
7
24
4
Connect the other end of the
RS-232C cable to the connector
on the PC or the handheld
terminal.
For the connector on the PC or the
handheld terminal, see the manuals
provided with that equipment.
3
Insert the RS-232C cable into
the connector.
Match the arrow on the RS-232C cable
connector with the arrow beside the
printer connector, and insert it firmly.
2
Remove the RS-232C connector
cover.
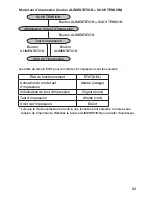
7. Operation with an RS-232C Cable
To print with an optional RS-232C cable connected to a PC or a handheld
terminal, perform the following operations.
1
Remove the USB/DIP switch
cover, and set the DIP switch
(DSW) to DSW-1, 2, 3, 4 = (OFF,
OFF, OFF, OFF).
2
3
4
1
ON
RS-232C cable
RS-232C cover
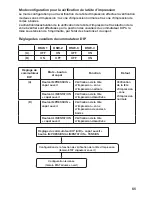
Printing
11
29
■
When the next label is not printed
12345
67
ABCDEF
G
abcdefg
1
ABC
abcd
FEED button
PRINT button
1234567
ABCDEFG
abcdefg
1234567
ABCDEFG
abcdefg
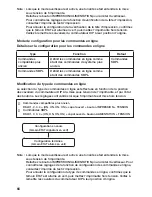
1
With the printer online, press the
PRINT button to take the printer
offline (STATUS LED turns off).
2
Press the FEED button to feed
the labels.
3
When the paper stops, pull it in
the direction of the arrow to cut
the label.
4
Press the PRINT button to put
the printer online (STATUS LED
lights green).
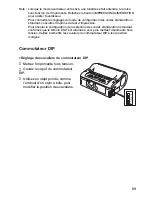
➊
Retirez le capot du connecteur RS-
232C .
Oper
ation with an RS-232C Cab
le
7
24
4
Connect the other end of the
RS-232C cable to the connector
on the PC or the handheld
terminal.
For the connector on the PC or the
handheld terminal, see the manuals
provided with that equipment.
3
Insert the RS-232C cable into
the connector.
Match the arrow on the RS-232C cable
connector with the arrow beside the
printer connector, and insert it firmly.
2
Remove the RS-232C connector
cover.
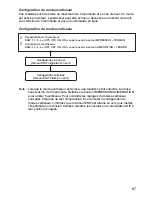
7. Operation with an RS-232C Cable
To print with an optional RS-232C cable connected to a PC or a handheld
terminal, perform the following operations.
1
Remove the USB/DIP switch
cover, and set the DIP switch
(DSW) to DSW-1, 2, 3, 4 = (OFF,
OFF, OFF, OFF).
2
3
4
1
ON
RS-232C cable
Printing
11
29
■
When the next label is not printed
12345
67
ABCDEF
G
abcdefg
1
ABC
abcd
FEED button
PRINT button
1234567
ABCDEFG
abcdefg
1234567
ABCDEFG
abcdefg
1
With the printer online, press the
PRINT button to take the printer
offline (STATUS LED turns off).
2
Press the FEED button to feed
the labels.
3
When the paper stops, pull it in
the direction of the arrow to cut
the label.
4
Press the PRINT button to put
the printer online (STATUS LED
lights green).
Capot du connecteur
RS-232C
Câble RS-232C
➊
Branchez le câble RS-232C dans le
connecteur .
Alignez la flèche de la fiche du câble
RS-232C avec la flèche du connecteur de
l’imprimante, et insérez bien la fiche dans
le connecteur .
➊
Branchez l’autre extrémité du câble
RS-232C dans le connecteur de
l’ordinateur ou du terminal .
En ce qui concerne le connecteur de
l’ordinateur ou du terminal, consultez les
manuels fournis avec ces équipements .


