


58
DPSClick User Manual
v. 4.0
NEW!
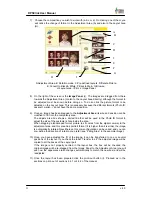
Index Print
: once in the Browser screen click the Index Print button to bring up the
corresponding menu, already dealt with in section 4.3.1.
As you are working with strips of film, it
may be necessary to identify the reel
associated with the Index Print that is to be
printed. To do so, complete the “A” space.
This information will be printed on the
paper of the Index Print.
It is also possible to identify the
miniatures with the same number and
letters as those that appear on the film. To
do so, write the number or letter of the first
valid image of the film in section “B”.
If the label of the strip of film begins
with the letter A, it can also be selected in
option “C”.
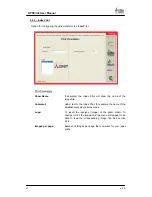
4.8.3 – Pakon Film scanners (F135 & F235)
Pakon F135 and F235 are full
integrated in DPSClick software
from version 4.0. That means you
don’t have to run any kind of
external software to use these
film scanners.
The screen that appears
when using Pakon scanners
consists of a browser-based
interface. The biggest part of the
screen will be used to show the
thumbnails of the scanned
photographs. On the bottom you
will find the buttons necessary to
operate with the scanner.
F135 and F235 Pakon scanners work identically. The only difference in DPSClick interface
between the two scanners is the resolution and colour modes.
When you enter Pakon screen, the first action that occurs is the scanner initialization. If
there is any problem during initialization, the scanner will not work.
A
B
C


