21
DPSClick User Manual
v. 4.0
NEW!
NEW!
4.3.4 – Print
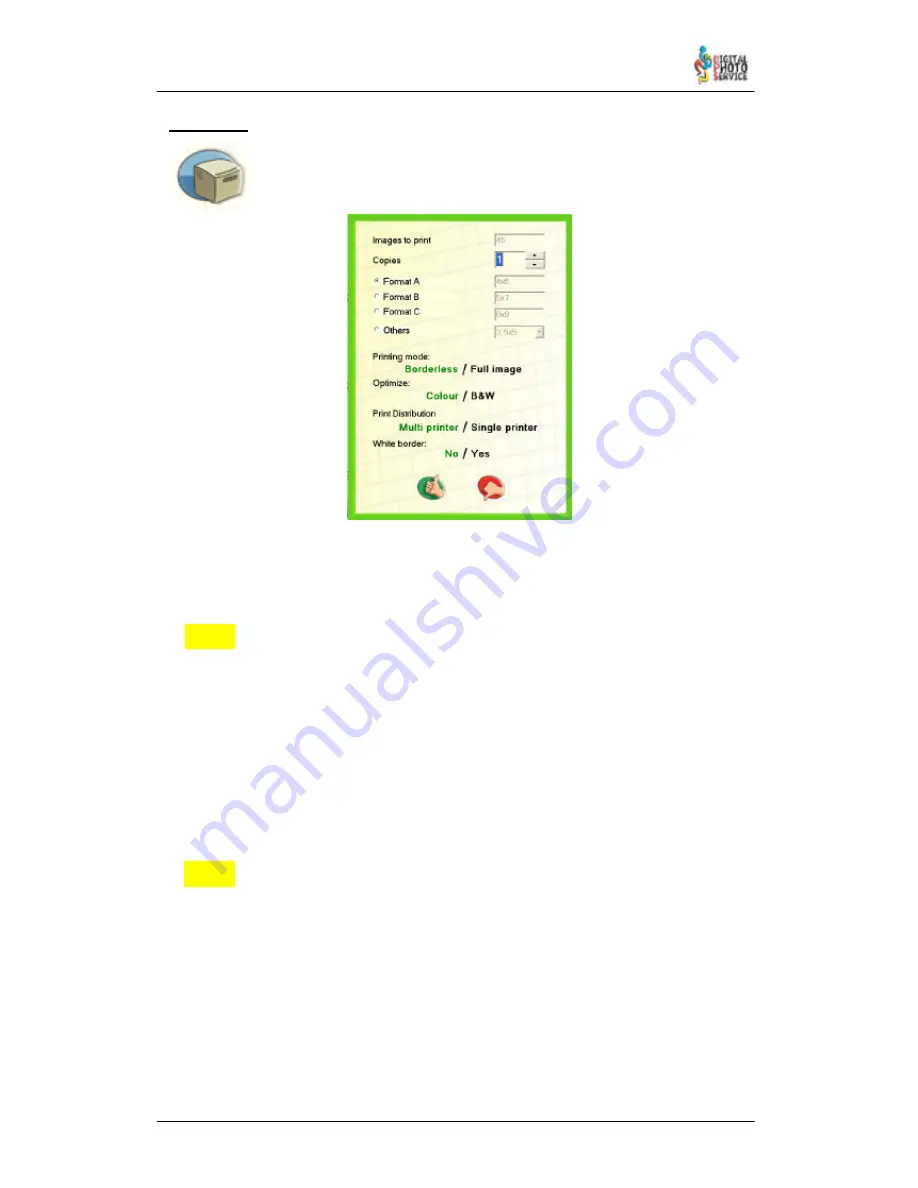
One or several images can be printed from the ‘Browser' or from the
‘MultiPrint screens’, where you can choose the output format and the number
of copies. To do so, select the files and press the OK button (Print).
You can define the number of copies for each print using the
Copies
counter.
You can also choose which
Format
the images will be printed in, and can choose between
‘Format A’, ‘Format B’ or ‘Format C’, defined in the ‘Configuration’ screen.
From version 4.0 it is possible to choose ‘Others’, too, in order to use some of the
supported formats not defined by Format A, B or C. This change affects to all
software screens where print formats can be chosen.
Printing Mode
: you can choose between fill printing area with image (you print borderless
but maybe you loose image data) or full image (you see white paper but no image data is
lost).
Optimisation
allows you to choose the Print mode: Colour or Black and White (
B&W
),
optimising the printer for the option chosen.
Print distribution
: before printing, you can select between Multi printer (pictures are being
sent to all printers that has the same paper size if the printer is busy) or Single printer (all
pictures of the current job are sent to the same printer).
White border:
from version 4.0 it is possible to print images with a white border.
Use this option to choose if you want white border or not.
NOTE:
If by mistake you print colour pictures by selecting optimisation to black and white, they will
not be printed in black and white, but with a wrong colour balance.
It is not advisable to print colour and black and white pictures in the same print session. It is
better to put colour and black and white copies in two different print sessions, each one
optimised for the purpose.
PRINT ERROR:
In the event of a print error or if the print–out simply does not take place, check the status in
the message bar of the 'Browser' or ‘Multiprint’ screen and then access the
PrintServer
tool
via the button located in the bottom left corner. (
See section 4.10
)


