


278
4
Click [Add File to Project], and select the demo page file you created.
Select [Demo page file(*.DMO)] on the bottom right of the screen to select the created
demo page file.
5
Click the demo page file.
6
Enter a component name for the demo page in [Component], and click [OK].
7
Select the machine in the window on the bottom of the Storage Manager plug-in
screen. You can select multiple machines to register demo pages to.
·
If the machine is not registered in the Configuration Tool, refer to "Registering the Machine".
8
Click [Send project files to printer].
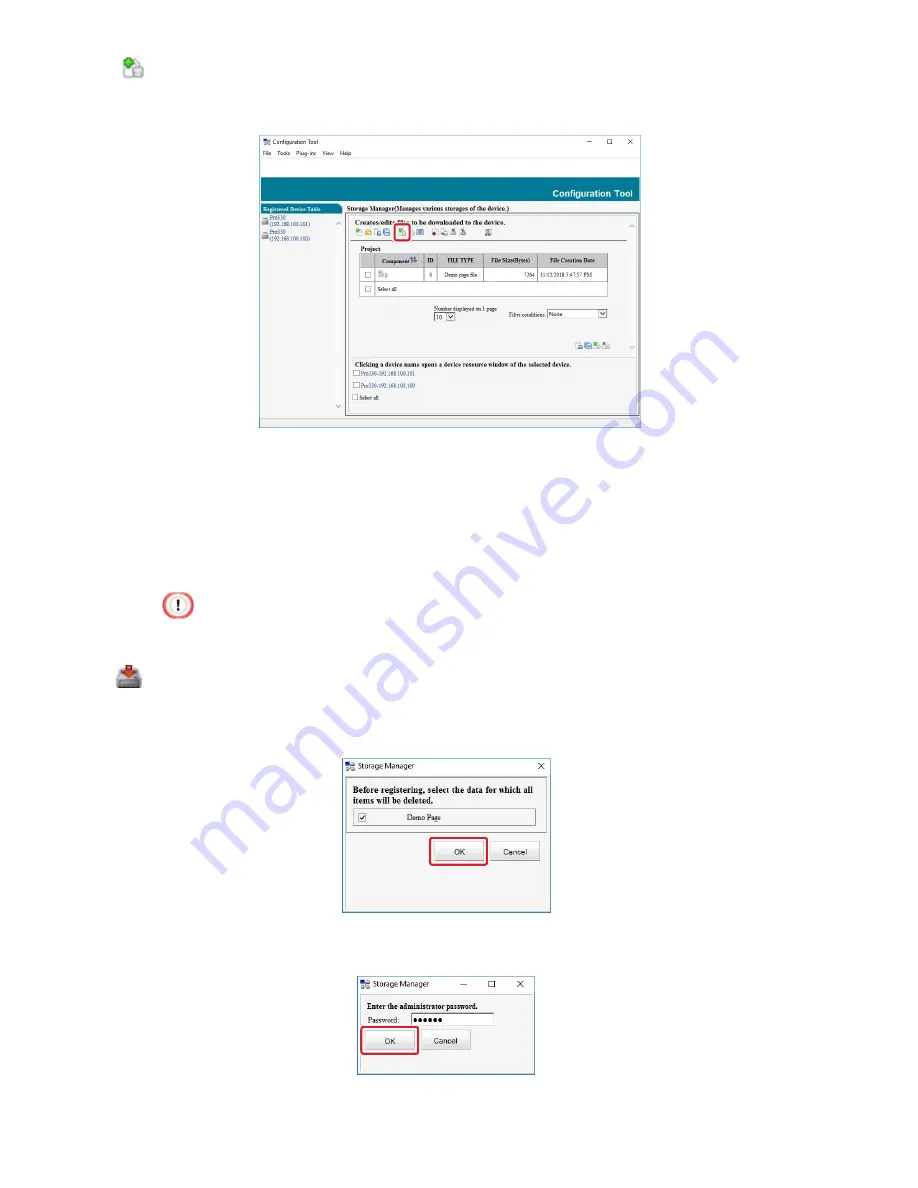
9
Delete items registered in the machine before performing registration.
Select the demo page, and click [OK].
10
Enter the administrator password, and then click [OK].
Summary of Contents for 360C
Page 1: ...360C Operator s Manual 880076 0101 Rev 2 ...
Page 17: ...17 Unpacking How to Unpack the Machine Checking the Accessories Installing Consumables 2 ...
Page 24: ...24 ...
Page 36: ...35 7 Tighten the screws x 2 8 Connect the connector ...
Page 37: ...36 9 Attach the Cover Cable PSNT 10 Attach the Cap Cover PSNT x 2 ...
Page 50: ...49 ...
Page 91: ...90 ...
Page 147: ...146 ...
Page 156: ...155 8 Remove the cover toner 9 Close the top cover 10 Open the toner cartridge cover ...
Page 167: ...166 8 Close the top cover ...
Page 178: ...177 15 Close the feeder cover until it clicks ...
Page 179: ...178 ...
Page 198: ...197 4 Close the feeder cover until it clicks ...
Page 233: ...232 ...
Page 244: ...243 The settings of the machine can be changed from the Admin Setup tab ...
Page 280: ...279 11 Confirm the setting results and click Back ...
Page 289: ...288 ...
Page 296: ......
Page 297: ......


