SmartDGA Hardware Manual
SmartDGA Commissioning
•
74
7.
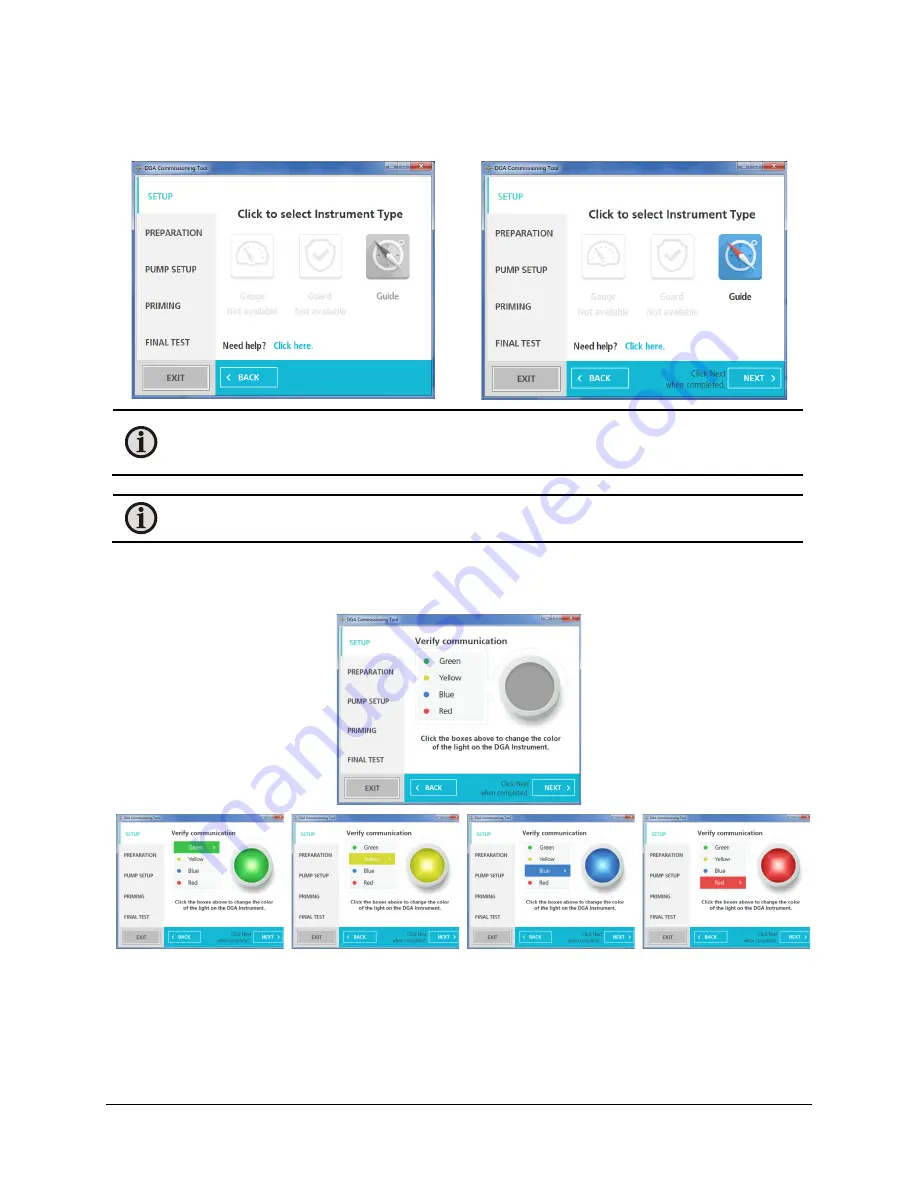
The software will identify the connected SmartDGA instrument(s). Select the first instrument
type (Gauge, Guide, or Guard) you would like to commission and click
Next >
to continue.
Note:
Outlined instruments (such as Gauge and Guard in the above example) are not
selectable for commissioning since only a Guide instrument is connected to the EZHub.
Indicate your selection by clicking on the grayscale icon (Guide).
Note:
You can only commission one SmartDGA instrument at a time and must repeat
the process for each additional instrument.
8.
Verify the communications by clicking on each of the color boxes. The selected light will
flash for 5 seconds every 15 seconds on the SmartDGA instrument. After testing, select
Green again and click
Next >
to continue.
Summary of Contents for SmartDGA
Page 1: ...HARDWARE MANUAL SmartDGA...
Page 99: ...SmartDGA Hardware Manual Diagrams Drawings 99 9 5 SmartDGA NEMA 4 Enclosure...
Page 100: ...SmartDGA Hardware Manual Diagrams Drawings 100 9 6 Inline Mounting Plate...
Page 102: ...SmartDGA Hardware Manual Diagrams Drawings 102 9 8 Assy Wall Mount SmartDGA EZHubTM...
Page 103: ...SmartDGA Hardware Manual Diagrams Drawings 103...
Page 104: ...SmartDGA Hardware Manual Diagrams Drawings 104 9 9 Assy Panel Mount SmartDGA EZHubTM...
Page 105: ...SmartDGA Hardware Manual Diagrams Drawings 105...
Page 106: ...SmartDGA Hardware Manual Diagrams Drawings 106 9 10 Assy Wall Mount LumaSMART iCoreTM...
Page 107: ...SmartDGA Hardware Manual Diagrams Drawings 107...
Page 108: ...SmartDGA Hardware Manual Diagrams Drawings 108 9 11 Assy Panel Mount LumaSMART iCoreTM...
Page 109: ...SmartDGA Hardware Manual Diagrams Drawings 109...
Page 110: ...SmartDGA Hardware Manual Diagrams Drawings 110 9 12 SmartDGA Instrument Sun Shade...
Page 111: ...SmartDGA Hardware Manual Diagrams Drawings 111...


