


WavePro 7Zi
23
WP700Zi-OM-E-RevA
Cable De-Embedding
When making measurements on serial data signals, losses in the cables used in the test setup can reduce the
accuracy of your signal (for example, signal amplitude and risetime), as well as introduce Inter-Symbol
Interference. These cable effects can dramatically alter your serial data measurements and potentially create
mask test violations. The Cable De-Embedding option allows you to quickly specify the characteristics of the
cables (typically found on the cable's data sheet) in your test setup and analyze your signal with the effects of the
cables removed.
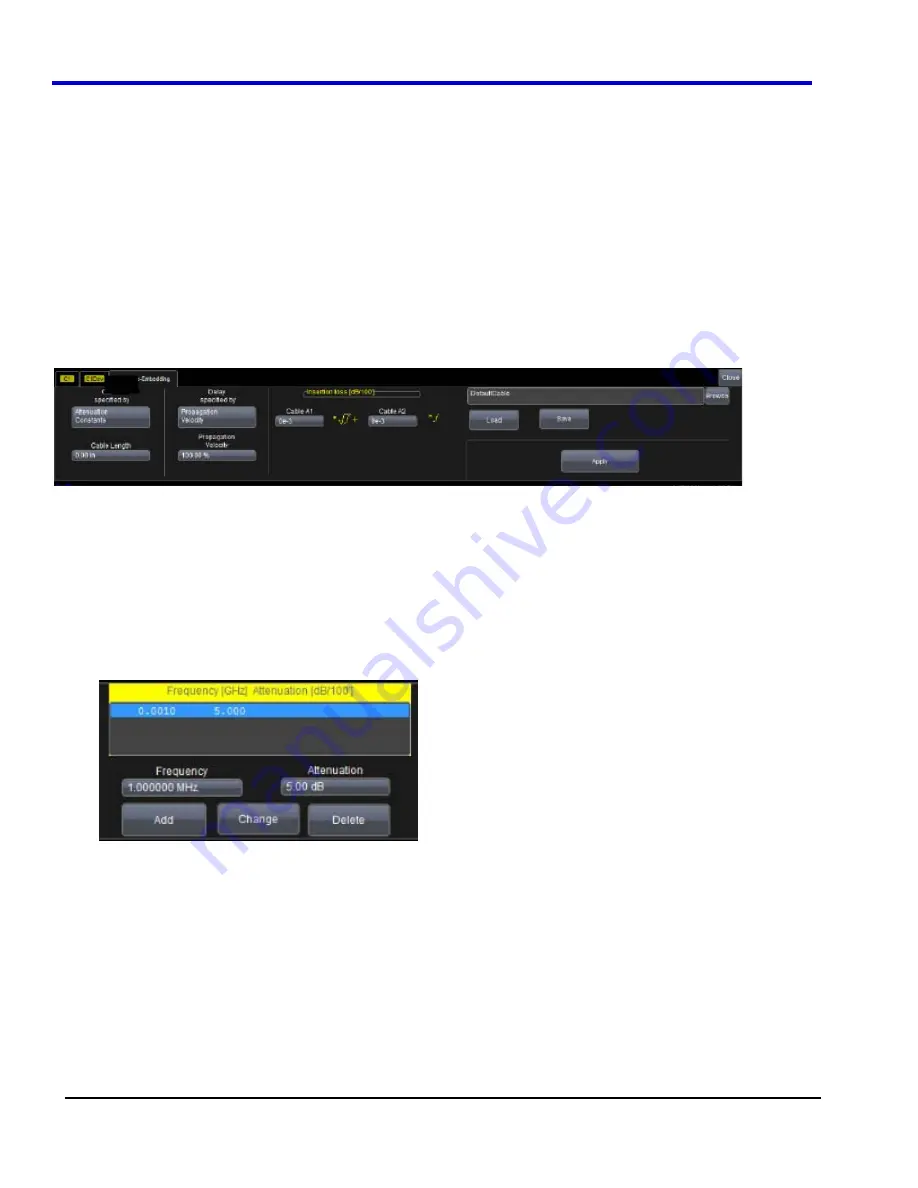
Setting Up Cable De-Embedding
Each of the four Channel menus has its own Cable De-Embedding dialog so that you can individually describe the
cable that is being used on each channel. You can specify your cable characteristics by entering either the
attenuation table for the cable or two attenuation constants of the loss model for the cable (provided by the cable
manufacturer). Then, you must specify the delay and physical length of the cable that you are using in your setup,
and you are ready to view your corrected signal. When you remove the effects of the cable, the compensated
signal is a more accurate representation of what was actually transmitted.
1. Touch
Vertical Channel
x
Setup
from the menu bar.
2. On
the
Channel
x
Setup
dialog, touch to place a check mark in the
Cable De-Embedding
checkbox. A
Cable De-Embedding
tab will be displayed.
3. Touch
the
Cable De-Embedding
tab.
4. Touch
inside
the
Cable Specified by
data entry field and select
Attenuation Constants
if you want to
specify your cable characteristics by entering the two attenuation constants of the loss model for the cable
(provided by the cable manufacturer).
OR
Touch inside the
Cable Specified by
data entry field and select Attenuation Table
if you want to specify your cable characteristics by
entering the attenuation table for the cable (provided by the cable manufacturer). Enter an
Attenuation
value and a
Frequency
and click
Add
to add them to the Attenuation Table. If you want to edit a row in the
table, highlight the row, change the
Attenuation
and
Frequency
and click
Change
. If you want to delete a
row, highlight the row and click
Delete
.
5. Touch
inside
the
Delay Specified by
data entry field to specify the delay. The cable delay can be either
Propagation Velocity
,
Nominal Delay
, or a
Dielectric Constant
.
6. Touch
inside
the
Cable Length
data entry field and enter the physical length of the cable in inches.
7. Click
Apply
to initiate the cable de-embedding for the signal on this channel so that the effects of the cable
are removed.
Saving Cable Configurations
You should save cable configurations so that you can easily load them at another time. The current cable
configuration will not be preserved after exiting the application unless you save it.
Summary of Contents for DDA 7 Zi series
Page 1: ...Operator s Manual WavePro SDA and DDA 7 Zi Series Oscilloscopes ...
Page 2: ... L R R H HUD RU D D ...
Page 41: ...Operator s Manual WP700Zi OM E RevA 40 The detachable WavePro Zi front panel ...
Page 376: ...WavePro 7Zi 375 WP700Zi OM E RevA Absolute Offset Relative ...
Page 439: ...Operator s Manual WP700Zi OM E RevA 438 ...
Page 440: ...WavePro 7Zi 439 WP700Zi OM E RevA ...
Page 544: ...Thank you for purchasing a WavePro SDA or DDA 7 Zi Oscilloscope ...


