


2
1
A
B
2
1
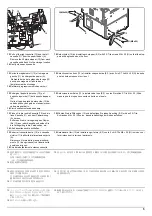
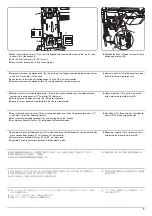
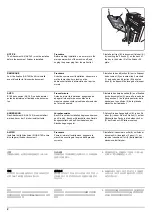
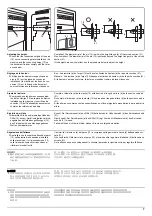
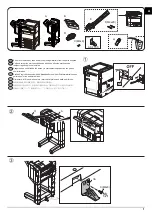
NOTICE
The Attachment Kit (AK-740) must be installed
before the document finisher is installed.
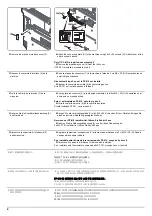
Procedure
Before starting installation, be sure to turn the
main power switch of the machine off, and
unplug the power plug from the wall outlet.
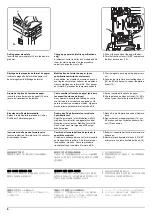
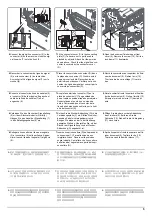
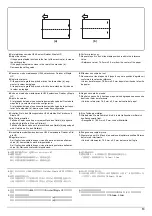
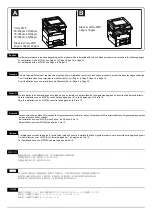
1.
Install eject tray (B) to document finisher (A)
by inserting the 2 hooks (1) on the back of
the tray in the holes (2) of the finisher lift
plate.
REMARQUE
Le kit de fixation (AK-740) doit être installé
avant d'installer le finisseur de document.
Procédure
Avant de commencer l'installation, s'assurer de
mettre la machine hors tension et de
débrancher la fiche d'alimentation de la prise
murale.
1.
Installez le bac d'éjection (B) sur le finisseur
de document (A) en insérant les 2 crochets
(1) au dos du bac d'éjection (B) dans les
trous (2) du dispositif de levage du finisseur.
AVISO
El Kit de conexión (AK-740) se debe instalar
antes de instalarse el finalizador de documen-
tos.
Procedimiento
Antes de iniciar la instalación, asegúrese de
apagar el interruptor de encendido de la
máquina y desenchufar el cable de alimentación
de la toma de pared.
1.
Instale la bandeja de salida (B) en el finaliza-
dor de documentos (A); para ello, inserte los
2 enganches (1) de la parte posterior de la
bandeja en los orificios (2) de la placa de
elevación del finalizador.
ANMERKUNG
Das Attachment Kit (AK-740) muss installiert
werden, bevor der Finisher installiert wird.
Vorgehensweise
Bevor Sie mit der Installation beginnen überzeu-
gen Sie sich, dass der Netzschalter des Geräts
ausgeschaltet und das Stromkabel aus der
Steckdose gezogen ist.
1.
Setzen Sie das Ausgabefach (B) in den Fin-
isher (A), indem Sie die 2 Haken (1) auf der
Rückseite des Fachs in die beiden Löcher
(2) der Finisher-Lift-Platte einsetzen.
AVVISO
Installare l'unità Attachment Kit (AK-740) prima
di collegare il finisher documenti.
Procedura
Prima di iniziare l'installazione, spegnere la
macchina e scollegare la spina dalla presa di
corrente.
1.
Installare il vassoio di uscita (B) sul finisher
documenti (A) inserendo i 2 ganci (1) sul
retro del vassoio nei fori (2) della piastra di
elevazione del finisher.
注意
ドキュメントフィニッシャーを取り付ける前
に、
アタッチメントキット
(AK‑740) の取り付け
をおこなうこと。
取付手順
必ず機械本体の主電源スイッチを OFF にし、
機
械本体の電源プラグを抜いてから作業するこ
と。
1.
排出トレイ (B) の裏側のフック (1)2 個をド
キュメントフィニッシャー(A) の昇降板の
穴 (2) に入れて、
取り付ける。
注意
安装装订器前,必须先安装连接组件 (AK-740)。
安装步骤
安装前务必关闭机器的主电源开关,并从墙壁插
座拔下电源插头。
1.
将排纸托盘(B)内侧的 2 个挂钩(1)装入装
订器(A)的升降板的孔(2)中。
주의
도큐먼트 피니셔를 설치하기 전에 어태치먼트
키트 (AK-740) 를 설치해야 합니다 .
설치순서
설치를 시작하기 전에 반드시 본체의 주 전원 스
위치를 끄고 벽 콘센트에서 전원 플러그를 분리
하십시오 .
1.
배출 트레이 (B) 의 후면 후크 (1) 2 개를 문
서 피니셔 (A) 의 리프트 플레이트 구멍 (2)
에 장착합니다 .
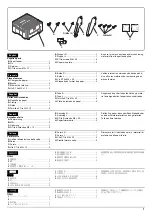
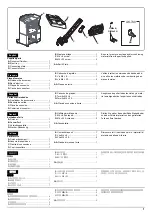
Summary of Contents for Copystar CS 3011i
Page 1: ...SERVICE MANUAL Published in September 2016 2RHSM 1 Rev 1 6 3011i 6 3511i ...
Page 4: ...This page is intentionally left blank ...
Page 10: ...This page is intentionally left blank ...
Page 78: ...2RG 2RH 1 2 51 B B A A B B A A B B A A Tray lower cover Pin Pin ...
Page 83: ...2RG 2RH 1 2 56 This page is intentionally left blank ...
Page 504: ...2RG 2RH 2 2 8 This page is intentionally left blank ...
Page 568: ...Installation Guide DP 7100 Document processor Installation Guide ...
Page 572: ...2 1mm 0mm ն ո պ ջ չ շ A D C B B A ...
Page 573: ...3 ռ ս վ ր ւ ց տ E A ...
Page 574: ...4 ք द I M3x8 փ F G M4x10 K J H A ...
Page 575: ...5 ON ध A ...
Page 577: ...7 շ յ ն ո D E B ...
Page 578: ...8 չ պ F G M4x10 H I M3x8 K J ջ B ...
Page 579: ...9 ռ B ...
Page 589: ...19 ո ն շ պ ջ չ 8 6 7 10 11 9 A B ...
Page 599: ...DP 7110 Document processor Installation Guide ...
Page 603: ...2 շ շ 2 շ 2 շ C M4x14 E ߑ ߒ ߓ ߔ ո շ 2 ߑ ն A ...
Page 604: ...3 ߘ ո ߕ ߗ ո չ պ ջ ߖ F G H M3x8 BLACK A ...
Page 605: ...4 ռ վ ր ւ ց ࠉտ ս I A ...
Page 606: ...5 J L փ ք द K M3x8 K M3x8 K M3x8 ध A ...
Page 607: ...6 ऩ प भ फ ब न म O N A ...
Page 608: ...7 ON य A ...
Page 610: ...9 շ ո շ 2 շ 2 շ 2 ߑ ն շ ߑ ߒ ߓ ߔ C M4x14 E B ...
Page 611: ...10 ߖ ߕ ߘ ߎ չ պ ջ ߗ F G ո H M3x8 BLACK B ...
Page 612: ...11 ռ ս տ ր ց վ I B ...
Page 613: ...12 ւ ք द ध न փ J L P K M3x8 K M3x8 B ...
Page 614: ...13 ऩ प फ O N B ...
Page 634: ...DP 7120 Document processor Installation Guide ...
Page 638: ...2 1mm 0mm ն շ ո չ ջ պ B B A D C A ...
Page 639: ...3 ռ ս վ տ ց ր E A ...
Page 640: ...4 G ւ F F ք փ H ON 10 mm 10 mm A ...
Page 642: ...6 շ ո յ ն D B ...
Page 643: ...7 չ E B ...
Page 644: ...8 F ON G պ F ջ ռ H 10 mm 10 mm B ...
Page 653: ...17 ղ ն շ ճ մ յ 2 6 7 3 4 5 A B ...
Page 655: ...19 չ ջ պ ս վ ռ 9 11 10 13 14 12 10 mm A B ...
Page 665: ...PF 791 500 x 2 Paper feeder Installation Guide ...
Page 673: ...PF 810 3000 sheet deck Installation Guide ...
Page 686: ...DF 791 3000 sheet finisher Installation Guide ...
Page 701: ...DF 7120 1000 sheet finisher Installation Guide ...
Page 705: ...2 մ յ ն 7 7 15 a b a a b b b a A ...
Page 706: ...3 ո շ չ պ A ...
Page 707: ...4 ջ ռ ս c d 14 c d c d 12 c d ջ ռ ս c d 14 c d c d 12 c d A ...
Page 708: ...5 վ ր D ց ON տ A ...
Page 710: ...7 L յ մ ն շ B ...
Page 712: ...9 ս ռ վ տ G B ...
Page 713: ...10 ր ց ւ b a 17 17 25 a b a a b b B ...
Page 714: ...11 ք փ द c d 24 c d c d 22 c d B ...
Page 715: ...12 न ध ऩ प B ...
Page 716: ...13 ब फ ON D B ...
Page 719: ...AK 740 Bridge unit Installation Guide ...
Page 721: ...MT 730 Mailbox Installation Guide ...
Page 736: ...PH 7A C D Punch unit Installation Guide ...
Page 757: ...DT 730 B Document tray Installation Guide ...
Page 759: ...5 2013 5 302LC56750 01 H F G D D 6 4 3 7 E C D D M4 8 M4 8 M4 8 M4 8 ...
Page 760: ...FAX System 12 Installation Guide ...


