


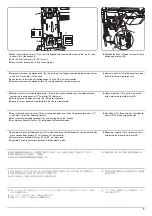


3
5
6
C
D
(M3x12)
B
2
B
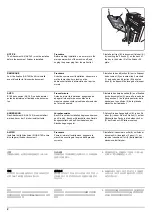
A
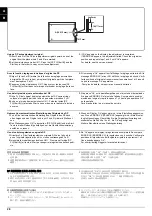
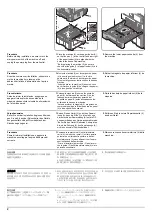
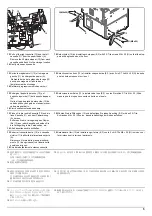
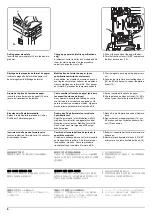
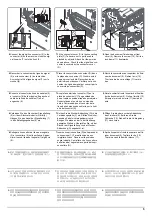
3.
Secure the machine (2) to the paper feeder
(A) with the 2 pins (B).
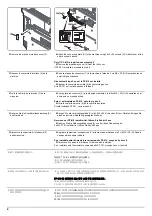
4.
IInsert the lower paper cassette (4) into the
machine.
5.
Install the retainer (C) in the location as
shown in the figure using 2 S Tite screws M3
× 12 (D).
6.
Open the lower right cover (5) on the
machine.
7.
Open the paper feeder right cover (6).
3.
Fixer la machine (2) au chargeur de papier
(A) avec les 2 broches (B).
4.
Insérez le magasin de papier inférieur (4)
dans la machine.
5.
Installer l'élément de retenue (C) à l'endroit
indiqué sur la figure avec 2 vis S Tite M3 ×
12 (D).
6.
Ouvrir le capot inférieur droit (5) de la
machine.
7.
Ouvrir le capot droit (6) du chargeur de
papier .
3.
Fije la máquina (2) al depósito de papel (A)
con las dos clavijas (B).
4.
Inserte el depósito de papel inferior (4) en la
máquina.
5.
Instale el retén (C) en el lugar que muestra
la ilustración, mediante los 2 tornillos S Tite
M3 × 12 (D).
6.
Abra la cubierta derecha inferior (5) de la
máquina.
7.
Abra la cubierta derecha del depós (6) ito de
papel .
3.
Sichern Sie das Gerät (2) mit den 2 Stiften
(B) am Papiereinzug (A).
4.
Setzen Sie die untere Papierkassette (4) ins
Gerät ein.
5.
Die Halterung (C) an der dargestellten Stelle
mit den 2 S-Tite-Schrauben M3 × 12 (D) bef-
estigen.
6.
Öffnen Sie die untere rechte Abdeckung (5)
des Geräts.
7.
Die rechte Abdeckung (6) des Papiereinzugs
öffnen.
3.
Fissare la macchina (2) sull'alimentatore
carta (A) con i 2 perni (B).
4.
Inserire il cassetto carta inferiore (4) nella
macchina.
5.
Installare il fermo (C) nella posizione
mostrata in figura, utilizzando le 2 viti S Tite
M3 × 12 (D).
6.
Aprire il pannello destro inferiore (5) sulla
macchina.
7.
Aprire il pannello destro (6) dell'unità di ali-
mentazione della carta.
3.
ピン (B)2 本で機械本体 (2) をペーパー
フィーダー(A) に固定する。
4.
下段カセット (4) を機械本体に挿入する。
5.
イラストの位置に取付板(C)をビス M3×12 S
タイト
(D)2 本で取り付ける。
6.
機械本体の右下カバー(5) を開く。
7.
ペーパーフィーダーの右カバー(6) を開く。
3.
用 2 个固定插销 (B) 将机器主机 (2) 固定在
供纸盒 (A) 上。
4.
把下部纸盒 (4) 插到机器主机中。
5.
使用 2 颗紧固型 S 螺丝 M3 × 12(D)将安
装板(C)安装在图示位置。
6.
打开机器主机的右下部盖板 (5)。
7.
打开供纸盒的右部盖板 (6)。
3.
핀 (B) 2 개로 본체 (2) 를 급지대 (A) 에 고정
합니다 .
4.
하단 용지 카세트 (4) 를 본체에 장착합니다 .
5.
나사 M3 × 12 S 타이트 (D) 2개를 사용하여
리테이너 (C) 를 그림에 표시된 위치에 설치
합니다 .
6.
본체의 오른쪽 하단 커버 (5) 를 엽니다 .
7.
급지대 오른쪽 커버 (6) 를 엽니다 .
Summary of Contents for Copystar CS 3011i
Page 1: ...SERVICE MANUAL Published in September 2016 2RHSM 1 Rev 1 6 3011i 6 3511i ...
Page 4: ...This page is intentionally left blank ...
Page 10: ...This page is intentionally left blank ...
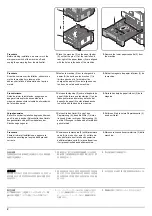
Page 78: ...2RG 2RH 1 2 51 B B A A B B A A B B A A Tray lower cover Pin Pin ...
Page 83: ...2RG 2RH 1 2 56 This page is intentionally left blank ...
Page 504: ...2RG 2RH 2 2 8 This page is intentionally left blank ...
Page 568: ...Installation Guide DP 7100 Document processor Installation Guide ...
Page 572: ...2 1mm 0mm ն ո պ ջ չ շ A D C B B A ...
Page 573: ...3 ռ ս վ ր ւ ց տ E A ...
Page 574: ...4 ք द I M3x8 փ F G M4x10 K J H A ...
Page 575: ...5 ON ध A ...
Page 577: ...7 շ յ ն ո D E B ...
Page 578: ...8 չ պ F G M4x10 H I M3x8 K J ջ B ...
Page 579: ...9 ռ B ...
Page 589: ...19 ո ն շ պ ջ չ 8 6 7 10 11 9 A B ...
Page 599: ...DP 7110 Document processor Installation Guide ...
Page 603: ...2 շ շ 2 շ 2 շ C M4x14 E ߑ ߒ ߓ ߔ ո շ 2 ߑ ն A ...
Page 604: ...3 ߘ ո ߕ ߗ ո չ պ ջ ߖ F G H M3x8 BLACK A ...
Page 605: ...4 ռ վ ր ւ ց ࠉտ ս I A ...
Page 606: ...5 J L փ ք द K M3x8 K M3x8 K M3x8 ध A ...
Page 607: ...6 ऩ प भ फ ब न म O N A ...
Page 608: ...7 ON य A ...
Page 610: ...9 շ ո շ 2 շ 2 շ 2 ߑ ն շ ߑ ߒ ߓ ߔ C M4x14 E B ...
Page 611: ...10 ߖ ߕ ߘ ߎ չ պ ջ ߗ F G ո H M3x8 BLACK B ...
Page 612: ...11 ռ ս տ ր ց վ I B ...
Page 613: ...12 ւ ք द ध न փ J L P K M3x8 K M3x8 B ...
Page 614: ...13 ऩ प फ O N B ...
Page 634: ...DP 7120 Document processor Installation Guide ...
Page 638: ...2 1mm 0mm ն շ ո չ ջ պ B B A D C A ...
Page 639: ...3 ռ ս վ տ ց ր E A ...
Page 640: ...4 G ւ F F ք փ H ON 10 mm 10 mm A ...
Page 642: ...6 շ ո յ ն D B ...
Page 643: ...7 չ E B ...
Page 644: ...8 F ON G պ F ջ ռ H 10 mm 10 mm B ...
Page 653: ...17 ղ ն շ ճ մ յ 2 6 7 3 4 5 A B ...
Page 655: ...19 չ ջ պ ս վ ռ 9 11 10 13 14 12 10 mm A B ...
Page 665: ...PF 791 500 x 2 Paper feeder Installation Guide ...
Page 673: ...PF 810 3000 sheet deck Installation Guide ...
Page 686: ...DF 791 3000 sheet finisher Installation Guide ...
Page 701: ...DF 7120 1000 sheet finisher Installation Guide ...
Page 705: ...2 մ յ ն 7 7 15 a b a a b b b a A ...
Page 706: ...3 ո շ չ պ A ...
Page 707: ...4 ջ ռ ս c d 14 c d c d 12 c d ջ ռ ս c d 14 c d c d 12 c d A ...
Page 708: ...5 վ ր D ց ON տ A ...
Page 710: ...7 L յ մ ն շ B ...
Page 712: ...9 ս ռ վ տ G B ...
Page 713: ...10 ր ց ւ b a 17 17 25 a b a a b b B ...
Page 714: ...11 ք փ द c d 24 c d c d 22 c d B ...
Page 715: ...12 न ध ऩ प B ...
Page 716: ...13 ब फ ON D B ...
Page 719: ...AK 740 Bridge unit Installation Guide ...
Page 721: ...MT 730 Mailbox Installation Guide ...
Page 736: ...PH 7A C D Punch unit Installation Guide ...
Page 757: ...DT 730 B Document tray Installation Guide ...
Page 759: ...5 2013 5 302LC56750 01 H F G D D 6 4 3 7 E C D D M4 8 M4 8 M4 8 M4 8 ...
Page 760: ...FAX System 12 Installation Guide ...


