


7
20
19
19
16
17
15
18
14
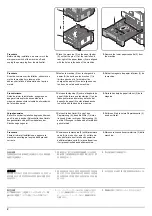
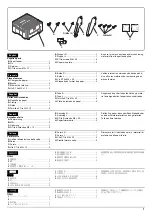
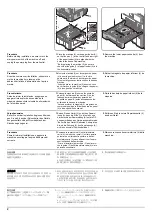
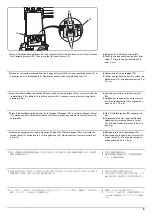
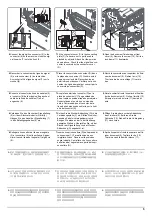
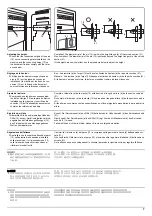
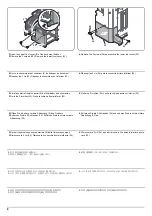
3.
Move the front deck cursor (15) so that it is aligned with the size indicators on the top (17) and
bottom (16) of the cassette.
4.
Turn the front lock lever (14) 90° to lock it.
5.
Move the rear deck cursor (18) in the same way.
6.
Release the hook (19) and remove the deck
trailing edge cursor (20).
3.
Déplacer le curseur de platine avant (15) de sorte qu'il soit aligné avec les indicateurs de format
en haut (17) et en bas (16) du tiroir.
4.
Faire tourner le levier de verrouillage avant (14) de 90º pour le verrouiller.
5.
Déplacer le curseur de platine arrière (18) en procédant de la même manière.
6.
Libérer le crochet (19) et déposer le curseur
du bord arrière de la platine (20).
3.
Mueva el cursor frontal de la plataforma (15) para que quede alineado con las indicadores de
tamaño de la parte superior (17) e inferior (16) del cajón.
4.
Gire la palanca de bloqueo frontal (14) 90º para bloquearla.
5.
Mueva el cursor trasero de la plataforma (18) de la misma forma.
6.
Libere el gancho (19) y quite el cursor del
borde inferior de la plataforma (20).
3.
Den vorderen Konsole-Cursor (15) so verschieben, dass er mit den Formatanzeigen oben (17)
und unten (16) an der Kassette fluchtet.
4.
Den vorderen Verriegelungshebel (14) zum Verriegeln um 90° drehen.
5.
Den hinteren Konsole-Cursor (18) auf gleiche Weise verschieben.
6.
Den Haken (19) lösen und den Hinterkante-
Cursor (20) der Konsole abnehmen.
3.
Spostare il cursore frontale del deck (15) in modo che esso risulti allineato con gli indicatori di for-
mato sulla parte superiore (17) e inferiore (16) del cassetto.
4.
Ruotare la leva frontale di blocco (14) di 90°, per bloccarla.
5.
Spostare il cursore posteriore del deck (18) allo stesso modo.
6.
Rilasciare il gancio (19) e rimuovere il cur-
sore del bordo di uscita del deck (20).
3.
カセット下のサイズ表示 (16) とカセット上のサイズ表示 (17) に合わせてデッキカーソル前
(15) を移動させる。
4.
ロックレバー前 (14) を 90° 回転させ固定する。
5.
同様にデッキカーソル後 (18) を移動させる。
6.
フック (19) を解除し、
デッキ後端カーソル
(20) を取り外す。
3.
移动堆纸板前部游标 (15),使纸盒下部的尺寸标记(16)与纸盒上部的尺寸标记(17)对齐。
4.
将前部锁定杆 (14) 旋转 90° 以固定。
5.
按同样方式移动后部堆纸板后部游标 (18)。
6.
解除挂钩 (19),拆下堆纸板后部游标 (20)。
3.
카세트 상단 (17) 과 하단 (16) 의 사이즈 지침에 맞춰 프론트 데크 커서 (15) 을 이동합니다 .
4.
프론트 잠금레버 (14) 을 90° 회전시켜 고정합니다 .
5.
리어 데크커서 (18) 도 같은방식으로 이동시킵니다 .
6.
후크 (19) 를 해제하고 데크 뒷단커서 (20) 를
제거합니다 .
Summary of Contents for Copystar CS 3011i
Page 1: ...SERVICE MANUAL Published in September 2016 2RHSM 1 Rev 1 6 3011i 6 3511i ...
Page 4: ...This page is intentionally left blank ...
Page 10: ...This page is intentionally left blank ...
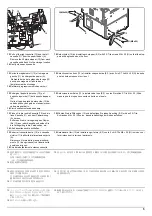
Page 78: ...2RG 2RH 1 2 51 B B A A B B A A B B A A Tray lower cover Pin Pin ...
Page 83: ...2RG 2RH 1 2 56 This page is intentionally left blank ...
Page 504: ...2RG 2RH 2 2 8 This page is intentionally left blank ...
Page 568: ...Installation Guide DP 7100 Document processor Installation Guide ...
Page 572: ...2 1mm 0mm ն ո պ ջ չ շ A D C B B A ...
Page 573: ...3 ռ ս վ ր ւ ց տ E A ...
Page 574: ...4 ք द I M3x8 փ F G M4x10 K J H A ...
Page 575: ...5 ON ध A ...
Page 577: ...7 շ յ ն ո D E B ...
Page 578: ...8 չ պ F G M4x10 H I M3x8 K J ջ B ...
Page 579: ...9 ռ B ...
Page 589: ...19 ո ն շ պ ջ չ 8 6 7 10 11 9 A B ...
Page 599: ...DP 7110 Document processor Installation Guide ...
Page 603: ...2 շ շ 2 շ 2 շ C M4x14 E ߑ ߒ ߓ ߔ ո շ 2 ߑ ն A ...
Page 604: ...3 ߘ ո ߕ ߗ ո չ պ ջ ߖ F G H M3x8 BLACK A ...
Page 605: ...4 ռ վ ր ւ ց ࠉտ ս I A ...
Page 606: ...5 J L փ ք द K M3x8 K M3x8 K M3x8 ध A ...
Page 607: ...6 ऩ प भ फ ब न म O N A ...
Page 608: ...7 ON य A ...
Page 610: ...9 շ ո շ 2 շ 2 շ 2 ߑ ն շ ߑ ߒ ߓ ߔ C M4x14 E B ...
Page 611: ...10 ߖ ߕ ߘ ߎ չ պ ջ ߗ F G ո H M3x8 BLACK B ...
Page 612: ...11 ռ ս տ ր ց վ I B ...
Page 613: ...12 ւ ք द ध न փ J L P K M3x8 K M3x8 B ...
Page 614: ...13 ऩ प फ O N B ...
Page 634: ...DP 7120 Document processor Installation Guide ...
Page 638: ...2 1mm 0mm ն շ ո չ ջ պ B B A D C A ...
Page 639: ...3 ռ ս վ տ ց ր E A ...
Page 640: ...4 G ւ F F ք փ H ON 10 mm 10 mm A ...
Page 642: ...6 շ ո յ ն D B ...
Page 643: ...7 չ E B ...
Page 644: ...8 F ON G պ F ջ ռ H 10 mm 10 mm B ...
Page 653: ...17 ղ ն շ ճ մ յ 2 6 7 3 4 5 A B ...
Page 655: ...19 չ ջ պ ս վ ռ 9 11 10 13 14 12 10 mm A B ...
Page 665: ...PF 791 500 x 2 Paper feeder Installation Guide ...
Page 673: ...PF 810 3000 sheet deck Installation Guide ...
Page 686: ...DF 791 3000 sheet finisher Installation Guide ...
Page 701: ...DF 7120 1000 sheet finisher Installation Guide ...
Page 705: ...2 մ յ ն 7 7 15 a b a a b b b a A ...
Page 706: ...3 ո շ չ պ A ...
Page 707: ...4 ջ ռ ս c d 14 c d c d 12 c d ջ ռ ս c d 14 c d c d 12 c d A ...
Page 708: ...5 վ ր D ց ON տ A ...
Page 710: ...7 L յ մ ն շ B ...
Page 712: ...9 ս ռ վ տ G B ...
Page 713: ...10 ր ց ւ b a 17 17 25 a b a a b b B ...
Page 714: ...11 ք փ द c d 24 c d c d 22 c d B ...
Page 715: ...12 न ध ऩ प B ...
Page 716: ...13 ब फ ON D B ...
Page 719: ...AK 740 Bridge unit Installation Guide ...
Page 721: ...MT 730 Mailbox Installation Guide ...
Page 736: ...PH 7A C D Punch unit Installation Guide ...
Page 757: ...DT 730 B Document tray Installation Guide ...
Page 759: ...5 2013 5 302LC56750 01 H F G D D 6 4 3 7 E C D D M4 8 M4 8 M4 8 M4 8 ...
Page 760: ...FAX System 12 Installation Guide ...


