


12
34
34
F
H
31
29
F
30
32
33
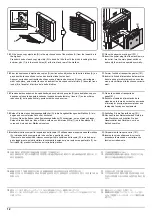
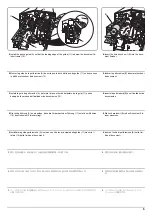
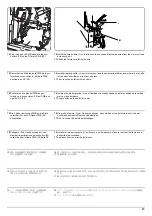
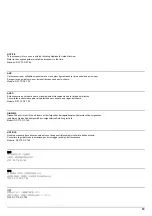
Installing the punch PWB and waste hole punch box (DF-790)
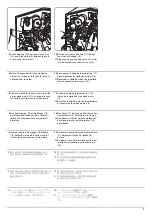
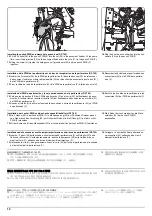
12.
Fit the 2 hooks (29) in the punch PWB (F) into the cut (30) in the document finisher. At the same
time, insert the projection (32) on the document finisher into the hole (31) in the punch PWB (F).
13.
Using the screw (H), tighten the hole punch unit ground wire (33) and the punch PWB (F)
together.
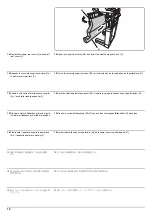
14.
Plug the 6 hole punch unit wires into the con-
nectors (34) on the punch PWB (F).
Installation de la PWB de la perforatrice et du bac de récupération de la perforatrice (DF-790).
12.
Insérer les 2 crochets (29) de la PWB de la perforatrice (F) dans la découpe (30) du retoucheur
de document. Insérer en même temps la saillie (32) du retoucheur de document dans le trou (31)
de la PWB de la perforatrice (F).
13.
Fixer le câble de terre de la perforatrice (33) à la PWB de la perforatrice (F) à l'aide d'une vis (H).
14.
Raccorder les 6 câbles de la perforatrice aux
connecteurs (34) de la PWB de la perfora-
trice (F).
Instalación del PWB de perforación y la caja para desechos de la perforación (DF-790)
12.
Coloque los 2 ganchos (29) del PWB de perforación (F) en el corte (30) del finalizador de docu-
mentos. Al mismo tiempo, inserte el resalto (32) del finalizador de documentos en el orificio (31)
del PWB de perforación (F).
13.
Usando el tornillo (H), apriete juntos el cable de conexión a tierra de la perforadora (33) y el PWB
de perforación (F).
14.
Enchufe los 6 cables de la perforadora a los
conectores (34) del PWB de perforación (F).
Installation der Locher-PWB und des Lochungsabfallbehälters (DF-790)
12.
Die 2 Haken (29) in der Locher-PWB (F) in die Aussparung (30) am Dokument-Finisher einset-
zen. Dabei auch den Vorsprung (32) am Dokument-Finisher in die Öffnung (31) auf der Locher-
PWB (F) einsetzen.
13.
Mit der Schraube (H) das Massekabel (33) der Lochereinheit an der Locher-PWB (F) festziehen.
14.
Die 6 Kabel der Lochereinheit an die Steck-
verbinder (34) der Locher-PWB (F)
anschließen.
Installazione della scheda a circuiti stampati di perforazione e dello scarto perforazione (DF-790)
12.
Inserire i 2 ganci (29) della scheda a circuiti stampati di perforazione (F) nell'intaglio (30) della
finitrice di documenti. Contemporaneamente, inserire la sporgenza (32) sulla finitrice di docu-
menti nel foro (31) della scheda a circuiti stampati di perforazione (F).
13.
Utilizzando la vite (H), stringere insieme il cavo di terra (33) dell'unità di perforazione e la scheda
a circuiti stampati di perforazione (F).
14.
Collegare i 6 cavi dell'unità di perforazione
nei connettori (34) sulla scheda a circuiti
stampati di perforazione (F).
基板とパンチくずボックスの取り付け
(DF-790 の場合)
12.
パンチ基板 (F) のフック (29)2 箇所をドキュメントフィニッシャーの切り欠き (30) に引っ掛け
る。同時に、パンチ基板 (F) の穴 (31) をドキュメントフィニッシャーの突起 (32) に入れる。
13.
ビス (H)1 本で、
パンチユニットのアース線 (33) とパンチ基板 (F) を共締めする。
14.
パンチユニットの電線 6 本を、パンチ基板
(F) のコネクター(34) に接続する。
安装电路板与打孔纸屑盒(DF-790 时)
12.
将打孔电路板 (F) 的 2 个卡扣 (29) 挂在装订器的缺口 (30) 上。同时,将打孔电路板 (F) 的孔
(31) 卡入装订器的突出部 (32)。
13.
使用 1 颗螺丝 (H) 将打孔单元的接地线 (33) 与打孔电路板 (F) 一起固定。
14.
将打孔单元的 6 根电线与打孔电路板 (F) 的
接插件 (34) 相连接。
기판과 펀치폐기박스의 부착(DF-790 의 경우)
12.
펀치기판 (F) 의 후크 (29) 2 곳을 문서 피니셔의 구멍 (30) 에 겁니다 . 동시에 펀치기판 (F) 구멍
(31) 을 문서 피니셔의 돌기 (32) 에 넣습니다 .
13.
나사 (H) 1 개로 펀치유니트의 접지선 (33) 과 펀치기판 (F) 을 함게 조입니다 .
14.
펀치유니트의 전선 6 선을 펀치기판 (F) 커넥
터 (34) 에 접속합니다 .
Summary of Contents for Copystar CS 3011i
Page 1: ...SERVICE MANUAL Published in September 2016 2RHSM 1 Rev 1 6 3011i 6 3511i ...
Page 4: ...This page is intentionally left blank ...
Page 10: ...This page is intentionally left blank ...
Page 78: ...2RG 2RH 1 2 51 B B A A B B A A B B A A Tray lower cover Pin Pin ...
Page 83: ...2RG 2RH 1 2 56 This page is intentionally left blank ...
Page 504: ...2RG 2RH 2 2 8 This page is intentionally left blank ...
Page 568: ...Installation Guide DP 7100 Document processor Installation Guide ...
Page 572: ...2 1mm 0mm ն ո պ ջ չ շ A D C B B A ...
Page 573: ...3 ռ ս վ ր ւ ց տ E A ...
Page 574: ...4 ք द I M3x8 փ F G M4x10 K J H A ...
Page 575: ...5 ON ध A ...
Page 577: ...7 շ յ ն ո D E B ...
Page 578: ...8 չ պ F G M4x10 H I M3x8 K J ջ B ...
Page 579: ...9 ռ B ...
Page 589: ...19 ո ն շ պ ջ չ 8 6 7 10 11 9 A B ...
Page 599: ...DP 7110 Document processor Installation Guide ...
Page 603: ...2 շ շ 2 շ 2 շ C M4x14 E ߑ ߒ ߓ ߔ ո շ 2 ߑ ն A ...
Page 604: ...3 ߘ ո ߕ ߗ ո չ պ ջ ߖ F G H M3x8 BLACK A ...
Page 605: ...4 ռ վ ր ւ ց ࠉտ ս I A ...
Page 606: ...5 J L փ ք द K M3x8 K M3x8 K M3x8 ध A ...
Page 607: ...6 ऩ प भ फ ब न म O N A ...
Page 608: ...7 ON य A ...
Page 610: ...9 շ ո շ 2 շ 2 շ 2 ߑ ն շ ߑ ߒ ߓ ߔ C M4x14 E B ...
Page 611: ...10 ߖ ߕ ߘ ߎ չ պ ջ ߗ F G ո H M3x8 BLACK B ...
Page 612: ...11 ռ ս տ ր ց վ I B ...
Page 613: ...12 ւ ք द ध न փ J L P K M3x8 K M3x8 B ...
Page 614: ...13 ऩ प फ O N B ...
Page 634: ...DP 7120 Document processor Installation Guide ...
Page 638: ...2 1mm 0mm ն շ ո չ ջ պ B B A D C A ...
Page 639: ...3 ռ ս վ տ ց ր E A ...
Page 640: ...4 G ւ F F ք փ H ON 10 mm 10 mm A ...
Page 642: ...6 շ ո յ ն D B ...
Page 643: ...7 չ E B ...
Page 644: ...8 F ON G պ F ջ ռ H 10 mm 10 mm B ...
Page 653: ...17 ղ ն շ ճ մ յ 2 6 7 3 4 5 A B ...
Page 655: ...19 չ ջ պ ս վ ռ 9 11 10 13 14 12 10 mm A B ...
Page 665: ...PF 791 500 x 2 Paper feeder Installation Guide ...
Page 673: ...PF 810 3000 sheet deck Installation Guide ...
Page 686: ...DF 791 3000 sheet finisher Installation Guide ...
Page 701: ...DF 7120 1000 sheet finisher Installation Guide ...
Page 705: ...2 մ յ ն 7 7 15 a b a a b b b a A ...
Page 706: ...3 ո շ չ պ A ...
Page 707: ...4 ջ ռ ս c d 14 c d c d 12 c d ջ ռ ս c d 14 c d c d 12 c d A ...
Page 708: ...5 վ ր D ց ON տ A ...
Page 710: ...7 L յ մ ն շ B ...
Page 712: ...9 ս ռ վ տ G B ...
Page 713: ...10 ր ց ւ b a 17 17 25 a b a a b b B ...
Page 714: ...11 ք փ द c d 24 c d c d 22 c d B ...
Page 715: ...12 न ध ऩ प B ...
Page 716: ...13 ब फ ON D B ...
Page 719: ...AK 740 Bridge unit Installation Guide ...
Page 721: ...MT 730 Mailbox Installation Guide ...
Page 736: ...PH 7A C D Punch unit Installation Guide ...
Page 757: ...DT 730 B Document tray Installation Guide ...
Page 759: ...5 2013 5 302LC56750 01 H F G D D 6 4 3 7 E C D D M4 8 M4 8 M4 8 M4 8 ...
Page 760: ...FAX System 12 Installation Guide ...


