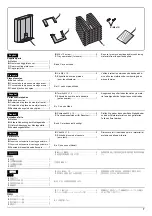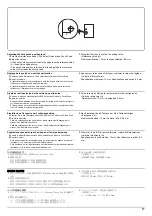
7
19
18
17
E
D
15
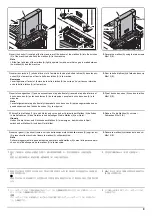
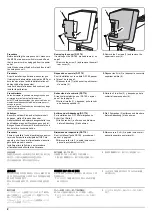
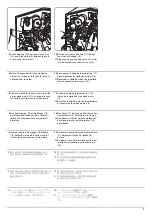
9.
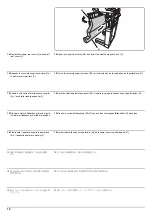
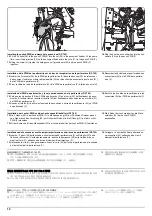
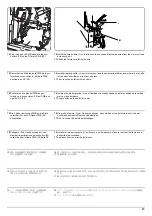
Fit the stop ring (D) over the motor unit rod
(15) and fit the spring (E) between the hole
punch unit and motor unit.
10.
Run the hole punch unit wire (17) through
the motor unit edging (18).
11.
Plug the wire from the hole punch unit motor
into the connector on the motor unit (19).
9.
Monter la bague d'arrêt (D) sur la tige du
moteur (15) et insérer le ressort (E) entre la
perforatrice et le moteur.
10.
Faire passer le câble de la perforatrice (17)
dans le passage de câbles du moteur (18)
11.
Raccorder le câble du moteur de la perfora-
trice au connecteur du moteur (19).
9.
Coloque el anillo de tope (D) sobre la varilla
de la unidad motriz (15) y coloque el resorte
(E) entre la perforadora y la unidad motriz.
10.
Tienda el cable de la perforadora (17) a
través de la pestaña de la unidad motriz
(18).
11.
Enchufe el cable del motor de la perforadora
al conector de la unidad motriz (19).
9.
Den Anschlagring (D) auf die Stange (15)
der Motoreinheit setzen und die Feder (E)
zwischen Lochereinheit und Motoreinheit
einsetzen.
10.
Das Kabel (17) der Lochereinheit durch den
Kantenschutz (18) der Motoreinheit führen.
11.
Das Kabel vom Motor der Lochereinheit an
den Steckverbinder der Motoreinheit (19)
anschließen.
9.
Inserire l'anello di bloccaggio (D) sull'asta
(15) dell'unità motore ed inserire molla (E)
tra l'unità di perforazione e l'unità motore.
10.
Far passare il cavo dell'unità di perforazione
(17) attraverso il bordo (18) dell'unità
motore.
11.
Collegare il cavo dal motore dell'unità di per-
forazione nel connettore sull'unità motore
(19).
9.
モーターユニットの軸 (15) にストップリン
グ (D) をはめ、パンチユニットとモーターユ
ニットの間にバネ (E) を取り付ける。
10.
パンチユニットの電線 (17) をモーターユ
ニットのエッジング (18) に通す。
11.
パンチユニットのモーターからの電線を
モーターユニットのコネクター(19) に接続
する。
9.
将止动环 (D) 嵌入到电机单元的轴 (15) 上,
在打孔单元与电机单元之间安装弹簧 (E)。
10.
将打孔单元的电线 (17) 穿过电机单元的包边
孔 (18)。
11.
将来自打孔单元的电机的电线与电机单元的
接插件 (19) 相连接。
9.
모터유니트 축 (15) 에 스톱링 (D) 을 꽂고 펀
치유니트와 모터유니트 사이에 스프링 (E)
을설치합니다 .
10.
펀치유니트의 전선 (17) 을 모터유니트의 에
징 (18) 에 지나가게 합니다 .
11.
펀치유니트 모터에서의 전선을 모터유니트
커넥터 (19) 에 접속합니다 .
Summary of Contents for Copystar CS 3011i
Page 1: ...SERVICE MANUAL Published in September 2016 2RHSM 1 Rev 1 6 3011i 6 3511i ...
Page 4: ...This page is intentionally left blank ...
Page 10: ...This page is intentionally left blank ...
Page 78: ...2RG 2RH 1 2 51 B B A A B B A A B B A A Tray lower cover Pin Pin ...
Page 83: ...2RG 2RH 1 2 56 This page is intentionally left blank ...
Page 504: ...2RG 2RH 2 2 8 This page is intentionally left blank ...
Page 568: ...Installation Guide DP 7100 Document processor Installation Guide ...
Page 572: ...2 1mm 0mm ն ո պ ջ չ շ A D C B B A ...
Page 573: ...3 ռ ս վ ր ւ ց տ E A ...
Page 574: ...4 ք द I M3x8 փ F G M4x10 K J H A ...
Page 575: ...5 ON ध A ...
Page 577: ...7 շ յ ն ո D E B ...
Page 578: ...8 չ պ F G M4x10 H I M3x8 K J ջ B ...
Page 579: ...9 ռ B ...
Page 589: ...19 ո ն շ պ ջ չ 8 6 7 10 11 9 A B ...
Page 599: ...DP 7110 Document processor Installation Guide ...
Page 603: ...2 շ շ 2 շ 2 շ C M4x14 E ߑ ߒ ߓ ߔ ո շ 2 ߑ ն A ...
Page 604: ...3 ߘ ո ߕ ߗ ո չ պ ջ ߖ F G H M3x8 BLACK A ...
Page 605: ...4 ռ վ ր ւ ց ࠉտ ս I A ...
Page 606: ...5 J L փ ք द K M3x8 K M3x8 K M3x8 ध A ...
Page 607: ...6 ऩ प भ फ ब न म O N A ...
Page 608: ...7 ON य A ...
Page 610: ...9 շ ո շ 2 շ 2 շ 2 ߑ ն շ ߑ ߒ ߓ ߔ C M4x14 E B ...
Page 611: ...10 ߖ ߕ ߘ ߎ չ պ ջ ߗ F G ո H M3x8 BLACK B ...
Page 612: ...11 ռ ս տ ր ց վ I B ...
Page 613: ...12 ւ ք द ध न փ J L P K M3x8 K M3x8 B ...
Page 614: ...13 ऩ प फ O N B ...
Page 634: ...DP 7120 Document processor Installation Guide ...
Page 638: ...2 1mm 0mm ն շ ո չ ջ պ B B A D C A ...
Page 639: ...3 ռ ս վ տ ց ր E A ...
Page 640: ...4 G ւ F F ք փ H ON 10 mm 10 mm A ...
Page 642: ...6 շ ո յ ն D B ...
Page 643: ...7 չ E B ...
Page 644: ...8 F ON G պ F ջ ռ H 10 mm 10 mm B ...
Page 653: ...17 ղ ն շ ճ մ յ 2 6 7 3 4 5 A B ...
Page 655: ...19 չ ջ պ ս վ ռ 9 11 10 13 14 12 10 mm A B ...
Page 665: ...PF 791 500 x 2 Paper feeder Installation Guide ...
Page 673: ...PF 810 3000 sheet deck Installation Guide ...
Page 686: ...DF 791 3000 sheet finisher Installation Guide ...
Page 701: ...DF 7120 1000 sheet finisher Installation Guide ...
Page 705: ...2 մ յ ն 7 7 15 a b a a b b b a A ...
Page 706: ...3 ո շ չ պ A ...
Page 707: ...4 ջ ռ ս c d 14 c d c d 12 c d ջ ռ ս c d 14 c d c d 12 c d A ...
Page 708: ...5 վ ր D ց ON տ A ...
Page 710: ...7 L յ մ ն շ B ...
Page 712: ...9 ս ռ վ տ G B ...
Page 713: ...10 ր ց ւ b a 17 17 25 a b a a b b B ...
Page 714: ...11 ք փ द c d 24 c d c d 22 c d B ...
Page 715: ...12 न ध ऩ प B ...
Page 716: ...13 ब फ ON D B ...
Page 719: ...AK 740 Bridge unit Installation Guide ...
Page 721: ...MT 730 Mailbox Installation Guide ...
Page 736: ...PH 7A C D Punch unit Installation Guide ...
Page 757: ...DT 730 B Document tray Installation Guide ...
Page 759: ...5 2013 5 302LC56750 01 H F G D D 6 4 3 7 E C D D M4 8 M4 8 M4 8 M4 8 ...
Page 760: ...FAX System 12 Installation Guide ...

