


3
9
10
7
7
7
8
5
6
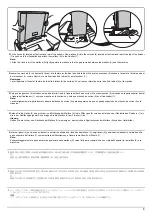
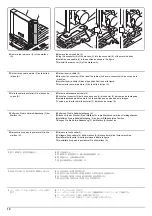
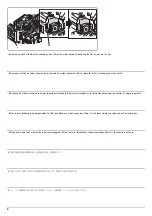
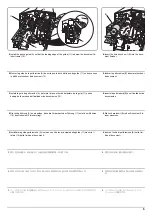
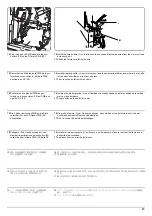
Removing the cover (DF-790)
1.
Remove the screw (5) and remove the small
rear cover (6).
2.
Remove the 3 screws (7) and remove the
upper rear cover (8).
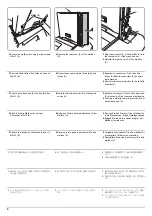
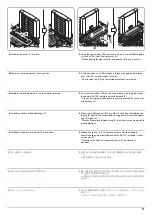
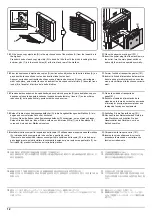
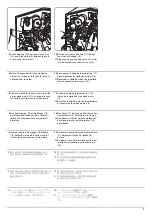
Installing the hole punch unit
3.
Remove the screw (9) and pull the guide
(10) outwards.
Dépose du couvercle (DF-790)
1.
Déposer la vis (5) et déposer le petit couver-
cle arrière (6).
2.
Déposer les 3 vis (7) et déposer le couvercle
supérieur arrière (8).
Installation de la perforatrice
3.
Déposer la vis (9) et tirer le guide (10) vers
l'extérieur.
Extracción de la cubierta (DF-790)
1.
Quite el tornillo (5) y, después, quite la cubi-
erta trasera pequeña (6).
2.
Quite los 3 tornillos (7) y, después, quite la
cubierta trasera superior (8).
Instalación de la perforadora
3.
Quite el tornillo (9) y tire de la guía (10)
hacia fuera.
Entfernen der Abdeckung (DF-790)
1.
Die Schraube (5) entfernen und die kleine
hintere Abdeckung (6) abnehmen.
2.
Die 3 Schrauben (7) entfernen und die obere
hintere Abdeckung (8) abnehmen.
Anbringen der Lochereinheit
3.
Die Schraube (9) entfernen und die Führung
(10) nach außen ziehen.
Rimozione del coperchio (DF-790)
1.
Rimuovere la vite (5) e quindi rimuovere il
pannello posteriore piccolo (6).
2.
Rimuovere le 3 viti (7) e quindi rimuovere il
pannello superiore posteriore (8).
Installare l’unità di perforazione
3.
Rimuovere la vite (9) ed estrarre la guida
(10) verso l'esterno.
カバーの取り外し
(DF-790 の場合)
1.
ビス (5)1 本を外し、後小カバー(6) を取り
外す。
2.
ビス (7)3 本を外し、後上カバー(8) を取り
外す。
パンチユニットの取り付け
3.
ビス (9)1 本を外し、ガイド (10) を手前に引
き出す。
拆下盖板(DF-790 时)
1.
拆除 1 颗螺丝 (5),拆下后部小盖板 (6)。
2.
拆除 3 颗螺丝 (7),拆下后上部盖板 (8)。
安装打孔单元
3.
拆除 1 颗螺丝 (9),将导向板 (10) 向外拉
出。
커버제거(DF-790 의 경우)
1.
나사 (5) 1 개를 제거하고 뒷 소커버 (6) 를
제거합니다 .
2.
나사 (7) 3 개를 제거하고 뒷 상커버 (8) 를
제거합니다 .
펀치유니트 부착
3.
나사 (9) 1 개를 제거하고 가이드 (10) 을 앞
으로 끌어 당깁니다 .
Summary of Contents for Copystar CS 3011i
Page 1: ...SERVICE MANUAL Published in September 2016 2RHSM 1 Rev 1 6 3011i 6 3511i ...
Page 4: ...This page is intentionally left blank ...
Page 10: ...This page is intentionally left blank ...
Page 78: ...2RG 2RH 1 2 51 B B A A B B A A B B A A Tray lower cover Pin Pin ...
Page 83: ...2RG 2RH 1 2 56 This page is intentionally left blank ...
Page 504: ...2RG 2RH 2 2 8 This page is intentionally left blank ...
Page 568: ...Installation Guide DP 7100 Document processor Installation Guide ...
Page 572: ...2 1mm 0mm ն ո պ ջ չ շ A D C B B A ...
Page 573: ...3 ռ ս վ ր ւ ց տ E A ...
Page 574: ...4 ք द I M3x8 փ F G M4x10 K J H A ...
Page 575: ...5 ON ध A ...
Page 577: ...7 շ յ ն ո D E B ...
Page 578: ...8 չ պ F G M4x10 H I M3x8 K J ջ B ...
Page 579: ...9 ռ B ...
Page 589: ...19 ո ն շ պ ջ չ 8 6 7 10 11 9 A B ...
Page 599: ...DP 7110 Document processor Installation Guide ...
Page 603: ...2 շ շ 2 շ 2 շ C M4x14 E ߑ ߒ ߓ ߔ ո շ 2 ߑ ն A ...
Page 604: ...3 ߘ ո ߕ ߗ ո չ պ ջ ߖ F G H M3x8 BLACK A ...
Page 605: ...4 ռ վ ր ւ ց ࠉտ ս I A ...
Page 606: ...5 J L փ ք द K M3x8 K M3x8 K M3x8 ध A ...
Page 607: ...6 ऩ प भ फ ब न म O N A ...
Page 608: ...7 ON य A ...
Page 610: ...9 շ ո շ 2 շ 2 շ 2 ߑ ն շ ߑ ߒ ߓ ߔ C M4x14 E B ...
Page 611: ...10 ߖ ߕ ߘ ߎ չ պ ջ ߗ F G ո H M3x8 BLACK B ...
Page 612: ...11 ռ ս տ ր ց վ I B ...
Page 613: ...12 ւ ք द ध न փ J L P K M3x8 K M3x8 B ...
Page 614: ...13 ऩ प फ O N B ...
Page 634: ...DP 7120 Document processor Installation Guide ...
Page 638: ...2 1mm 0mm ն շ ո չ ջ պ B B A D C A ...
Page 639: ...3 ռ ս վ տ ց ր E A ...
Page 640: ...4 G ւ F F ք փ H ON 10 mm 10 mm A ...
Page 642: ...6 շ ո յ ն D B ...
Page 643: ...7 չ E B ...
Page 644: ...8 F ON G պ F ջ ռ H 10 mm 10 mm B ...
Page 653: ...17 ղ ն շ ճ մ յ 2 6 7 3 4 5 A B ...
Page 655: ...19 չ ջ պ ս վ ռ 9 11 10 13 14 12 10 mm A B ...
Page 665: ...PF 791 500 x 2 Paper feeder Installation Guide ...
Page 673: ...PF 810 3000 sheet deck Installation Guide ...
Page 686: ...DF 791 3000 sheet finisher Installation Guide ...
Page 701: ...DF 7120 1000 sheet finisher Installation Guide ...
Page 705: ...2 մ յ ն 7 7 15 a b a a b b b a A ...
Page 706: ...3 ո շ չ պ A ...
Page 707: ...4 ջ ռ ս c d 14 c d c d 12 c d ջ ռ ս c d 14 c d c d 12 c d A ...
Page 708: ...5 վ ր D ց ON տ A ...
Page 710: ...7 L յ մ ն շ B ...
Page 712: ...9 ս ռ վ տ G B ...
Page 713: ...10 ր ց ւ b a 17 17 25 a b a a b b B ...
Page 714: ...11 ք փ द c d 24 c d c d 22 c d B ...
Page 715: ...12 न ध ऩ प B ...
Page 716: ...13 ब फ ON D B ...
Page 719: ...AK 740 Bridge unit Installation Guide ...
Page 721: ...MT 730 Mailbox Installation Guide ...
Page 736: ...PH 7A C D Punch unit Installation Guide ...
Page 757: ...DT 730 B Document tray Installation Guide ...
Page 759: ...5 2013 5 302LC56750 01 H F G D D 6 4 3 7 E C D D M4 8 M4 8 M4 8 M4 8 ...
Page 760: ...FAX System 12 Installation Guide ...


