


10
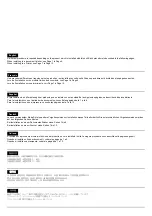
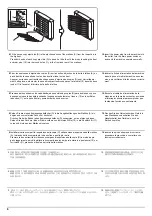
3.
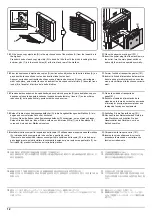
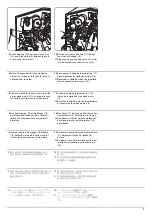
Remove the rear cover (3) of the mailbox
(A).
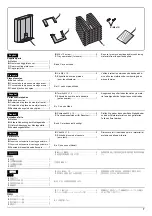
4.
Remove the wire saddle (4).
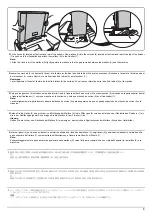
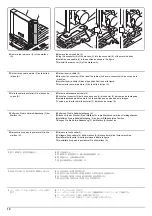
5.
Plug the connector (5) of the mailbox (A) into the connector (6) of the machine body.
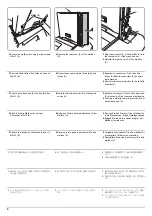
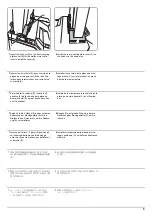
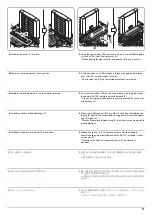
6.
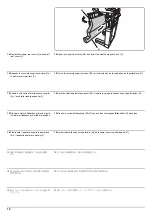
Install the wire saddle (4) in the position as shown in the figure.
7.
Reinstall the rear cover (3) of the mailbox (A).
3.
Retirer le couvercle arrière (3) de la boîte à
lettres (A).
4.
Retirer le serre-câble (4).
5.
Brancher le connecteur (5) de la boîte à lettres (A) dans le connecteur (6) du corps de la
machine.
6.
Installer le serre-câble (4) dans la position illustrée sur la figure.
7.
Remonter le couvercle arrière (3) de la boîte à lettres (A).
3.
Quite la cubierta posterior (3) del buzón de
correo (A).
4.
Retire la abrazadera del cable (4).
5.
Enchufe el conector (5) del buzón de correo (A) al conector (6) del cuerpo de la máquina.
6.
Instale la abrazadera del cable (4) en la posición que se muestra en la imagen.
7.
Vuelva a instalar la cubierta posterior (3) del buzón de correo (A).
3.
Entfernen Sie die hintere Abdeckung (3) der
Mailbox (A).
4.
Entfernen Sie die Kabelbefestigung (4).
5.
Stecken Sie den Stecker (5) der Mailbox (A) in die Steckbuchse (6) des Gerätegehäuses.
6.
Installieren Sie die Kabelbefestigung (4) an der im Bild gezeigten Position.
7.
Bringen Sie die hintere Abdeckung (3) der Mailbox (A) wieder an.
3.
Rimuovere il coperchio posteriore (3) della
mailbox (A).
4.
Rimuovere l'unità sella (4).
5.
Collegare il connettore (5) della mailbox (A) al connettore (6) del corpo macchina.
6.
Installare l'unità sella (4) nella posizione indicata in figura.
7.
Reinstallare il coperchio posteriore (3) della mailbox (A).
3.
メールボックス (A) の後カバー(3) を取り
外す。
4.
ワイヤーサドル (4) を外す。
5.
メールボックス (A) のコネクター(5) を機械本体のコネクター (6) に接続する。
6.
ワイヤーサドル (4) を図の位置に取り付ける。
7.
メールボックス (A) の後カバー(3) を元通りに取り付ける。
3.
拆下邮箱(A)的后部盖板 (3)。
4.
取下束线夹(4)。
5.
将邮箱(A)的接插件(5)插入机器的接插件 (6)。
6.
把束线夹 (4) 安装到图示位置。
7.
重新安装邮箱(A)的后盖板(3)。
3.
메일박스 (A) 의 뒤커버 (3) 를 떼어냅니다 .
4.
와이어 새들 (4) 을 분리합니다 .
5.
메일박스 (A) 의 커넥터 (5) 를 본체의 커넥터 (6) 에 연결합니다 .
6.
와이어 새들 (4) 을 그림에 표시된 위치에 설치합니다 .
7.
메일박스 (A) 의 뒤커버 (3) 를 다시 장착합니다 .
4
4
5
6
A
3
Summary of Contents for Copystar CS 3011i
Page 1: ...SERVICE MANUAL Published in September 2016 2RHSM 1 Rev 1 6 3011i 6 3511i ...
Page 4: ...This page is intentionally left blank ...
Page 10: ...This page is intentionally left blank ...
Page 78: ...2RG 2RH 1 2 51 B B A A B B A A B B A A Tray lower cover Pin Pin ...
Page 83: ...2RG 2RH 1 2 56 This page is intentionally left blank ...
Page 504: ...2RG 2RH 2 2 8 This page is intentionally left blank ...
Page 568: ...Installation Guide DP 7100 Document processor Installation Guide ...
Page 572: ...2 1mm 0mm ն ո պ ջ չ շ A D C B B A ...
Page 573: ...3 ռ ս վ ր ւ ց տ E A ...
Page 574: ...4 ք द I M3x8 փ F G M4x10 K J H A ...
Page 575: ...5 ON ध A ...
Page 577: ...7 շ յ ն ո D E B ...
Page 578: ...8 չ պ F G M4x10 H I M3x8 K J ջ B ...
Page 579: ...9 ռ B ...
Page 589: ...19 ո ն շ պ ջ չ 8 6 7 10 11 9 A B ...
Page 599: ...DP 7110 Document processor Installation Guide ...
Page 603: ...2 շ շ 2 շ 2 շ C M4x14 E ߑ ߒ ߓ ߔ ո շ 2 ߑ ն A ...
Page 604: ...3 ߘ ո ߕ ߗ ո չ պ ջ ߖ F G H M3x8 BLACK A ...
Page 605: ...4 ռ վ ր ւ ց ࠉտ ս I A ...
Page 606: ...5 J L փ ք द K M3x8 K M3x8 K M3x8 ध A ...
Page 607: ...6 ऩ प भ फ ब न म O N A ...
Page 608: ...7 ON य A ...
Page 610: ...9 շ ո շ 2 շ 2 շ 2 ߑ ն շ ߑ ߒ ߓ ߔ C M4x14 E B ...
Page 611: ...10 ߖ ߕ ߘ ߎ չ պ ջ ߗ F G ո H M3x8 BLACK B ...
Page 612: ...11 ռ ս տ ր ց վ I B ...
Page 613: ...12 ւ ք द ध न փ J L P K M3x8 K M3x8 B ...
Page 614: ...13 ऩ प फ O N B ...
Page 634: ...DP 7120 Document processor Installation Guide ...
Page 638: ...2 1mm 0mm ն շ ո չ ջ պ B B A D C A ...
Page 639: ...3 ռ ս վ տ ց ր E A ...
Page 640: ...4 G ւ F F ք փ H ON 10 mm 10 mm A ...
Page 642: ...6 շ ո յ ն D B ...
Page 643: ...7 չ E B ...
Page 644: ...8 F ON G պ F ջ ռ H 10 mm 10 mm B ...
Page 653: ...17 ղ ն շ ճ մ յ 2 6 7 3 4 5 A B ...
Page 655: ...19 չ ջ պ ս վ ռ 9 11 10 13 14 12 10 mm A B ...
Page 665: ...PF 791 500 x 2 Paper feeder Installation Guide ...
Page 673: ...PF 810 3000 sheet deck Installation Guide ...
Page 686: ...DF 791 3000 sheet finisher Installation Guide ...
Page 701: ...DF 7120 1000 sheet finisher Installation Guide ...
Page 705: ...2 մ յ ն 7 7 15 a b a a b b b a A ...
Page 706: ...3 ո շ չ պ A ...
Page 707: ...4 ջ ռ ս c d 14 c d c d 12 c d ջ ռ ս c d 14 c d c d 12 c d A ...
Page 708: ...5 վ ր D ց ON տ A ...
Page 710: ...7 L յ մ ն շ B ...
Page 712: ...9 ս ռ վ տ G B ...
Page 713: ...10 ր ց ւ b a 17 17 25 a b a a b b B ...
Page 714: ...11 ք փ द c d 24 c d c d 22 c d B ...
Page 715: ...12 न ध ऩ प B ...
Page 716: ...13 ब फ ON D B ...
Page 719: ...AK 740 Bridge unit Installation Guide ...
Page 721: ...MT 730 Mailbox Installation Guide ...
Page 736: ...PH 7A C D Punch unit Installation Guide ...
Page 757: ...DT 730 B Document tray Installation Guide ...
Page 759: ...5 2013 5 302LC56750 01 H F G D D 6 4 3 7 E C D D M4 8 M4 8 M4 8 M4 8 ...
Page 760: ...FAX System 12 Installation Guide ...


