


7
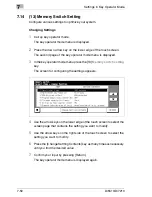
Settings in Key Operator Mode
7-52
Di5510/Di7210
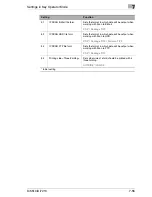
13
EDH AMS
Automatically enables the AMS feature when an
original is loaded into the EDH:
OFF/ ON*
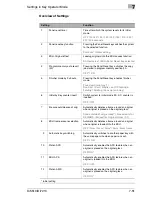
14
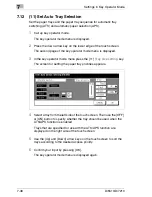
Select tray when APS cancel
The following paper tray is used if the APS function
is disabled:
APS preferential tray* / Tray 1 / Tray 2 / Tray 3 /
Tray 4 / Bypass
15
Platen original size detect
Original sizes that are detected when placed on
the original glass:
AB series* / Only A series / Full-image Area /
Inch series
16
EDH original size detect
Original sizes that are detected when loaded into
the EDH.
AB series* / Only A series / Full-image Area /
Inch series
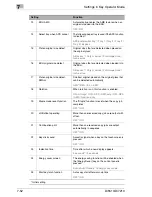
17
Platen original size detect.
SMALL
Smallest original placed on the original glass that
can be detected automatically.
A5R* / B6R / 5.5 × 8.5R
18
Rotation
When rotation is on, this function is enabled:
ON - Always* / ON - APS / AMS only / ON - APS
/ AMS / Reduce only
19
Staple mode reset-function
The “Staple” function is reset when the copy job
completes:
OFF* / ON
20
JOB offset operating
More than one reserved copy jobs are output with
offset.
OFF* / ON
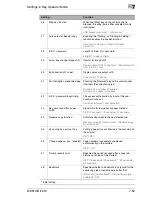
21
Continuation print
More than one reserved copy jobs are output
automatically in sequence.
OFF* / ON
22
Key click sound
Acoustic signal when a key on the touch screen is
pressed.
OFF* / ON
23
Indication time
Time after which a new display appears.
3 seconds* / 5 seconds
24
Energy saver screen
The energy saving function will be enabled when
the [Energy Saver] key on the control panel is
pressed:
Auto shut off mode* / Energy save mode
25
Start key latch function
Auto copy start after warm-up time.
OFF* / ON
Setting
Function
* Initial setting
Summary of Contents for Di5510
Page 1: ...Di5510 Di7210 Advanced Information...
Page 2: ......
Page 28: ...1 Introduction 1 16 Di5510 Di7210...
Page 90: ...2 Getting to Know Your System 2 62 Di5510 Di7210 9 Close the finisher door...
Page 96: ...2 Getting to Know Your System 2 68 Di5510 Di7210...
Page 148: ...3 Initial Steps 3 52 Di5510 Di7210...
Page 236: ...4 Basic Functions 4 88 Di5510 Di7210...
Page 352: ...6 Network functions 6 54 Di5510 Di7210 3 Configure settings as required...
Page 455: ...Troubleshooting 8 Di5510 Di7210 8 13 5 Close the finisher door...
Page 457: ...Troubleshooting 8 Di5510 Di7210 8 15 5 Close the finisher door...


