Removing the hard disk drive tray
Each hard disk drive has a tray that you can remove when removing the hard disk
drive.
Perform the following procedure to remove a hard disk drive tray.
1.
Read “Safety” on page v and the “Installation guidelines” on page 239.
2.
Shut down the operating system, turn off the blade server, and remove the
blade server from the BladeCenter unit. See “Removing the blade server from a
BladeCenter unit” on page 241.
3.
Carefully lay the blade server on a flat, static-protective surface, with the cover
side up.
4.
Open and remove the blade server cover. See “Removing the blade server
cover” on page 244.
5.
Remove the hard disk drive if one is installed. See “Removing a SAS hard disk
drive” on page 248.
6.
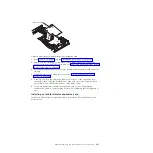
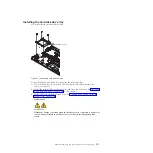
Remove the four screws that secure the drive tray to the system board and
remove the drive tray.
Save the screws that secure the tray to the system board. Store the screws in a
safe place.
Hard disk drive tray
Figure 26. Removing a hard disk drive tray
270
JS12 Type 7998: Problem Determination and Service Guide
Summary of Contents for BladeCenter JS12
Page 1: ...BladeCenter JS12 Type 7998 Problem Determination and Service Guide...
Page 2: ......
Page 3: ...BladeCenter JS12 Type 7998 Problem Determination and Service Guide...
Page 14: ...xii JS12 Type 7998 Problem Determination and Service Guide...
Page 248: ...234 JS12 Type 7998 Problem Determination and Service Guide...
Page 252: ...238 JS12 Type 7998 Problem Determination and Service Guide...
Page 290: ...276 JS12 Type 7998 Problem Determination and Service Guide...
Page 298: ...284 JS12 Type 7998 Problem Determination and Service Guide...
Page 302: ...288 JS12 Type 7998 Problem Determination and Service Guide...
Page 312: ...298 JS12 Type 7998 Problem Determination and Service Guide...
Page 317: ......
Page 318: ...Part Number 60Y1568 Printed in USA 1P P N 60Y1568...

