


First Steps with the TNC 640 | Programming the first part
1
72
HEIDENHAIN | TNC 640 | Conversational Programming User's Manual | 10/2017
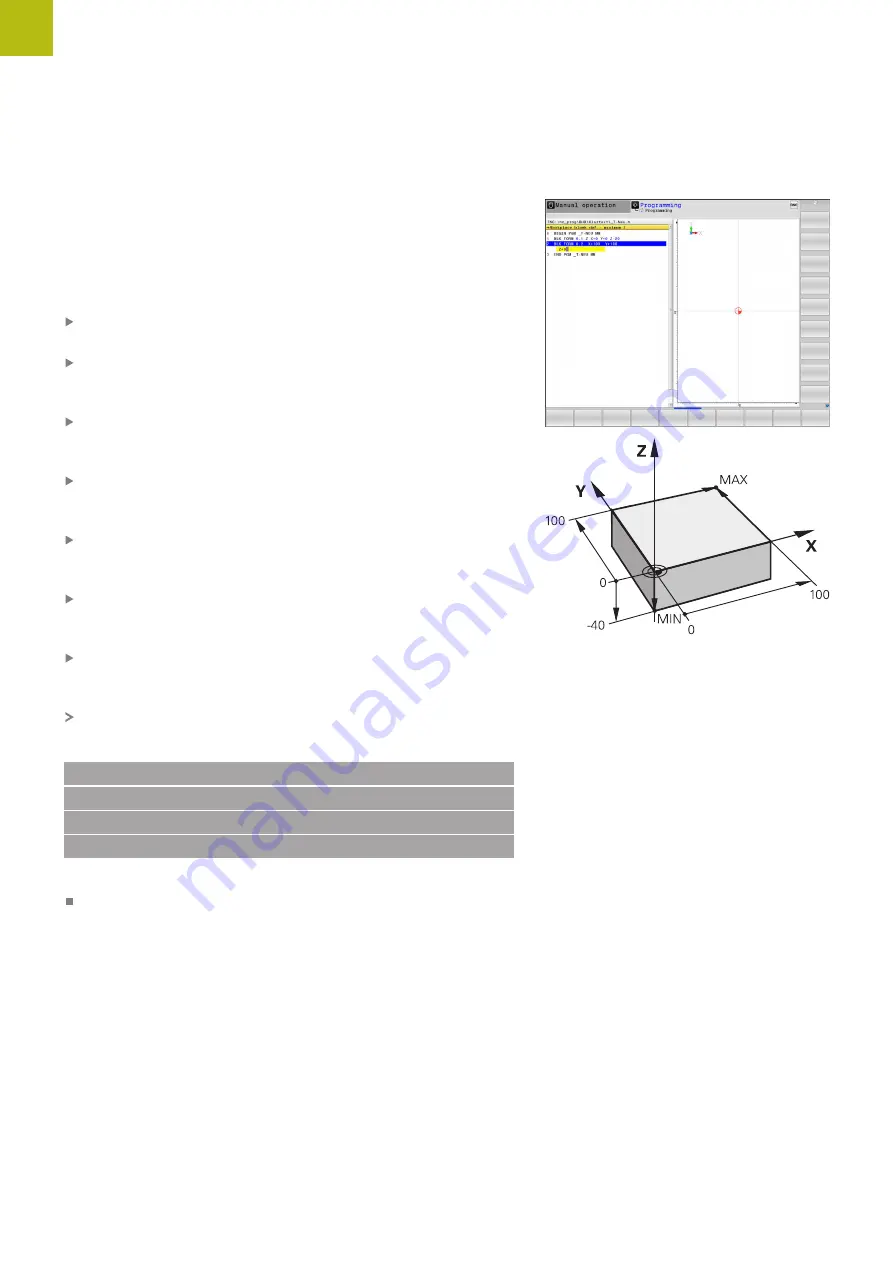
Defining a workpiece blank
After you have created a new program you can define a workpiece
blank. For example, define a cuboid by entering the MIN and MAX
points, each with reference to the selected preset.
After you have selected the desired blank form via soft key, the
control automatically initiates the workpiece blank definition and
asks for the required data:
Working plane in graphic: XY?
: Enter the active spindle axis. Z
is saved as default setting. Accept with the
ENT
key
Workpiece blank def.: Minimum X
: Enter the smallest X
coordinate of the workpiece blank with respect to the preset,
e.g. 0, confirm with the
ENT
key
Workpiece blank def.: Minimum Y
: Enter the smallest Y
coordinate of the workpiece blank with respect to the preset,
e.g. 0, confirm with the
ENT
key
Workpiece blank def.: Minimum Z
: Enter the smallest Z
coordinate of the workpiece blank with respect to the preset,
e.g. -40, confirm with the
ENT
key
Workpiece blank def.: Maximum X
: Enter the largest X
coordinate of the workpiece blank with respect to the preset,
e.g. 100, confirm with the
ENT
key
Workpiece blank def.: Maximum Y
: Enter the largest Y
coordinate of the workpiece blank with respect to the preset,
e.g. 100, confirm with the
ENT
key
Workpiece blank def.: Maximum Z
: Enter the largest Z
coordinate of the workpiece blank with respect to the preset,
e.g. 0, confirm with the
ENT
key
The control ends the dialog.
Example
0 BEGIN PGM NEW MM
1 BLK FORM 0.1 Z X+0 Y+0 Z-40
2 BLK FORM 0.2 X+100 Y+100 Z+0
3 END PGM NEW MM
Further information on this topic
Define workpiece blank
Summary of Contents for TNC 640
Page 4: ......
Page 5: ...Fundamentals ...
Page 36: ...Contents 36 HEIDENHAIN TNC 640 Conversational Programming User s Manual 10 2017 ...
Page 67: ...1 First Steps with the TNC 640 ...
Page 90: ......
Page 91: ...2 Introduction ...
Page 130: ......
Page 131: ...3 Operating the Touchscreen ...
Page 144: ......
Page 145: ...4 Fundamentals File Management ...
Page 206: ......
Page 207: ...5 Programming Aids ...
Page 236: ......
Page 237: ...6 Tools ...
Page 281: ...7 Programming Contours ...
Page 333: ...8 Data Transfer from CAD Files ...
Page 355: ...9 Subprograms and Program Section Repeats ...
Page 374: ......
Page 375: ...10 Programming Q Parameters ...
Page 478: ......
Page 479: ...11 Miscellaneous Functions ...
Page 501: ...12 Special Functions ...
Page 584: ......
Page 585: ...13 Multiple Axis Machining ...
Page 650: ......
Page 651: ...14 Pallet Management ...
Page 664: ......
Page 665: ...15 Batch Process Manager ...
Page 673: ...16 Turning ...
Page 713: ...17 Manual Operation and Setup ...
Page 797: ...18 Positioning with Manual Data Input ...
Page 803: ...19 Test Run and Program Run ...
Page 843: ...20 MOD Functions ...
Page 881: ...21 Tables and Overviews ...