REV5
DIRECTION 2173225-100
3-4
Left Mounting Plate Assembly
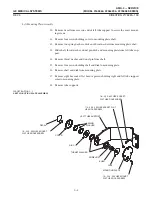
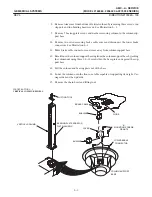
10. Remove decal from cover on end of left tube support to access the cover mountĆ
ing screws.
11. Remove four screws holding cover to mounting plate shaft.
12. Remove two spring washers, diskand thrust washer from mounting plate shaft.
13. Slide shaft, thrust washer, dowel pin, disk, and mounting plate from left tube supĆ
port.
14. Remove thrust washer and dowel pin from shaft.
15. Remove four screws holding shaft and diskto mounting plate.
16. Remove shaft and diskfrom mounting plate.
17. Remove eight hex socket flat head capscrews holding right and left tube support
arms to mounting plate.
18. Remove tube supports.
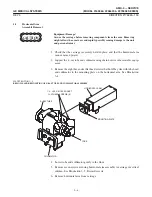
ILLUSTRATION 3-3
1/4-20 X .625 HEX SOCKET
FLAT HEAD CAPSCREW
MOUNTING PLATE
COVER
DECAL
SHAFT
DISK
SPRING
WASHER
LEFT TUBE SUPPORT
1/4-20 X .500 HEX SOCKET FLAT
HEAD CAPSCREW
10-32 X .500 HEX SOCKET
FLAT HEAD CAPSCREW
10-32 X .500 HEX SOCKET
FLAT HEAD CAPSCREW
THRUST WASHER
DOWEL PIN
DISC
Summary of Contents for AMX 4+
Page 1: ...0 0 1 1 2 2...
Page 2: ......
Page 3: ...D D D D D D D D D D D D D D D D...
Page 4: ...D D D D D D D D...
Page 6: ...iv...
Page 8: ...vi...
Page 14: ...xii...
Page 18: ...xvi...
Page 32: ...1 14...
Page 48: ...3 14...
Page 84: ...5 10...
Page 106: ...7 12...
Page 112: ...8 6...
Page 116: ...9 4...
Page 131: ......
Page 132: ...3 2 2 1 0 3 5 0 2 0 4 0 2...


