FUSION SPLICER 90S Rev5
52
7.
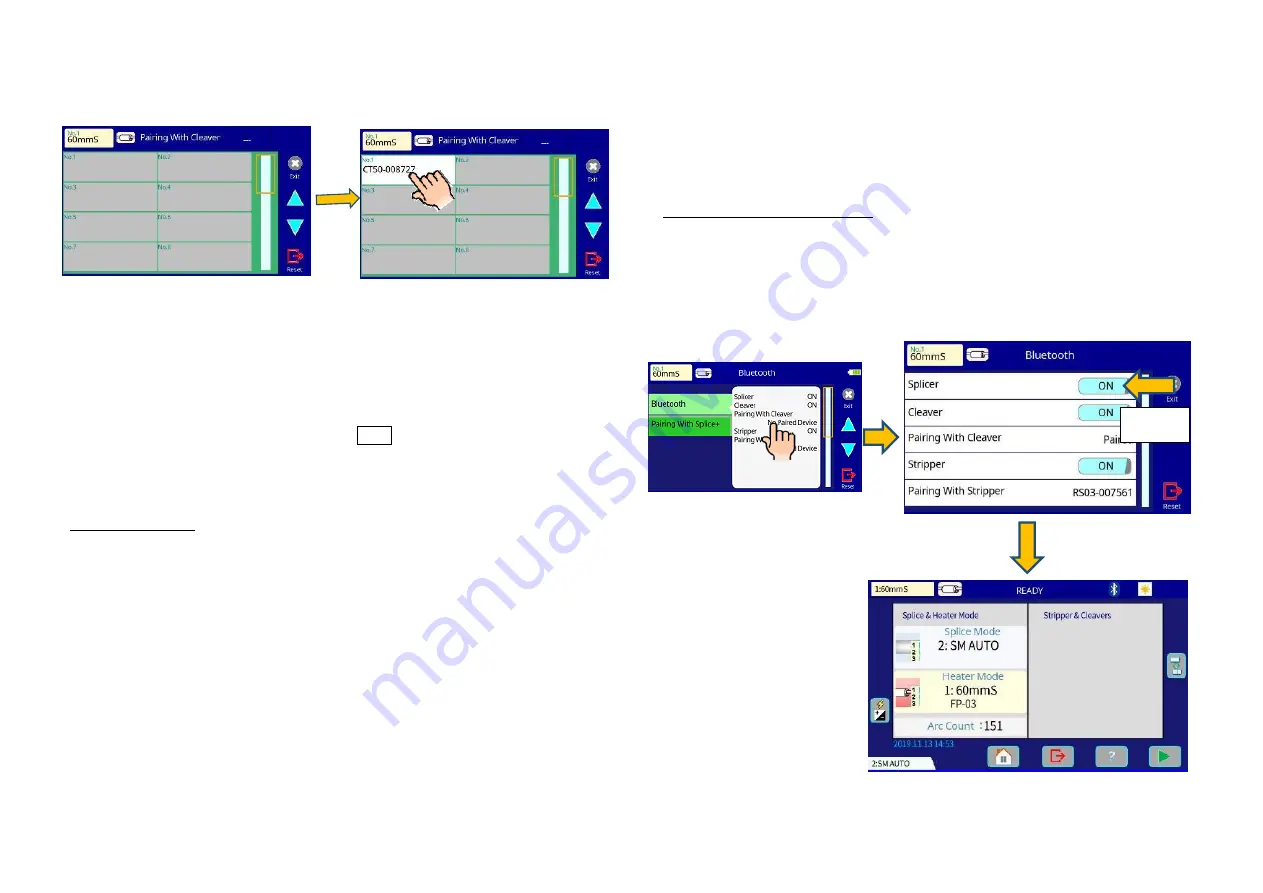
The cleaver or stripper requesting pairing appears on the screen of the splicer
and is displayed in white. Tap with your finger to pair.
8.
When pairing is successful, the “LINK” LED of the cleaver or the ribbon fiber
stripper stops blinking and remains on briefly before turning off.
9.
Press the “RESET” icon or button to return to the [Ready] screen, the serial
number of the paired cleaver now shows.
To confirm successful paring, press the LINK button on the cleaver or the
ribbon fiber stripper for 1 second. When connected correctly, the “LINK” LED
briefly turns on.
Change the device
1. Turn [Splicer] and [Stripper] or [Cleaver] in Bluetooth menu “ON”.
2. Select [Pairing With Stripper] or [Pairing With Cleaver] in the Bluetooth menu.
Touching either one will make the [Device List] screen appear.
3. Hold the “LINK” button for 6 seconds of cleaver or ribbon fiber stripper. The Link
LED will begin blinking blue and then wait for the command from the splicer to
pair.
4. For each unique device, it adds the serial number to the [Device List] screen.
5. Touch the serial number on-screen of the cleaver or the ribbon fiber stripper you
want to connect to.
6. This initiates the wireless data communication with the new ribbon fiber stripper
or cleaver.
How to turn off the wireless data communication
Please turn off the wireless data communication function when using this splicer
in places where wireless data communication is prohibited. In order to stop
output of all electromagnetic waves, Bluetooth must be turned off the cleaver,
the ribbon fiber stripper and the splicer. Turning Bluetooth off on one device
does not disable wave output for the other.
Procedure in case of the splicer
1.
Open the [Bluetooth] menu screen.
2.
Turn off the [Splicer] on the [Bluetooth] Menu.
3.
Press the [RESET] key to return the [Ready] screen.
Make sure the cleaver and stripper icons have disappeared.
OFF


