Installing and Removing Options (EPL-6200 only)
299
8
8
8
8
8
8
8
8
8
8
8
8
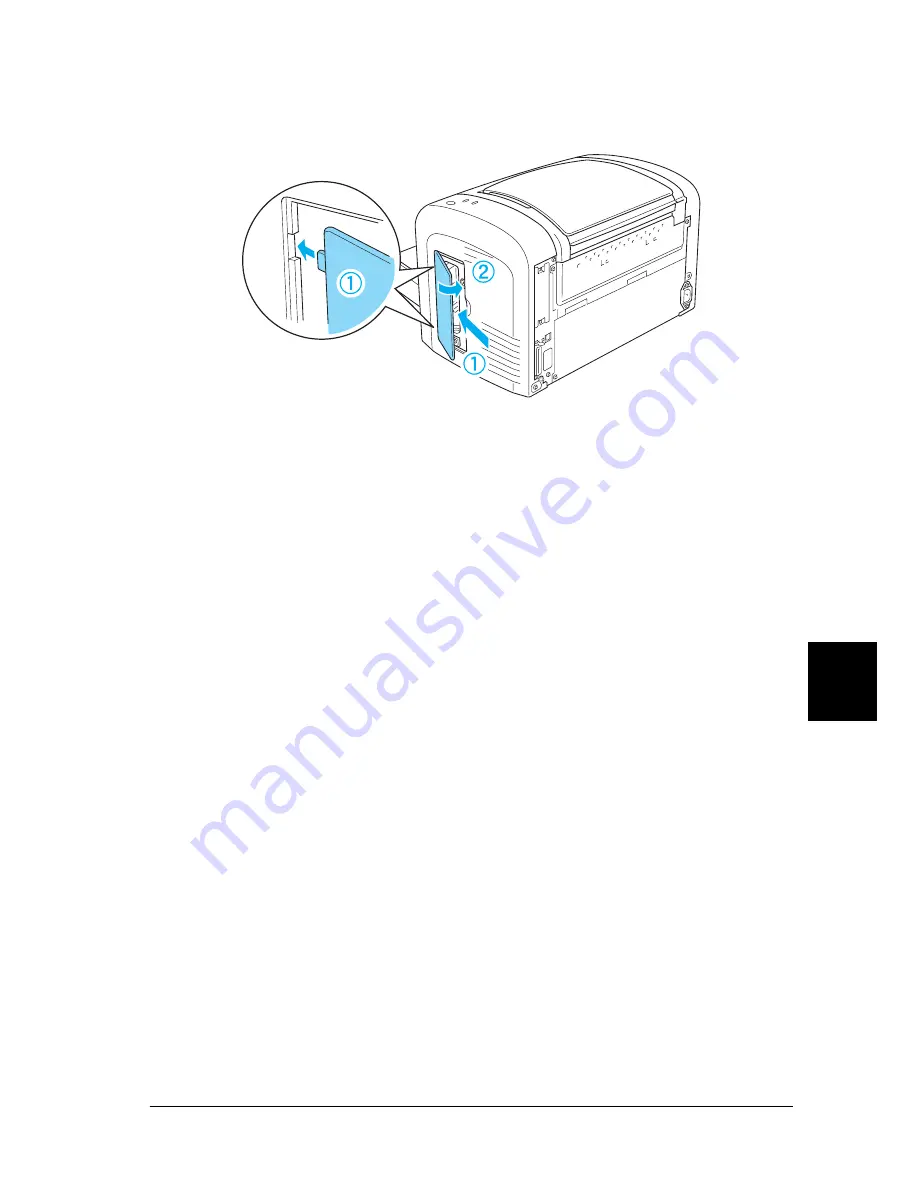
7. Replace the printer’s right side cover as shown below.
8. Reconnect all interface cables.
9. Plug the printer’s power cord into the printer and into an
electrical outlet.
10. Turn on the printer.
To verify that the memory module is correctly installed, print a
status sheet. See “Printing a Status Sheet” on page 362 to print a
status sheet.
If an incorrect amount of memory is shown on the status sheet,
turn off the printer and review the steps above to make sure you
correctly installed the memory module. If the amount of memory
is still incorrect, contact your dealer or a qualified service
representative for assistance.
Note:
After installing both the printer driver and the EPSON Status Monitor
3, Windows users can confirm whether the memory module is correctly
installed by checking the printer driver. The memory module status is
displayed in the Optional Settings sheet in the printer’s Properties dialog
box.
Summary of Contents for 6200L - EPL B/W Laser Printer
Page 29: ...12 Product Information ...
Page 39: ...22 Paper Handling 1 Pull the paper tray out from the cassette unit ...
Page 49: ...32 Paper Handling ...
Page 133: ...116 Using the Printer Driver For Windows ...
Page 207: ...190 Using the Printer Driver For Macintosh ...
Page 259: ...242 Setting Up Your Printer on a Network EPL 6200L ...
Page 321: ...304 Installing and Removing Options EPL 6200 only ...
Page 349: ...332 Cleaning and Transporting the Printer ...
Page 397: ...380 Troubleshooting 1 Remove the MP tray cover 2 Remove paper stacked in the tray ...
Page 457: ...440 Symbol Sets EPL 6200 only ...
Page 489: ...472 Working with Fonts ...
Page 500: ...Samples 483 E E E E E E E E E E E E Appendix E Samples Postscript Font Samples 484 ...
Page 501: ...484 Samples Postscript Font Samples ...
Page 502: ...Samples 485 E E E E E E E E E E E E ...
Page 503: ...486 Samples ...


