


Page 172
IM02601004E
www.eaton.
11 Troubleshooting & Maintenance
11.6. Return Procedure
If an internal malfunction is identified, the unit should be returned to the factory for repair or replace
-
ment. To have a unit returned, contact your Eaton authorized distributor with your system hardware
and system firmware identification information. This information can be found in the Setup System
area of your Meter. See the Setup chapter for additional information.
11.7. Resetting the Meter to Factory Defaults (Web Browser)
A factory reset may take up to five minutes to complete. Once you’ve confirmed the reset from the
web interface, please close your browser window and the wait five minutes before reconnecting to
the unit.
To reset the meter to factory defaults with a known username and password:
1. Open a web browser and navigate to the meter by typing its IP address into the web browser’s
address field.
2. Once the web interface has loaded, click on the Setup button.
3. On the setup screen, click the Login / Change Users button to log in.
4. Log in as an administrator level user. If you do not know your admin username and password,
please contact Eaton Support for instructions on how to recover a lost username and password.
5. Once you are logged in, click on the Quick Setup link in the left-hand pane.
6. Click the Factory Reset button.
7.
A confirmation dialog box will appear. Click Yes to confirm the factory reset. Doing so will erase
all data on the unit, and clear all of its settings.
8.
Make note of the time, it will take approximately five minutes for the meter to complete its fac
-
tory reset.
9. Once the green LED on the left side of the meter module has returned to a slow blink pattern
(one second on, one second off) the meter is ready to be configured.
NOTE:
the CE Card Ethernet settings will have been lost during factory reset, please log into the
meter using the local configuration port to configure the meter.
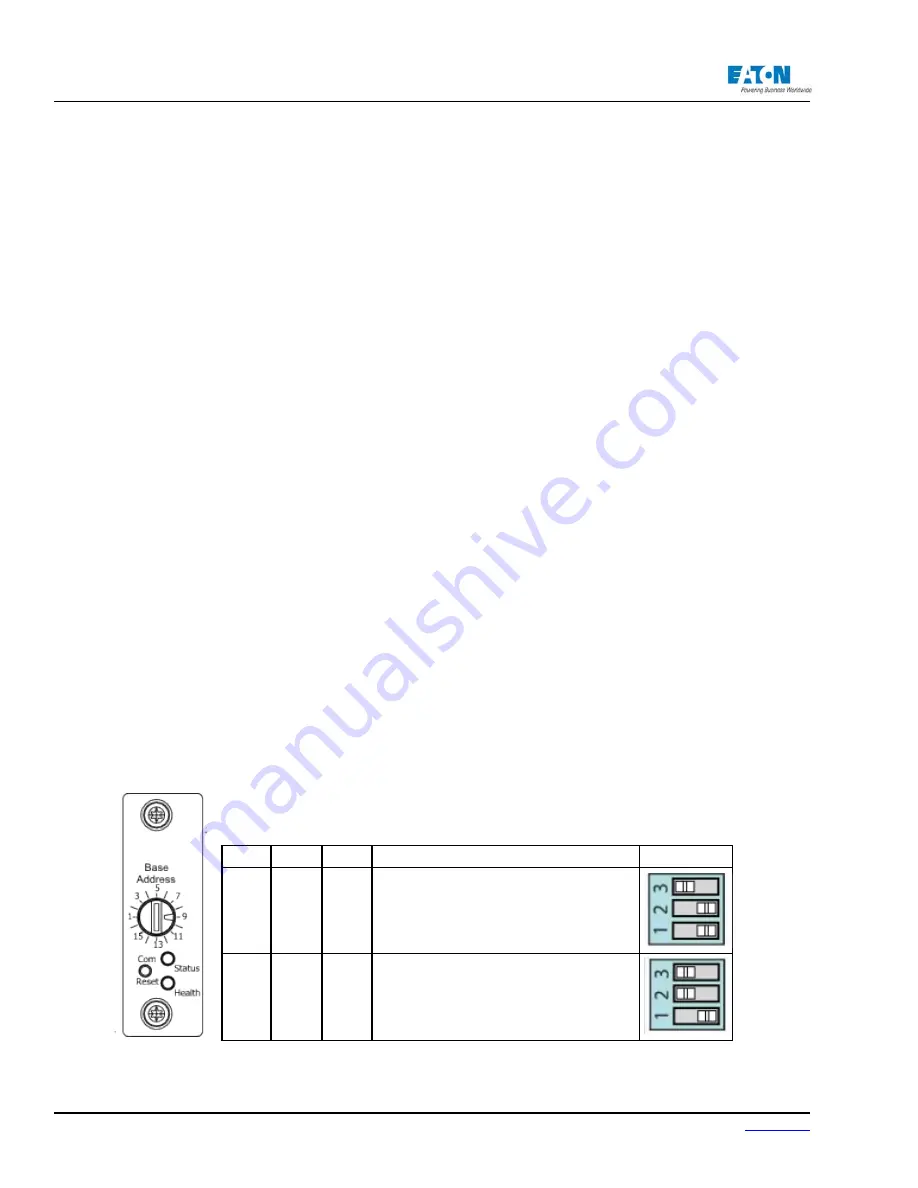
11.8. Com Reset Switch
Located above the rotary switch, the Com Reset switch can be used in conjunction with the DIP
switches on the power supply front panel to reset the meter’s communications ports. The reset
switch has the following functions, depending on the DIP switch settings.
DS -1 DS-2
DS-3
OFF
OFF
ON
Initialize all communicadtions ports to their
factory default settings.
OFF
ON
ON
Initialize the LAN/WAN and Local Config
communications ports and assign the fol-
lowing IP addresses:
LAN/WAN: 10.1.1.1
Local Config: 192.168.1.1
Summary of Contents for Power Xpert PXM 4000
Page 1: ...User and Installation Manual IM02601004E Power Xpert PXM 4000 6000 8000 ...
Page 8: ...Page vi IM02601004E www eaton ...
Page 19: ...www eaton com IM02601004E Page 11 1 Introduction ...
Page 24: ...Page 16 IM02601004E www eaton ...
Page 36: ...Page 18 IM02601004E www eaton com 2 Quick Start Guide for the Meter Module ...
Page 45: ...www eaton com IM02601004E Page 37 3 Installation 3 8 MeterDimensions ...
Page 46: ...Page 38 IM02601004E www eaton 3 Installation Dimension Con t ...
Page 47: ...www eaton com IM02601004E Page 39 3 Installation Dimension Con t ...
Page 48: ...Page 40 IM02601004E www eaton 3 Installation Dimension Con t ...
Page 53: ...www eaton com IM02601004E Page 45 3 Installation ...
Page 54: ...Page 46 IM02601004E www eaton 3 Installation ...
Page 55: ...www eaton com IM02601004E Page 47 3 Installation ...
Page 56: ...Page 48 IM02601004E www eaton 3 Installation ...
Page 57: ...www eaton com IM02601004E Page 49 3 Installation ...
Page 58: ...Page 50 IM02601004E www eaton 3 Installation ...
Page 59: ...www eaton com IM02601004E Page 51 3 Installation ...
Page 60: ...Page 52 IM02601004E www eaton 3 Installation ...
Page 61: ...www eaton com IM02601004E Page 53 3 Installation ...
Page 62: ...Page 54 IM02601004E www eaton 3 Installation ...
Page 63: ...www eaton com IM02601004E Page 55 3 Installation ...
Page 66: ...Page 58 IM02601004E www eaton 3 Installation ...
Page 75: ...www eaton com IM02601004E Page 67 4 Introduction to Web Server Screens ...
Page 76: ...Page 68 IM02601004E www eaton 4 Introduction to Web Server Screens ...
Page 86: ...Page 78 IM02601004E www eaton 5 Introduction to the Local Graphical Display ...
Page 108: ...Page 100 IM02601004E www eaton 6 Functions on the Web Server Pages ...
Page 128: ...Page 120 IM02601004E www eaton 7 Functions on the Graphical Display ...
Page 164: ...Page 156 IM02601004E www eaton 8 Setup on the Web Server Pages ...
Page 198: ...Page 190 IM02601004E www eaton A MODBUS Communication ...
Page 242: ...Page 234 IM02601004E www eaton ...
Page 252: ...Page 244 IM02601004E www eaton D Diagnostics ...
Page 254: ...Page 246 IM02601004E www eaton D Diagnostics ...


