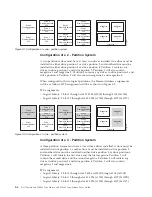
The SCSI specification does not allow gaps in the SCSI element addressing. Special
handling is needed for empty drive slots to fulfill the specification. Also
temporarily removed drives need to have their addresses preserved to not confuse
the attached host and host application. Generally only drives which are currently
physically available or temporarily removed are reported. Empty (unused) slots
located at the bottom or the top should not be reported, with an exception in case
of a “removed” condition. A drive slot which does not contain a drive, and has a
position between used slots, needs to be reported as a SCSI element. To signal the
host application that this slot is not usable, its ACCESS bit will be disabled.
Note:
When reducing the number of drives in your library, update the Logical
Library configuration. This will remove the Attention LED on the front
panel and the exclamation mark on the Home screen indicating that a drive
is missing.
Updating the Logical Library configuration will also update the drive element
addressing and drive numbering. Replacing LTO half height drives with full height
drives may require you to execute Restore Factory Defaults to correctly update the
drive element addressing and drive numbering. See “Configure Library:
Save/Restore Configuration” on page 5-56.
Logical Unit Number (LUN) Scanning
The library uses a single SCSI or Loop ID per drive and dual LUNs to control the
tape drive (LUN 0) and library accessor (LUN 1). The library requires a Host Bus
Adapter (HBA) that supports LUN scanning. If it is not enabled, your host system
will not scan beyond LUN 0 and will fail to discover the library. It will only see
the tape drive.
Important:
Some HBAs, such as RAID controllers, do not support LUN scanning.
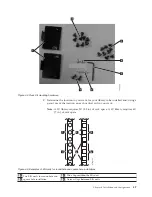
SCSI Element
Slot
4
3
2
1
SCSI Element
Slot
4
3
2
1
257
25
6
257
25
6
25
8
4U Unit with only FH drives
(
1
lo
g
ic
a
l libr
a
ry)
4U Unit with FH
a
nd HH drives
(
1
lo
g
ic
a
l libr
a
ry)
a77ug1
6
5
Figure 3-5. Examples of SCSI element addressing
3-6
Dell PowerVault TL2000 Tape Library and TL4000 Tape Library User's Guide
Summary of Contents for PowerVault TL2000
Page 1: ...Dell PowerVault TL2000 Tape Library and TL4000 Tape Library User s Guide ...
Page 2: ......
Page 3: ...Dell PowerVault TL2000 Tape Library and TL4000 Tape Library User s Guide ...
Page 6: ...iv Dell PowerVault TL2000 Tape Library and TL4000 Tape Library User s Guide ...
Page 12: ...x Dell PowerVault TL2000 Tape Library and TL4000 Tape Library User s Guide ...
Page 14: ...xii Dell PowerVault TL2000 Tape Library and TL4000 Tape Library User s Guide ...
Page 20: ...xviii Dell PowerVault TL2000 Tape Library and TL4000 Tape Library User s Guide ...
Page 22: ...xx Dell PowerVault TL2000 Tape Library and TL4000 Tape Library User s Guide ...
Page 36: ...1 14 Dell PowerVault TL2000 Tape Library and TL4000 Tape Library User s Guide ...
Page 56: ...3 12 Dell PowerVault TL2000 Tape Library and TL4000 Tape Library User s Guide ...
Page 196: ...8 14 Dell PowerVault TL2000 Tape Library and TL4000 Tape Library User s Guide ...
Page 228: ...10 28 Dell PowerVault TL2000 Tape Library and TL4000 Tape Library User s Guide ...
Page 236: ...A 8 Dell PowerVault TL2000 Tape Library and TL4000 Tape Library User s Guide ...
Page 242: ...B 6 Dell PowerVault TL2000 Tape Library and TL4000 Tape Library User s Guide ...
Page 260: ...D 4 Dell PowerVault TL2000 Tape Library and TL4000 Tape Library User s Guide ...
Page 264: ...F 2 Dell PowerVault TL2000 Tape Library and TL4000 Tape Library User s Guide ...
Page 268: ...H 2 Dell PowerVault TL2000 Tape Library and TL4000 Tape Library User s Guide ...
Page 280: ...X 4 Dell PowerVault TL2000 Tape Library and TL4000 Tape Library User s Guide ...
Page 281: ......
Page 282: ... Printed in USA ...


