background image

a77ug0

6

7

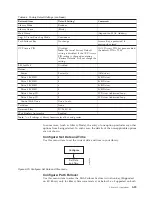
Inventory As Of 14:02:04 Library Time

Drive Inventory

Drive

Status

Label

Source

1

Empty

-------------

Magazine Inventory

8

9

10

11

4

5

6

7

IO-Station

1

2

3

+

23

22

21

20

19

18

17

16

14

13

12

+

15

Refresh

Figure 5-30. The 2U library Monitor Library: Inventory page

Chapter 5. Operations

5-41

Summary of Contents for PowerVault TL2000

Page 1: ...Dell PowerVault TL2000 Tape Library and TL4000 Tape Library User s Guide ...

Page 2: ......

Page 3: ...Dell PowerVault TL2000 Tape Library and TL4000 Tape Library User s Guide ...

Page 4: ... Dell Inc is strictly forbidden Trademarks used in this text Dell the DELL logo and PowerVault are trademarks of Dell Inc Other trademarks and trade names may be used in this document to refer to either the entities claiming the marks and names or their products Dell Inc disclaims any proprietary interest in trademarks and trade names other than its own Printed May 2010 ...

Page 5: ... Dell For customers in the United States call 800 WWW DELL 800 999 3355 Note If you do not have an active Internet connection you can find contact information on your purchase invoice packing slip bill or Dell product catalog Dell provides several online and telephone based support and service options Service availability varies by country and product and some services may not be available in your...

Page 6: ...iv Dell PowerVault TL2000 Tape Library and TL4000 Tape Library User s Guide ...

Page 7: ...l Paths 3 2 Using Multiple Control Paths for Path Failover 3 2 Library Partitioning and Element Addressing 3 2 Logical Unit Number LUN Scanning 3 6 Host Interfaces 3 7 SCSI Interface 3 7 SAS Interface 3 9 Fibre Channel Interface 3 9 Chapter 4 Installation and Configuration 4 1 Using the Library Configuration Form 4 1 Installing Your Library 4 1 Choosing a Location 4 1 Unpacking the Library 4 2 Ver...

Page 8: ...0 4 Installing a Tape Drive Sled 10 6 Adding a Tape Drive Sled 10 9 Replacing a Power Supply 10 10 Replacing a Library Controller Card 10 11 Replacing Cartridge Magazines 10 13 Replacing the Library Enclosure 10 13 Preparing the Defective Library for Replacement 10 13 Unpacking and Preparing the Replacement Library Enclosure 10 14 Installing Your Drive s in the Replacement Library Enclosure 10 16 ...

Page 9: ...8 The 2U library Configure Library General screen 4 20 4 19 Example The 4U library Configure Library General screen 4 20 4 20 The 4U library Configure Library Logical Libraries page 4 21 4 21 The Configure Library Path Failover Feature Activation screen 4 21 4 22 Feature Key verification screen 4 22 4 23 Feature Activation Key screen 4 22 4 24 Configure Library Encryption Activation screen 4 23 4 ...

Page 10: ...50w power supply with LEDs 7 7 7 2 A 80w power supply without LEDs 7 8 9 1 Access holes for the left magazine 9 1 9 2 Access holes for the right magazine 9 2 9 3 Left magazine pulled out of the 2U library 9 3 9 4 Left Magazines pulled out of the 4U Library 9 3 10 1 ESD label 10 1 10 2 Shipping Lock and Label Storage Location 10 2 10 3 Shipping Lock and Label 10 2 10 4 Library drive sled without El...

Page 11: ...A 4 Configuration of a four partition system A 6 A 5 Examples of SCSI element addressing A 6 Figures ix ...

Page 12: ...x Dell PowerVault TL2000 Tape Library and TL4000 Tape Library User s Guide ...

Page 13: ... 37 5 9 Drive Status page elements 5 38 5 10 Configure Library General page elements 5 44 5 11 Configure Library Specific page elements 5 44 5 12 Drive Identity page elements 5 49 6 1 Nominal Cartridge Life Load Unload Cycles 6 2 6 2 Ultrium data cartridge compatibility with Ultrium tape drive 6 2 6 3 Cartridges and VOLSERs compatible with the Ultrium Tape Drives 6 4 6 4 Location of the write prot...

Page 14: ...xii Dell PowerVault TL2000 Tape Library and TL4000 Tape Library User s Guide ...

Page 15: ...ple because of some existing condition A caution notice can be accompanied by one of several symbols If the symbol is It means A hazardous electrical condition with less severity than electrical danger A generally hazardous condition not represented by other safety symbols A hazardous condition due to the use of a laser in the product Laser symbols are always accompanied by the classification of t...

Page 16: ...en the host and the library s tape drives 2 Turn off the power to the library by pushing in on the Power button 1 shown in Figure 1 1 on Page 1 1 for 4 seconds 3 If drives are SCSI attached disconnect the SCSI cable and check the SCSI bus terminator for damage 4 Unplug the library s power cord or cords from the electrical outlet and the library power supply 5 Check the library s power cord for dam...

Page 17: ... rack mounted devices v Each rack cabinet might have more than one power cord Ensure that all power cords in the rack cabinet are disconnected before servicing any device in the rack cabinet v Connect all devices installed in a rack cabinet to power devices installed in the same rack cabinet Do not plug a power cord from a device installed in one rack cabinet into a power device installed in a dif...

Page 18: ...rrect power connection to a rack refer to the rating labels located on the equipment in the rack to determine the total power requirement of the supply circuit v For sliding drawers Do not pull out or install any drawer or feature if the rack stabilizer brackets are not attached to the rack Do not pull out more than one drawer at a time The rack may become unstable if you pull out more than one dr...

Page 19: ...at you choose can hold the weight of the loaded rack cabinet Refer to the documentation that comes with your rack cabinet for the weight of a loaded rack cabinet v Verify that all door openings are at least 762 x 2032 mm 30 x 80 inches v Ensure that all devices shelves drawers doors and cables are secure v Ensure that the four leveling pads are raised to their highest position v Ensure that there ...

Page 20: ...xviii Dell PowerVault TL2000 Tape Library and TL4000 Tape Library User s Guide ...

Page 21: ...rary Related Publications Refer to the following publications for additional information v Dell PowerVault TL2000 Tape Library and TL4000 Tape Library Getting Started Guide provides installation information v Dell PowerVault TL2000 Tape Library and TL4000 Tape Library SCSI Reference provides supported SCSI commands and protocol governing the behavior of SCSI interface xix ...

Page 22: ...xx Dell PowerVault TL2000 Tape Library and TL4000 Tape Library User s Guide ...

Page 23: ...ess to cartridges via four removable magazines The 2U library houses up to 24 tape cartridges or 23 and an elective 1 slot I O Station in a compact 2U form factor with easy access to cartridges via two removable magazines The TL2000 TL4000 Library supports LT0 3 tape drives with these interfaces a Small Computer Systems Interface SCSI LTO3 SAS drive Fibre Channel interface FC LTO 4 and LTO 5 drive...

Page 24: ...ported from the library The amber LED may also be lit because a power supply or a power supply fan is failing or a drive sled is defective missing or has been replaced by a different drive type v Error Amber LED It is illuminated when there is an unrecoverable library or drive failure A message is displayed at the same time on the Operator Control Panel display 3 Cartridge magazines v The 2U libra...

Page 25: ...ious menu screen v SELECT The lower right button is used to display a sub menu or force an accessor action 7 Operator Control Panel display This component is a 128 X 64 monochrome graphic display 8 I O Station The Input Output I O Station is used to import and export cartridges into and out of the library v The 2U library has an elective 1 slot I O Station v The 4U library has an elective 3 slot I...

Page 26: ...rium 4 tape drive The tape drive in the library is packaged in a container called a drive sled Drive sleds come in a full height or half height configuration The drive sled is a customer replaceable unit CRU and is hot pluggable which is designed for easy removal and replacement 1 3 4 2 5 6 7 8 9 10 a77ug100 11 Figure 1 4 Rear panel of a 4U library with full height Fibre Channel drive and half hei...

Page 27: ...ve sled Bar Code Reader The bar code reader is an integral part of the library accessor The bar code reader provides inventory feedback to the host application Operator Control Panel display and Web User Interface by reading cartridge bar code labels The library stores the customized inventory data in memory Library firmware supports a 6 or 8 character volume serial number VOLSER on the bar code l...

Page 28: ...If you purchased library managed encryption at the time you purchased your library a hard copy of the license key is provided with your library as a backup If there are any issues with the license key for library managed encryption purchased with the library please visit http www dell com tapeautomation to obtain your license key You will need the library serial number and worldwide node name to o...

Page 29: ...r v Product Status such as the severity of the trap status current and previous and the time the trap occurred v Library State physical device status such as identification and status of devices that are monitored In the case of the library it would include enclosure power supply controller magazine status drive count cartridge slot count and I O station count Also included would be certain librar...

Page 30: ...rtridges v Native 72 TB v Compressed 144 TB 2 1 compression Maximum storage capacity Ultrium 4 Data Cartridges v 24 data cartridges v Native 19 2 TB v Compressed 38 4 TB 2 1 compression v 48 data cartridges v Native 38 4 TB v Compressed 75 2 TB 2 1 compression Maximum storage capacity Ultrium 3 Data Cartridges v 24 data cartridges v Native 9 6 TB v Compressed 19 2 TB 2 1 compression v 48 data cart...

Page 31: ...S 1 cables The Ultrium 3 Full Height Tape Drive supports LVD Ultra160 or Fibre Channel interfaces It features two HD68 connectors or one LC Fibre Channel connector The Ultrium 3 Half Height Drive supports one SAS SFF 8088 connector The SFF 8088 SAS connectors on the Ultrium 3 tape drives are compatible with SAS 1 cables a77ug008 Figure 1 6 Library drive sled without ESD springs SCSI sled shown a77...

Page 32: ...ives can read and write LTO Ultrium 4 Data Cartridges at original Ultrium 4 capacities and can also read LTO Ultrium 3 Data Cartridges with improved data rates Ultrium 4 tape drives can read and write LTO Ultrium 4 Data Cartridges Ultrium 4 tape drives can read and write LTO Ultrium 3 Data Cartridges at original Ultrium 3 capacities and can also read LTO Ultrium 2 Data Cartridges with improved dat...

Page 33: ...m storage capacity Maximum number of data cartridges 24 Native 36 TB Compressed 72 TB 2 1 compression Maximum number of data cartridges 48 Native 72 TB Compressed 144 TB 2 1 compression Number of slots 24 including I O Station 48 Including 3 I O station slots Sustained native data transfer rate Ultrium 5 Drive 140 MB s Ultrium 5 Drive 140 MB s Drive types Ultrium 5 Drive Fibre Channel SAS Ultrium ...

Page 34: ...ding I O Station 48 Including 3 I O station slots Sustained native data transfer rate Ultrium 3 Full Height Drive 80 MB s Ultrium 3 Half Height Drive 60 MB s Drive types Ultrium 3 Full Height Drive SCSI Fibre Channel Ultrium 3 Half Height Drive Serial Attached SCSI SAS Interfaces Ultra160 SCSI LVD 4 Gb s Fibre Channel 3 Gb s SAS Environmental Specifications Table 1 10 Environmental Specifications ...

Page 35: ...ust and people walking on the carpet can cause the carpet fibers and the dust to become airborne v Keep the library out of printer copier rooms because of toner and paper dust Additionally do not store paper supplies next to the library v Keep the library away from moving air caused by doorways open windows fans and air conditioners Ensure that the machine covers are always kept closed to minimize...

Page 36: ...1 14 Dell PowerVault TL2000 Tape Library and TL4000 Tape Library User s Guide ...

Page 37: ...refore the next button pressed only transitions the Operator Control Panel to the User Interaction mode from the System Driven mode In case of the activated user security feature the User Interaction mode is restricted to Login and Monitor menu items until a user logs in with a correct password Operator Control Panel Philosophy Operator Control Panel operation must obey some basic rules These rule...

Page 38: ...ibrary v I O Station the current status of the I O Station While the library is going through its power up cycle you can monitor the state of the library via the OCP however you may not be able to make any configuration changes until the unit has completed its initialization routine Attempts to make changes will be ignored Note about the Front Panel LEDs All LEDs are updated during power ON and re...

Page 39: ...s or Web User Interface Configure Library Logical Libraries Restore defaults Operator Control Panel Configure Restore Defaults or Web User Interface Configure Library Restore Defaults Redundant power supply failed Complete the following steps 1 Replace the failed power supply see Replacing a Power Supply on page 10 10 2 Cycle library power Power supply fan failure Replace the power supply v The Er...

Page 40: ...ntrol Panel is the Power ON OFF button If the library is powered ON pressing this button for 4 seconds will initiate a controlled power down of the library soft landing The following operations will take place before the library shuts down completely v The display indicates with an appropriate message that the shutdown is in progress v The library controller finishes all ongoing library and drive ...

Page 41: ...e same privileges as the Admin account with the addition of advanced unit diagnostics Note User and Superuser accounts must be enabled by the library administrator These accounts are disabled by default Note Passwords are case sensitive Use the following password for logging in as an Admin user secure Each level affects which areas you have access to and what actions you can initiate from those ar...

Page 42: ...that the library is still capable of performing operations This condition can be caused by a media library redundant power supply power supply fan or a drive sled problem To determine which view the System Status screen v The red X indicates that user intervention is required and that the library is not capable of performing operations a77ug070 Figure 2 2 Web User Interface login page a77ug080 Fig...

Page 43: ...manufactured after March 14 2008 If a redundant power supply fails the System Status screen will appear as shown in Figure 2 6 Note If your library has 04 level redundant power supplies see label on top of power supply it is normal for the one in Standby mode to turn its Green LED off You can test this power supply by pulling the power connector from the other Active power supply The power supply ...

Page 44: ... the upper right corner of the screen A new web page will open Using the left navigation pane select the desired Help page To close the Help page click the red X in the upper right corner of the screen Logging out of the Web User Interface To log out of the Web User Interface click Logout in the upper right corner of the current screen Important If you click the X in the upper right corner of your...

Page 45: ...te with separate applications through separate control paths This configuration requires no special capabilities from the server or application For more information see Using Multiple Logical Libraries for Library Sharing on page 3 2 v Configure any single logical library including the entire physical library so that it is shared by two or more servers that are running the same application Dependi...

Page 46: ...or Path Failover Command failures and timeouts are costly You want your library to run smoothly and efficiently To ensure continued processing the library offers an optional path failover feature that enables the host device driver to resend the command to an alternate control path for the same logical library With control path failover installed the alternate control path can include another HBA ...

Page 47: ...ght drives there are four potential drives in the space that used to occupy two As a result the first half height drive position or the first full high drive position will be called Drive 1 The second half height drive position will be called Drive 2 The third half height drive position or the second full height drive position will be called Drive 3 The fourth half height drive position will be ca...

Page 48: ...tain the second drive and the second magazine Partition 3 will contain any drives in drive position 3 and drive position 4 Partition 3 will also contain magazine 3 and magazine 4 STE assignments v Logical Library 1 Slot 1 through slot 9 4096 x1000 through 4104 0x1008 v Logical Library 2 Slot 10 through slot 21 4096 x1000 through 4107 0x100B v Logical Library 3 Slot 22 through slot 45 4096 x1000 th...

Page 49: ...ot There is one exception to this addressing scheme to accommodate libraries currently in the field A 4U library containing only full height drives will continue to have the addresses assignments 256 and 257 thus causing no interruptions to their operation Drive slots will still be incremented by 1 for each drive slot position Note Exchanging drives with different form factors will result in the l...

Page 50: ...ating that a drive is missing Updating the Logical Library configuration will also update the drive element addressing and drive numbering Replacing LTO half height drives with full height drives may require you to execute Restore Factory Defaults to correctly update the drive element addressing and drive numbering See Configure Library Save Restore Configuration on page 5 56 Logical Unit Number L...

Page 51: ... a maximum system to device cable length of 10 m 33 ft when attaching to the host interface board SCSI and one or two daisy chained drives Use a maximum system to device cable length of 5 m 17 ft when attaching to the host interface board SCSI and three to six daisy chained drives Note For maximum performance it is recommended to have a maximum of one drive per SCSI bus Only use the maximum system...

Page 52: ...sion achieved Ultra160 SCSI buses have a bandwidth of 160 MB per second The table below lists the types of SCSI buses and gives the recommended maximum quantity of drives that you can attach Table 3 3 Recommended maximum quantity of drives per SCSI bus Type of Drive Ultra 160 SCSI Bus LVD Ultrium 3 1 drive at 2 1 compression Using Multiple SCSI Buses The library has two SCSI connectors for each ta...

Page 53: ...izes and types to be connected simultaneously with thinner and longer cables its full duplex signal transmission supports up to 6 0 Gb s The SFF 8088 SAS connectors on the Ultrium 5 tape drives are compatible with SAS 1 or SAS 2 cables The SFF 8088 SAS connectors on the Ultrium 3 and Ultrium 4 tape drives are compatible with SAS 1 cables In addition SAS drives can be hot plugged SAS drives will au...

Page 54: ...Security For security reasons it is important to limit the devices that a server or servers can recognize or access Also some performance configurations and SAN configurations can result in a device being seen multiple times from the same server For example if you have two HBAs from the same server connected to an Ultrium Tape Drive in the library the drive will be detected and appear as two logic...

Page 55: ...port sharing If your software does not support sharing note that Fibre Channel switches have a zoning capability to form a SAN partition For systems that do not cooperate use zoning to prevent the systems from sharing the same drive You can remove zoned partitions as you upgrade software and system levels Chapter 3 Installation Planning 3 11 ...

Page 56: ...3 12 Dell PowerVault TL2000 Tape Library and TL4000 Tape Library User s Guide ...

Page 57: ...4 Installing the Library Foot Pads for Desktop Installation ONLY on page 4 3 5 Removing and Storing the Shipping Lock on page 4 4 6 Rackmounting the Library for Rack Installation ONLY on page 4 5 7 Connecting the Host Interface Cable on page 4 11 8 Connecting a Power Cord on page 4 13 Choosing a Location Choose a location that meets the following criteria Table 4 1 Location criteria Criteria Defin...

Page 58: ...ibrary 2 Before opening and removing the library from the shipping container inspect the container for shipping damage If you notice any damage report it to the shipping company immediately 3 Open the shipping container and carefully remove the shipping materials from the top of the library Remove the accessory package and set it aside Important Once the drive is unpacked save and store the packag...

Page 59: ...rary on a flat surface without foot pads may damage your library or cause it not to function properly Six foot pads must be installed on the bottom of the library before the library can be used as a desktop unit To install the library foot pads 1 Being very careful lay the library on its side 2 Peel the adhesive from the back of each foot pad 3 Install the foot pads on the bottom of the library en...

Page 60: ...d in place with a label and is located in the top center of the library After the shipping lock is removed it should be stored on the right side of the back panel of the library for future use To remove and store the shipping lock 1 Remove the blue label 2 that is securing the lock 1 to the top of the library then remove the lock see Figure 4 2 on page 4 5 1 a77ug085 Figure 4 1 Installing foot pad...

Page 61: ...The 2U library and the 4U library are easily installed into a standard 19 inch rack system The 2U library requires 2U 3 5 in of space The 4U library requires 4U 7 in of space 1 2 a77ug018 Figure 4 2 Shipping lock and label 1 2 a77ug019 Figure 4 3 Library shipping lock and label storage location Chapter 4 Installation and Configuration 4 5 ...

Page 62: ...t of the library To install your library in a rack perform the following steps 1 Verify that your rack kit includes the following contents see Figure 4 4 on page 4 7 v Packaged in plastic material 2 rails not shown 2 mounting brackets 1 v Packaged in the small bag with no label 1 Torx wrench 5 2 anchors 4 2 countersunk screws for securing the anchors 6 2 small countersunk screws for securing the t...

Page 63: ... 3 5 in of rack space A 4U library requires 4U 7 in of rack space 1 Two EIA units for round hole and square hole installation 3 Wide Gaps within the EIA unit 2 4 Narrow Gaps between EIA units Figure 4 4 Rack Kit mounting hardware a77ug133 1 3 4 2 1 2 Figure 4 5 Examples of EIA units for round hole and square hole installations Chapter 4 Installation and Configuration 4 7 ...

Page 64: ...variety of rack depths Each rail requires 2U of rack space 1 in Figure 4 6 4 Using the Torx wrench included in your shipment remove the screws 1 as shown in Figure 4 7 Screw locations on the 4U library are similar 5 Install the library rack anchors 2 as shown in Figure 4 8 on page 4 9 on each side of your library using the longest counter sunk screws included in the rack kit 1 a77ug009 Figure 4 6 ...

Page 65: ...ck anchors and mounting brackets installed slide the library onto the rails as shown in Figure 4 9 and Figure 4 10 on page 4 10 When the library stops gently push the library to lock the anchors installed on each side of the library to the rails and until the mounting brackets are flush with the vertical rack rails a77ug012 1 2 Figure 4 8 2U library rack anchors and mounting brackets a77ug127 Figu...

Page 66: ...12 on page 4 11 for a 4U library by placing a screw in the center hole of each mounting bracket and tightening them 1 a77ug109 Figure 4 10 Sliding the 4U library into the rack a77ug128 1 Figure 4 11 Securing the 2U library to the rack 4 10 Dell PowerVault TL2000 Tape Library and TL4000 Tape Library User s Guide ...

Page 67: ... before connecting the host interface cable could result in damage to the library 2 For a SCSI library attach one end of the host interface cable to one of the connectors on the back panel of the library see 1 in Figure 4 13 on page 4 12 For a Fibre Channel library attach one end of the host interface cable to the connector on the back panel of the library see 5 in Figure 4 14 on page 4 12 For a S...

Page 68: ...to the remaining SCSI connector on the back panel of the library if the library is the last or only a77ug017 1 3 4 2 Figure 4 13 Attaching a SCSI host interface cable to the 2U library a77ug101 1 3 4 2 5 6 Figure 4 14 Attaching host interface cables to the 4U library THE CONFIGURATION SHOWN IN THIS FIGURE IS USED FOR EXAMPLE ONLY THIS CONFIGURATION IS NOT SUPPORTED a77ug134 1 3 2 Figure 4 15 Attac...

Page 69: ...tion 4 Plug the network ethernet cable 2 in Figure 4 13 on page 4 12 Figure 4 14 on page 4 12 or 3 in Figure 4 15 on page 4 12 into the ethernet port on the back panel of the library If the ethernet connection is directly attached to a server or laptop a crossover ethernet cable may be required Note It is the customer s responsibility to supply the crossover cable if one is required Connecting a P...

Page 70: ...ured using the Operator Control Panel and or the Web User Interface The recommended method for configuring your library is using the Web User Interface For complete detailed configuration information on all of the functions available on your library using both the Operator Control Panel and the Web User Interface see Chapter 5 Operations on page 5 1 For default library settings see Configure Save ...

Page 71: ...rface on page 4 28 12 Configuring Logs and Traces using the Web User Interface on page 4 28 13 Entering Email Notification Information using the Web User Interface on page 4 29 14 Configuring SNMP Settings on page 4 29 15 Testing Encryption Configuration for Library Managed Encryption on page 4 30 16 Restoring Factory Default Settings using the Web User Interface on page 4 31 17 Logging out of the...

Page 72: ...DHCP as your library network setting skip this step and proceed to the next step If you want to select DHCP as your library network setting complete the following steps a Press the DOWN button to highlight DHCP b Press the SELECT button to highlight the DHCP field c Press the DOWN button to select ON d Press the SELECT button to apply your selection e Skip to Step 7 6 Press the DOWN button to sele...

Page 73: ...E and CANCEL v If SAVE is highlighted press the SELECT button to apply your new configuration If changes were made to the Network settings a pop up menu will display the option to reboot the library or cancel the reboot If you select CANCEL in the pop up menu you will need to power cycle the library for the network changes to be applied v If CANCEL is highlighted press the SELECT button to cancel ...

Page 74: ...og out of the Web User Interface Note The SNMP MIB file is an optional feature 2 Download the latest library firmware drive firmware and SNMP MIB Management Information Base file from http support dell com Note The SNMP MIB file is an optional feature a Enter in your internet browser address field and press Enter on your keyboard b Compare the firmware level available on the web to those that you ...

Page 75: ...an empty drive Loop Sequential mode with loop mode ON loads the cartridge in the lowest numerical slot after the cartridge in the highest numerical slot has been filled and sent back to its home slot This allows endless backup operations without user interaction v Active Slots Select the number of active slots you would like to assign in your library This item will affect the number of Res Reserve...

Page 76: ...creen Apply Selections Click this button to submit the changes made to the screen 3 If your library has more than one drive proceed to Choosing the Number of Logical Libraries for Your Library on page 4 21 If your library has one drive proceed to Entering Path Failover Feature Activation Key on page 4 21 Figure 4 18 The 2U library Configure Library General screen Figure 4 19 Example The 4U library...

Page 77: ... left cartridge magazine v Logical Library 2 will contain Drive 2 and the upper left cartridge magazine v Logical Library 3 will contain Drive 3 and the lower right cartridge magazine v Logical Library 4 will contain Drive 4 and the upper right cartridge magazine The I O Station and slots reserved for cleaning cartridges if any are shared among all logical libraries 1 Click Configure Library Logic...

Page 78: ...Tape Cartridge v Library firmware level 5 80 or higher v Drive firmware level 77BE or higher v Tape backup software application that supports LTO4 encryption Minimum Prerequisites for Library Managed Encryption v SAS and Fibre Channel LTO Ultrium 4 Tape Drive Full Height or Half Height v Ultrium 4 Tape Cartridge v Library firmware level 5 80 or higher v Drive firmware level 77BE or higher v Dell E...

Page 79: ...maximum availability of encrypted backup and recovery These settings are required for Library Managed Encryption only Enter the EKM Server Setting information Note The IP address of the Encryption Key Manager EKM host must be consistent with the library Network settings This means if the library is set to IPV4 only network support the EKM host must be an IPV4 address If the Dell PowerVault library...

Page 80: ...tings 1 Click Configure Library Drives in the left navigation pane 2 Select the desired settings for each drive listed either SCSI SAS or Fibre Channel See Figure 4 25 3 Click one of the following v Refresh to update the current screen v Submit to apply the changes made to the screen Entering Library Network Settings This page shows the current network configuration of the library and allows modif...

Page 81: ...e will not be retained 2 Select a Protocol Stack Choose IPv4 only IPv6 only or Dual Stack IPv4 IPv6 If you choose Dual Stack IPv4 IPv6 you must be prepared to enter both IPv4 and IPv6 IP addresses The sections below will gray out depending on the choices made here 3 Enter the Host Name 4 Enter the Domain Name 5 DNS Primary Enter the IP address of your primary DNS server 6 DNS Secondary Enter the I...

Page 82: ...e the IP Address of your library automatically set by the DHCP server b Enable Stateless Auto Config Stateless Auto config is ALWAYS on not defeatable c Static Address Enter the assigned IPv6 address The format of an IPv6 IP address is a 128 bit numeric address written as 8 groups of four numbers separated by colons d Prefix length The default prefix length is set to 64 but can be set to any lengt...

Page 83: ...ord can be set for each Role 4 Enter the New Password The password has a maximum of 10 characters A Z a z 0 9 hyphen space period 5 In Repeat Password enter the new password again 6 In Support Name enter the name of the person that will be able to offer the user help with the library Note Only one support person can be configured for the entire tape library The support person may or may not be one...

Page 84: ...ction is not available on the Operator Control Panel 1 Click Configure Library Logs Traces in the left navigation pane 2 For Error Log Mode select Continuous so all information for logs and traces will be captured 3 Trace Level and Trace Filter options can be changed by Service personnel only 4 Click one of the following v Refresh to cancel all of your entries and leave the settings as they were v...

Page 85: ...address 6 Enter the Domain Name for your library This field cannot be blank when using event notification Note If you attempt to enter a blank value for the Domain Name a warning message will appear It will say If you are using Event Notification then a value is required for the Domain Name 7 Click one of the following v Refresh to cancel all of your entries and leave the settings as they were v S...

Page 86: ... management application and the library Enter your preferred name or leave as public The Community Name is limited to 33 alpha numeric characters A Z a z 0 9 3 Click one of the following v Refresh to cancel the changes made to the screen v Submit to apply the changes made to the screen Testing Encryption Configuration for Library Managed Encryption Please refer to http support dell com to determin...

Page 87: ...igure Menu on page 5 18 for information on configuring the following items v Logical Libraries v Library Settings v Drive s v Network v Set Access PIN v Set Date and Time v Path Failover To complete the configuration of your library the following items will have to be accessed from the Web User Interface v Encryption if purchased see Configure Library Encryption on page 5 47 v User Access Informat...

Page 88: ...uld be terminated 4 Confirm that the host server operating system recognized the library In Microsoft Windows XP or Windows Server 2003 you can verify this by going to Settings Control Panel System Hardware Device Manager Tape Drive and or Medium Changer For more information on verifying the connection of SCSI devices consult the operating system documentation Cartridge Magazines The library has r...

Page 89: ...the left magazine To open the I O Station select Control Open I O Station The I O Station will pop open To close the I O Station gently push it back into the left magazine a77ug241 Figure 4 33 2U library left magazine a77ug242 Figure 4 34 2U library right magazine Chapter 4 Installation and Configuration 4 33 ...

Page 90: ... I O Station 1 in Figure 4 36 The upper right magazine has twelve storage slots The lower right magazine has twelve storage slots For information on Element Addressing see 4U Library I O Slots Storage Slots and Drive Slots Element Addresses and Physical Locations on page A 2 a77ug248 Figure 4 35 2U library I O Station in the left magazine a77ug245 Figure 4 36 4U library left magazines 4 34 Dell Po...

Page 91: ... close the I O Station gently push it back into the lower left magazine There are finger holes on the back side of the I O Station see 1 in Figure 4 39 on page 4 36 that allow the user to push the cartridges out of the I O station a77ug249 Figure 4 37 4U library right magazines a77ug246 Figure 4 38 4U library I O Station in the lower left magazine Chapter 4 Installation and Configuration 4 35 ...

Page 92: ...User Interface Manage Library Release Magazine select Left or Right Note The magazines will relock after 15 seconds if they have not been removed 3 Remove the selected magazines from the library 4 Insert cartridges in the magazine s Do not store cartridges in the I O Station or in the dedicated cleaning cartridge slot See 2U Library I O Slot Storage Slots and Drive Slot Element Addresses and Physi...

Page 93: ... slot is available to any logical library drive even if the reserved slot is not in that particular logical library If the library contains multiple logical libraries typically the last logical library is chosen to be the reserved slot containing the cleaning cartridge As with a library with a single logical library this slot is the last physical slot in the library top right magazine uppermost re...

Page 94: ... To determine the number of cleaning uses remaining click on the Web User Interface Monitor Library Inventory v Click on the located under that magazine presentation to expand the detail of resident cartridges v Cleaning cartridges are labeled as CLNxxxLx Observe the information displayed for the slots containing a cleaning cartridge The number of Media Loads represent how many times the cleaning ...

Page 95: ...this interface Monitor Library Inventory Monitor Library Inventory on page 5 40 Cartridge Inventory Monitor Inventory Magazines Monitor Inventory on page 5 14 Manage Library Perform Inventory Manage Library Perform Inventory on page 5 43 Cartridge Move Control Move Cartridges Control Move Cartridges on page 5 16 Manage Library Move Media Manage Library Move Media on page 5 42 Cartridge currently i...

Page 96: ... page 5 50 Diagnostics run drive Head test Service Service Drive Tests Service Run Tests on page 5 31 Not available with this interface Diagnostics run drive Media test Service Service Drive Tests Service Run Tests on page 5 31 Not available with this interface Diagnostics run drive Normal Read Write test Service Service Drive Tests Service Run Tests on page 5 31 Not available with this interface ...

Page 97: ... Library Drive Status Monitor Library Drive Status on page 5 38 Drive data compression status Not available with this interface Monitor Library Drive Identity Data Compression Monitor Library Drive Identity on page 5 35 Drive Fibre Worldwide Node Name Monitor Drive Identity Drive n WWNN Monitor Drive on page 5 12 Monitor Library Drive Identity Monitor Library Drive Status on page 5 38 Drive Hashed...

Page 98: ...e Library Network on page 5 50 Email notifications add modify and delete Not available with this interface Configure Library Email Notification Configure Library Email Notification on page 5 55 Error log view Monitor Library Error log Monitor Library on page 5 10 Service Library View logs Service Library View Logs on page 5 58 Error logs and traces set mode Not available with this interface Config...

Page 99: ...dress modify Configure Network Gateway Configure Network on page 5 24 Configure Library Network Configure Library Network on page 5 50 Inventory perform Control Re Inventory Control Re Inventory on page 5 18 Manage Library Perform Inventory Manage Library Perform Inventory on page 5 43 I O Station configuring Configure Library Settings I O Station Configure Library on page 5 20 Configure Library G...

Page 100: ...Configure Network on page 5 24 Configure Library Network Configure Library Network on page 5 50 Network configuration change Configure Network Configure Network on page 5 24 Configure Library Network Configure Library Network on page 5 50 Network configuration view Monitor Library Network Monitor Library on page 5 10 Configure Library Network Configure Library Network on page 5 50 Path Failover en...

Page 101: ...P Configure Library SNMP on page 5 56 Telnet Service Port activate Service Telnet Service Port Service Telnet Service Port on page 5 33 Not available with this interface Time elapsed since power ON Monitor Library Status Monitor Library on page 5 10 Monitor Library Library Status Monitor Library Library Status on page 5 37 Operator Control Panel access PIN enable disable Configure Set Access PIN C...

Page 102: ...tion and return to the previous menu screen 3 SELECT Lower right button Used to display a sub menu or force an accessor action 4 DOWN Lower left button Used to scroll downward through menu items a77ug254 3 4 1 2 Figure 5 1 2U Library Control Keys a77ug253 3 4 1 2 Figure 5 2 4U Library Control Keys 5 8 Dell PowerVault TL2000 Tape Library and TL4000 Tape Library User s Guide ...

Page 103: ...u item will appear 3 Use the UP 1 or DOWN 4 and SELECT 3 keys to scroll until you get to the area screen you wish to configure 4 Use the CANCEL 2 key if you wish to move backwards through the menu selections Operator Control Panel Menu Tree The Operator Control Panel Main menu is made up of the following items v Monitor v Control v Configure v Service The table below shows each Main menu item and ...

Page 104: ...s menu item displays current library information and settings Configure Service Control Monitor Library Drive Inventory Open I O Station Move Cartridges Magazines Re Inventory Drive Library Settings Network Save Restore Set Access PIN Set Date and Time Control Path Failover Library Verify Run Tests Service Drives a77ug050 Logical Libraries Display Contrast Telnet Service Port Figure 5 3 Operator C...

Page 105: ... Station Date Time Product ID Slots Empty a77ug051 Library Mode IP Stack Netmask Gateway IP Address DHCP OFF IPv4 IPv4 IPv6 DHCP ON Static IPv6 Address Prefix Length Ethernet DHCP OFF IPv6 Link Local IPv6 Address Assigned IPv6 Address Note This will display when Stateless Auto Config is enabled Stateless autoconfig Gateway Ethernet Figure 5 4 Monitor Library menu Chapter 5 Operations 5 11 ...

Page 106: ...e current library mode Random or Sequential Under Monitor Library Error Log you will have a list of errors logged by the library The errors will be displayed beginning with the most recent error Under Monitor Library Network are the following items v IP Stack the internet protocol currently being used by the library v DHCP Dynamic Host Configuration Protocol records whether DHCP is ON or OFF v IP ...

Page 107: ... Port A Status Drive Speed A Serial Number Hashed Address A WWNN Topology A Activity Vendor ID Product ID a77ug035 Port B Status Topology A Speed A Loop ID A Speed B Hashed Address B Speed A Loop ID A PID A PID B SCSI ID Encryption Fibre Channel Drive SAS Drive Fibre Channel Drive SAS Drive SCSI Drive Figure 5 5 Monitor Drive menu Chapter 5 Operations 5 13 ...

Page 108: ...der Identity and Drive n are the following items v Firmware Rev the current level of drive firmware v Vendor ID Dell v Product ID drive inquiry string v Serial Number the drive serial number v SCSI ID the unique identifier assigned to a SCSI drive v WWNN the fibre channel drive s World Wide Node Name v Topology the topology chosen for the fibre channel drive v Speed indicates the speed of the fibr...

Page 109: ...n be changed to storage slots if needed See Configuring I O Stations and Reserving Slots on page 5 65 Press SELECT to display all empty slots and cartridge serial numbers in the associated magazine Monitor Magazines Drive n Upper Right Upper Left Drive status Lower Left Lower Right Inventory a77ug036 Graphic of left magazine Graphic of right magazine Figure 5 6 Example of a 4U Monitor Inventory me...

Page 110: ...enu The Control Menu contains the following items v Open I O Station v Move Cartridges v Magazine v Re Inventory Control Open I O Station Use this menu item to open the I O Station Attention After closing the I O Station you must wait for the library to complete its inventory before proceeding with normal library operations Control Move Cartridges Use this menu item to move cartridges in the libra...

Page 111: ...ber of the cartridge v Dest Type the destination Drive I O station magazine v Dest the choices start with the choice made in the preceding item and then advances through all available choices Control Magazine Use this menu item to unlock the cartridge magazines Choose Left or Right to unlock the corresponding cartridge magazine s The magazines can now be removed from the library by gently pulling ...

Page 112: ... this menu item to initiate a scan of the cartridges currently in the library Note It may take up to five minutes to complete the library inventory Configure Menu The Configure Menu is used during the initial setup of your library and when changes need to be made to your library s configuration This menu contains the following items v Logical Libraries v Library Settings v Drive v Network v Set Ac...

Page 113: ...enever there is a hardware configuration change such as drives being swapped with different form factors i e HH to FH or FH to HH a library configuration change is needed Reconfiguring the library by reassigning the amount of logical libraries will clear this issue Figure 5 13 Configure Logical Libraries menu Chapter 5 Operations 5 19 ...

Page 114: ...toload Mode Loop Auto Clean Auto Clean Library Settings If 1 Logical Library If 2 or more Logical Libraries Autoload Loop Mode 1 2 Sequential Sequential Random Random a77ug056 Logical Lib Settings 3 4 I O Station s enabled Remove DCS No Host Label Length I O Station s enabled Host Label Length Figure 5 14 Configure Library menu 5 20 Dell PowerVault TL2000 Tape Library and TL4000 Tape Library User ...

Page 115: ...and to the drive In that case the next cartridge in sequence will be loaded into the drive If the Autoload Option if OFF sequential mode must be started by selecting the Move Cartridges option Control Move Cartridges to load the first cartridge or any cartridge into the drive Whatever cartridge is loaded into the drive that is where the sequence starts from For example if a cartridge from the fift...

Page 116: ... higher than 1 95 that chose to retain the DCS in their library a CLN cartridge must be present in that slot On libraries that don t have a DCS a storage slot must be reserved RSVD by reducing the active slot count by one A cleaning cartridge CLNxxxLx must be placed or moved to the reserved slot Auto Clean must be enabled Note Cleaning cartridges must be replaced after 50 cleanings The Web User In...

Page 117: ...faces refer to Host Interfaces on page 3 7 v Control Paths use this to enable the drive as a control path drive Each logical library must have a control path drive however all drives in a logical library can be designated as control path drives Configure Drive Interface Control Path Drive a77ug042 SCSI ID SAS drives do not require user configuration A Speed A Type A Address Mode A Loop ID Fibre Ch...

Page 118: ...eb User Interface or Stateless Autoconfig Operator Control Panel if Netmask Gateway IP Address Configure DHCP OFF IPv4 IPv4 IPv6 Network a77ug043 DHCP ON IP Stack Static IPv6 Address Prefix Length Ethernet DHCP OFF IPv6 Link Local IPv6 Address Assigned IPv6 Address Note This will display when Stateless Auto Config is enabled Stateless autoconfig Gateway Ethernet Figure 5 16 Configure Network menu ...

Page 119: ...Server 2 the second DNS server address Note If a host and domain name are entered instead of an address the IPv4 or IPv6 address will be resolved from the DNS using that name That address will be stored in the library rather than the name Therefore if the address changes the name or a new address will have to be entered Configure Set Access PIN Use this menu item to enable disable set or change th...

Page 120: ...cess PIN 6 After entering the final digit press the DOWN button and select one of the following v Save to apply your settings v Cancel to delete your settings Note In Figure 5 18 on page 5 27 menus with the pound sign are the only menus accessible when the Access PIN is enabled but entered incorrectly or before it is entered To gain access to all menus disable the Access PIN or enter the correct P...

Page 121: ...ettings Figure 5 18 Pound sign shows accessible menus when access PIN is enabled but before it is entered Configure Save Restore a77ug045 Restore All Restore Library Config Restore Passwords Save Library Config Figure 5 19 Configure Save Restore menu Chapter 5 Operations 5 27 ...

Page 122: ... installed in the library Important Restoring factory defaults will wipe out all the previous configuration data Factory defaults must be restored when the library drive is changed from a LTO half height to full height configuration in order for the library to correct the element addressing and drive numbering If a new drive is added to the library configuration a restore factory default is not re...

Page 123: ...ve 4 SCSI ID 8 SCSI Drives Drive 1 Loop ID 4 FC Drives Arbitrated Loop Drive 2 Loop ID 5 FC Drives Arbitrated Loop Control Path Drive Drive 1 only Partitions None Reserved Slots 2U 24 4U 48 IPv6 Stateless Autoconfig Enabled Note all settings at library firmware level 4 xx and greater In some cases such as Library Mode the entry of one option precludes any other options from being selected In such ...

Page 124: ... any service functions ensure the host is not performing any data writing or retrieval The Service Menu contains the following items v Library Verify an overall library diagnostic v Run Tests other library diagnostics v Service diagnostics and procedures for servicing the drive v Display Contrast setting the display from light to dark v Telnet Service Port Service Library Verify This is an overall...

Page 125: ...erify screen Service Run Tests The following library diagnostics are available in this menu v System Test this test exercises library components by moving customer data cartridges from slots to drives and back to slots No data is written or read from the customer tapes To run this test successfully the library must contain at least one data cartridge for every drive present in the library v Slot t...

Page 126: ...lank or scratch cartridge into the I O Station when requested 3 The test will execute If the test PASSES resume normal library operations If the test FAILS an error will be displayed Make note of the error then refer to Isolating Drive Sled Problems on page 7 9 4 Remove the cartridge from the I O Station if needed then close the I O Station 5 Press Cancel to exit the screen v Drive Power use this ...

Page 127: ...ences between the Menu description in this document and the web user interface menus on your library The following menus are available on the Web User Interface Table 5 5 Web User Interface Menus Monitor Library Library Identity Drives Identity Library Status Drives Status Inventory Manage Library Move Media Perform Inventory Release Magazine Configure Library General Logical Libraries Path Failov...

Page 128: ...nts Menu Item Description 2U 4U Service Tag This is the unique identification number assigned by the manufacturer X X Product ID This is the SCSI inquiry string of the library X X Currently Installed Library Firmware This is the current level of firmware installed on the library For information on updating your firmware refer to Service Library Upgrade Firmware on page 5 62 X X Bootcode Firmware R...

Page 129: ... this page The displayed information will vary depending on the library model and drive type SCSI SAS or Fibre Channel Table 5 7 lists all available elements on the Drive Identity page An X indicates that the element displays for the specified drive type Table 5 7 Drive Identity page elements Menu Item Description 2U Library 4U Library SCSI Fibre SAS SCSI Fibre SAS Vendor ID This identifies the ma...

Page 130: ...rive is compressing data this element displays Yes If not this element displays No X X X X X X Interface Type This identifies the drive host interface X X X X X X Node Name This is the Worldwide node Name assigned to a Fibre drive X X Worldwide ID This is the Worldwide ID assigned to a SAS drive Ports A and B X X Port A This provides information about Port A X X X X Port Name This is the name assi...

Page 131: ...cause of a serious problem X X Cartridge in Transport This identifies a cartridge that is currently being moved by the accessor None is displayed if no cartridge is being moved X X Number of Moves This is the number of times the accessor has moved a cartridge from Point A to Point B for example from a storage slot to a drive X X Total Power On Time This is the total amount of time that the library...

Page 132: ...ry 4U Library SCSI Fibre SAS SCSI Fibre SAS Status This is the current status of the drive A checkmark indicates that the drive is operating properly An exclamation point indicates that the drive is operating but has a problem An X indicates that the drive is not operational because of a serious problem X X X X X X Cartridge in Drive This is the serial number of the cartridge currently in the driv...

Page 133: ...tion to the host N Port ID X X Hashed SAS Address The Hashed SAS address is a value which is calculated from the WWID for use on the SAS interface X X Encryption Status This shows the status of any encryption that is enabled on the drive X X X X Encryption method This is the type of encryption that is enabled on the drive X X X X Key path This is the path used for transferring an encryption key Th...

Page 134: ...ypted densities means that the host can see a different density code for encrypted vs non encrypted tapes x72 enc as opposed to x52 non enc This feature masks this so the drive reports the primary density only Normally this is set to the drive default which is to show encr density Monitor Library Inventory This page provides detailed information about the tape inventory in the library A summary of...

Page 135: ...ary Time Drive Inventory Drive Status Label Source 1 Empty Magazine Inventory 8 9 10 11 4 5 6 7 IO Station 1 2 3 23 22 21 20 19 18 17 16 14 13 12 15 Refresh Figure 5 30 The 2U library Monitor Library Inventory page Chapter 5 Operations 5 41 ...

Page 136: ...es within the library The source and destination are selected and then the MOVE button in the center of the screen is clicked to activate the move Res a77ug099 Figure 5 31 The 4U library Monitor Library Inventory page 5 42 Dell PowerVault TL2000 Tape Library and TL4000 Tape Library User s Guide ...

Page 137: ...rform Inventory This page allows the library to be re scanned to determine the current media inventory Manage Library Release Magazine This page allows the user to release the right or left magazine from the library Note To manually release a magazine see Releasing the Magazines Manually on page 9 1 However this manual process should only be used if the magazine cannot be released using the Operat...

Page 138: ...the 2U library and 3 more storage slots to the 4U library When the I O Station is disabled removing or adding media to the library must be performed by releasing the left and or right magazine s X X Auto Clean Enabled Auto Clean defaults to Disabled For Auto Clean to function a cleaning cartridge CLNxxxLx must be resident in a reserved library slot and Auto Clean must be enabled turned on Note If ...

Page 139: ...ubmit One cartridge magazine cannot be assigned to two logical libraries If you partition a multi drive library each of the magazines must be assigned to a logical library on a magazine boundary The entire magazine must be part of one logical library only In a fully populated 4U library with four logical libraries resource assignments will be as follows v Logical Library 1 will contain Drive 1 and...

Page 140: ... 4U libraries with library firmware levels above 8 xx For library firmware levels below 8 xx the Path Failover feature is available for select LTO 4 tape drives and Path Failover is not supported for Half Height drives Library firmware levels higher than 8 xx support Path Failover on LTO 5 drives as well as LTO 4 Full Height drives For more information refer to the Dell PowerVault TL4000 Failover ...

Page 141: ...rts LTO4 encryption Prerequisites for Library Managed Encryption v SAS and Fibre Channel LTO Ultrium 4 Tape Drive Full Height or Half Height Note Fibre Channel is full height drive only v Ultrium 4 Tape Cartridge v Library firmware level 5 80 or higher v Drive firmware level 77BE or higher v Dell Encryption Key Manager application Setting or Changing a Drive s Method of Encryption 1 Enter your lib...

Page 142: ...pported v Internal Label Encrypt All Check your tape backup software application documentation to see if this feature is supported 10 A primary and secondary EKM server can be set for each logical library Each partition has its own Encryption and EKM settings Maintaining primary and secondary EKM servers is desired for maximum availability of encrypted backup and recovery These settings are requir...

Page 143: ...ry depending on the library model and drive type SCSI SAS or Fibre Channel Table 5 12 lists all available elements on this page An X indicates that the element displays for the specified drive type Table 5 12 Drive Identity page elements Menu Item Description 2U Library 4U Library SCSI Fibre SAS SCSI Fibre SAS SCSI ID For each SCSI drive click on the drop down list and select the number of the slo...

Page 144: ...does not power ON after committing changes Configure Library Network This page shows the current network configuration of the library and allows modification to the configuration When a change is requested a pop up box checks confirms the request 1 Click Network in the left navigation pane to display the Network page a77ug064 Figure 5 41 The Configure Library Drives page for a 2U library a77ug095 ...

Page 145: ...hanges made will not be retained 2 Select a Protocol Stack Choose IPv4 only IPv6 only or Dual Stack IPv4 IPv6 If you choose Dual Stack IPv4 IPv6 you must be prepared to enter both IPv4 and IPv6 IP addresses The sections below will gray out depending on the choices made here 3 Enter the Host Name 4 Enter the Domain Name 5 DNS Primary Enter the IP address of your primary DNS server 6 DNS Secondary E...

Page 146: ...tically set by the DHCP server b Enable Stateless Auto Config Stateless Auto config is ALWAYS on not defeatable c Static Address Enter the assigned IPv6 address The format of an IPv6 IP address is a 128 bit numeric address written as 8 groups of four numbers separated by colons d Prefix length The default prefix length is set to 64 but can be set to any length depending upon the address used e Gat...

Page 147: ...ncheck the checkbox es to allow Superuser or User login New Password The password must be a maximum of ten characters A Z a z 0 9 space hyphen period Repeat Password Enter the New Password again Support name The name of the individual within your company to contact for Web User Interface or library support Note Only one support person can be configured for the entire tape library The support perso...

Page 148: ...to the screen Configure Library Logs Traces This page allows service personnel to set the error log mode to Continuous or to Stop trace at first error It is recommended that you select Continuous for the Error Log Mode so that all information for logs and traces will be captured Click one of the following v Refresh to cancel the changes made to the screen v Submit to apply the changes made to the ...

Page 149: ...y warnings boxes The user can add an invalid email as long as the email address format is correct i e a xxx xxx SMTP Server Address IPv4 or IPv6 Enter the address of the email server of the individual you would like to receive the errors and or warnings This can be an IPv4 or IPv6 address or a host name and domain If a host name and domain is listed the IPv4 or IPv6 address will be resolved from t...

Page 150: ...Version The library offers three versions of the SNMP protocol v1 v2 and v3 Select a version for each Target IP Address f Community Name An SNMP community name is a text string that acts as a password to authenticate messages sent between the SNMP remote management application and the library Enter your preferred name or leave as public The Community Name is limited to 33 alpha numeric characters ...

Page 151: ...If a new drive is added to the library configuration a restore factory default is not required Service Library Menu Some Service Library functions will post a warning message stating that the library should be taken offline from the host before performing any Service functions It is up to the operator to ensure that it is taken offline at the host Before performing any service functions ensure the...

Page 152: ...ing the following v Log Type Error Trace Logs all the error messages Informational Trace Logs all the informational messages created as the library operates Warning Trace Logs all warning messages created by the library Warning messages will not stop a library s operation but does remind the user of issues that may become a problem Example Invalid Media Configuration Change Trace Logs any configur...

Page 153: ...ick Prev Next to index through the log entries The Next button will not be displayed if the log has more fewer entries than the of entries per page setting After clicking the Next button the Prev button will be displayed If the log entries fit on a single page the Prev Next buttons do not appear Service Library View Drive Logs This page allows the drive logs to be viewed after selecting the follow...

Page 154: ...iled to Tech Support for analysis if needed Note The dump may take as long as 20 minutes to complete The System Status portion of the screen shows Drive Dump in Progress with the number of KBs transferred Service Library Perform Diagnostics Note When running the System Test the library must contain at least the same number of data cartridges as there are drives in that library For example if your ...

Page 155: ...rt dell com to determine the availability of this feature Important Ensure that library firmware and drive firmware are up to date before running the Key Path Diagnostic Library firmware level must be greater than 6 xx See Verifying Updating Firmware on page 4 18 The key path diagnostics test provides the ability to perform diagnostics on the encryption key path Only drives that are set up for lib...

Page 156: ...or additional information Service Library Upgrade Firmware Note Library firmware and tape drive firmware are verified and released together When updating to the latest firmware verify that all installed components such as tape drive s and library are at the latest levels noted on the Support web site Mixing different levels of library and tape drive firmware is not supported and may cause unpredic...

Page 157: ...of the Web User Interface take the library OFFLINE This inactive mode can interfere with host based application software causing data loss Ensure that the library is idle before attempting to perform any remote operations that will take the library OFFLINE This page is used to perform a library reboot There is a default time delay when the Web User Interface page refreshes itself This time should ...

Page 158: ...ee Control Move Cartridges on page 5 16 or Manage Library Move Media on page 5 42 for more information If the library does not have an I O Station all slots are assigned to storage and you wish to import media you will need to release a magazine and insert the cartridges manually following these steps 1 From the OCP Main Menu select Control Magazine Choose the desired magazine to unlock remove 2 P...

Page 159: ...ibraries usually have 1 slot for an I O Station while 4U libraries have 3 slots assigned as an I O Station These slots can be configured as storage if needed To configure the I O Station using the Web User Interface follow these steps v Go to Configure Library General v To enable the I O Station place a check mark in the I O Station Enabled box If it is checked as enabled the first 3 physical slot...

Page 160: ...al library drive even if the reserved slot is not in that logical library Typically if the library contains multiple logical libraries the last logical library is chosen for the reserved slot containing the cleaning cartridge As with a library with a single logical library this slot is the last physical slot in the library top right magazine uppermost rear slot Note Configure the required number o...

Page 161: ...s can be identified by color Type Color Ultrium 5 Burgundy Ultrium 5 WORM Burgundy and Silvery gray Ultrium 4 Green Ultrium 4 WORM Green and Silvery gray Ultrium 3 Slate Blue Ultrium 3 WORM Slate Blue and Silvery gray Ultrium 2 Purple Ultrium 1 Black All generations contain 1 2 inch dual coat metal particle tape When processing tape in the cartridges Ultrium Tape Drives use a linear serpentine rec...

Page 162: ...o a leader pin 3 behind the door When the cartridge is inserted into the drive a threading mechanism pulls the pin and tape out of the cartridge across the drive head and onto a non removable take up reel The head can then read or write data from or to the tape The write protect switch 4 prevents data from being written to the tape cartridge For more information see Write Protect Switch on page 6 ...

Page 163: ...ray Data Security on WORM Media Certain built in security measures help ensure that the data written on a WORM cartridge does not become compromised for example v The format of an Ultrium 4 800 GB or Ultrium 3 400 GB WORM Tape Cartridge is unlike that of standard read write media This unique format prevents a drive that lacks WORM capable firmware from writing on a WORM tape cartridge v When the d...

Page 164: ...A volume serial number VOLSER that is human readable v A bar code that the library can read Note The IBM LTO Ultrium 5 Tape Drive does not require bar code labels but you may choose to use labels for tape cartridge identification purposes When read by a library s bar code reader the bar code identifies the cartridge s VOLSER to the library The bar code also tells the library whether the cartridge ...

Page 165: ...m reading the label Guidelines for Using Bar Code Labels Apply the following guidelines whenever using bar code labels v Do not reuse a label or reapply a used label over an existing label v Before you apply a new label remove the old label by slowly pulling it at a right angle to the cartridge case v Use peel clean labels that do not leave a residue after being removed If there is glue residue on...

Page 166: ... the tape If the switch is set to v The locked position solid red data cannot be written to the tape v The unlocked position black void data can be written to the tape If possible use your server s application software to write protect your cartridges rather than manually setting the write protect switch This allows the server s software to identify a cartridge that no longer contains current data...

Page 167: ...re that any service or contract personnel who perform archiving are properly trained in media handling procedures v Include media handling procedures as part of any services contract v Define and make personnel aware of data recovery procedures Ensure Proper Packaging v When shipping a cartridge use the original or better packaging v Always ship or store a cartridge in a jewel case v Use only a re...

Page 168: ...ditions that are described in Environmental and Shipping Specifications for Tape Cartridges on page 6 9 Perform a Thorough Inspection After purchasing a cartridge and before using it perform the following steps v Inspect the cartridge s packaging to determine potential rough handling v When inspecting a cartridge open only the cartridge door Do not open any other part of the cartridge case The upp...

Page 169: ... in the cartridge v Do not stack more than six cartridges v Do not degauss a cartridge that you intend to reuse Degaussing makes the tape unusable Environmental and Shipping Specifications for Tape Cartridges Before you use a tape cartridge acclimate it to the operating environment for 24 hours or the time necessary to prevent condensation in the drive the time will vary depending on the environme...

Page 170: ...r Operating Operational Storage1 Archival Storage2 Shipping Temperature 10 to 45 C 50 to 113 F 16 to 32 C 61 to 90 F 16 to 25 C 61 to 77 F 23 to 49 C 9 to 120 F Relative humidity non condensing 10 to 80 20 to 80 20 to 50 5 to 80 Maximum wet bulb temperature 26 C 79 F 26 C 79 F 26 C 79 F 26 C 79 F Note 1 The short term or operational storage environment is for storage durations of up to six months ...

Page 171: ...Library Verify to ensure that all library components are functioning properly before resuming normal library operations Table 7 1 Troubleshooting table Problem Solution INSTALLATION CONFIGURATION Unable to configure 3 logical libraries with 3 drives 2 half height drives and 1 full height drive installed The 2 half height drives must be in drive positions 1 and 2 the lowest drive positions in the l...

Page 172: ...r logs for entries that are related to encryption See Service Library View Logs on page 5 58 Service Library View Drive Logs on page 5 59 Chapter 8 Error Codes on page 8 1 and Drive Sense Data on page C 6 Connection problem with the Dell Encryption Key Manager EKM If you are using library managed encryption perform the Key Path Diagnostic see Service Library Key Path Diagnostics on page 5 61 if th...

Page 173: ...t a substantially different temperature or level of humidity than the library Refer to Provide Proper Acclimation and Environmental Conditions on page 6 8 v Any cartridge that is suspected of being defective or contaminated should NOT be reused in any drive Power Supply or Fan Issues Check the power supply or redundant power supply for failure and also check any power supply fans Replace any defec...

Page 174: ... eliminates the host and its software as a problem source 3 If the problem still exists contact technical support Cartridge can not be removed from storage slot See Removing Cartridges from Magazine Slots on page 9 1 MEDIA Cleaning or data cartridge incompatible with drive Ensure that you are using data and cleaning cartridges that are compatible with the drive and model of your library The librar...

Page 175: ...RVICE SPARES Drive Sled See Isolating Drive Sled Problems on page 7 9 Power Supply See System Status on page 2 6 and Isolating a Power Supply Problem on page 7 7 Library Controller Card See Isolating a Library Controller Card vs Accessor Enclosure Problem on page 7 10 Library Enclosure Service Spare See Isolating a Library Controller Card vs Accessor Enclosure Problem on page 7 10 ITDT Performance...

Page 176: ... Support Make sure that Fibre Channel Tape Support is enabled on the HBA if you are installing a library with a Fibre Channel drive v SCSI Cable Length Ensure that the maximum cable length is not over 25 meters 82 ft for a single device on the bus or 12 meters 40 ft for multiple devices Internal SCSI length within the library accounts for 2 ft v SCSI Termination Verify proper termination on both e...

Page 177: ...magazines prism integrity should be verified prior to exchanging a library component This situation can be noted by the ACTIVITY line on the Operator Panel posting Recovery Prism integrity verification can be done by releasing the magazines and inspecting the cell prisms Normal initialization or inventory time for a 2U library once the picker mechanism starts its operation should be approximately ...

Page 178: ...er supply 6 and at the electrical outlet then turn library power ON a For power supplies with LED s the Blue LED will be lit if AC power is good b If your power supply does not have LED s feel for air flowing out of the cooling fan grill on the rear of the library 4 AC is good if air is flowing from the cooling fan grill 3 If power appears to be missing a Plug the power cord into another electrica...

Page 179: ...has 05 level redundant power supplies the Green LED will be ON on both power supplies If both Green LEDs are not ON replace the failed power supply refer to Replacing a Power Supply on page 10 10 8 If the Green LED is not lit and it is the only one in the Library replace it refer to Replacing a Power Supply on page 10 10 Isolating Drive Sled Problems Prior to replacing a drive sled CRU verify that...

Page 180: ...C failed or library not connected to power source or Power Supply defect v LED flashing 1 flash per second normal operation v LED flashing slower than once per second normal operation v LED flashing faster than once per second LCC failed 3 With library power OFF loosen the two thumb screws which secure the controller card to the library enclosure and slide it out v Inspect the card for any broken ...

Page 181: ... the certificate or allow an exception depending on the internet browser you are using Even though with some browsers you will still receive a security certificate warning error each time you log in to the Web User Interface your transmission is secure SSL is enabled when the URL to your library begins with https and some browsers will show a lock 4 If the ethernet connection is a direct connectio...

Page 182: ...l the required or latest available Operating System files and or updates dll s PTF s etc have been installed and applied Identifying a Suspect Cartridge The amber Attention LED will be lit on the front panel of the library when there has been a failure that indicates a piece of media is bad marginal or invalid It will be cleared when all invalid cartridges have been exported from the library Note ...

Page 183: ...lowing format yy mm dd hh mm ss HH Where v yy is the year v mm is the month v dd is the current day v hh is hours v mm is minutes v ss is seconds v HH is 1 100 second The time stamp is set to zero at system start A description of each error code and possible solution is provided in Error Codes on page 8 2 Preparing to Resolve an Error Code 1 Record the error information that is displayed on the Op...

Page 184: ...able Programmable Read Only Memory Error no response from EEPROM located on accessor controller 83 Accessor controller generic problem 84 Setting of gripper motor parameters failed 85 Setting of slider motor parameters failed 86 Setting of elevator motor parameters failed 87 Setting of rotation motor parameters failed 88 Setting of sled motor parameters failed 89 Gripper blocked 1 If this is the f...

Page 185: ...xpected range 95 Elevator outside range Elevator has reached a position beyond the expected range 96 Rotation outside range Rotation has reached a position beyond the expected range 97 Sled outside range Sled has reached a position beyond the expected range 98 Cartridge present sensor not found 99 Slider home sensor not found 9A Rotation home sensor not found 9B Sled position sensor fiducial senso...

Page 186: ...or Web UI verify that your file extension is dbb If the extension is correct your file may have been corrupted during the save Reconfigure then save your library configuration Note Configuration files saved with one version of library firmware may not be compatible with other versions of firmware It is recommended to save a configuration file each time the library firmware is upgraded Restore the ...

Page 187: ... library 2 Insert magazine in library If error recurs contact technical support F0 Drive Over temperature Condition The subcode indicates which drive is affected Example Subcode 02 drive 2 1 Check the ambient temperature conditions and check all fans 2 Refer to Isolating Drive Sled Problems on page 7 9 Chapter 8 Error Codes 8 5 ...

Page 188: ...drive is affected Example F3 xy Where x refers to the hardware drive error code single character display and Y refers to the drive position in the library x values v 4 firmware or hardware error v 5 hardware error v 6 hardware or media error v A recoverable hardware error F4 Drive Load Timeout Drive has run in a timeout while loading a tape The subcode indicates which drive is affected Example Sub...

Page 189: ...ode Description ROBOTICS 00 No sub error code 01 Mechanical initialization failure 02 Connection to slave robotic failed 03 Error motor initialization 04 Error during gripper close 05 Error slider home positioning 06 Error elevator home movement 07 Error during sled movement to rotation position 08 Error during rotation initialization get range failed 09 Error elevator init 0A Error during rotatio...

Page 190: ...tion movement 28 Error Extra inventory scan 29 Error during closing gripper 2A Error slider preposition movement 2B Error during opening gripper 2C Error during sled movement up to sensor 2D Error slider preposition backwards movement 30 Error slot preposition 31 Error during sled movement in FLMoveRotation function 32 Command sending to robotic failed 33 Error during elevator movement in FLMoveRo...

Page 191: ...uring rotation to drive position 55 Error during elevator movement in drive position 56 Error during sled movement to rotation position 57 Error during rotation to end position 60 Move from to drive failed 61 Error during first slider movement 62 Error during first gripper movement 63 Error during second slider movement 64 Error during second gripper movement get range failed 65 Error during third...

Page 192: ...iled 88 Error accessing slot status 90 Accessor load not reached Cartridge Present sensor 91 No activity after Load command 92 Timeout while loading tape 93 No activity after load command 94 Timeout drive Unload 95 Drive terminated unsuccessfully 96 Tape not ejected at robot unload 97 Slot not free at robot unload 98 Cartridge not seated in load phase Warning Events Warning events described in thi...

Page 193: ...5 SCSI media removal prevented by drive 46 SCSI media removal prevented by library 47 SCSI flash image does not fit personality Check the version of firmware used for the upgrade 48 SCSI drive type not supported in this library Check whether a version of firmware is available which supports this drive type For a list of supported drives refer to Ultrium Tape Drives on page 1 8 49 SCSI incompatible...

Page 194: ...ge and replace if necessary 3 Refer to Configuring I O Stations and Reserving Slots on page 5 65 62 Cleaning cartridge expired Replace cleaning cartridge 63 Invalid cartridge Drive has rejected the data cartridge as invalid 1 Verify that the correct cartridge is being used Refer to Cartridge Compatibility on page 6 2 2 Refer to Identifying a Suspect Cartridge on page 7 12 64 Invalid cleaning cartr...

Page 195: ...an has failed Redundancy may be at risk The subcode indicates which power supply fan is affected Subcode 01 1st PS fan from bottom Subcode 02 2nd PS fan from bottom DF Power Good signal changed from 2 to 1 Power Supplies F6 No drive installed A drive has never been installed Install at least one drive Chapter 8 Error Codes 8 13 ...

Page 196: ...8 14 Dell PowerVault TL2000 Tape Library and TL4000 Tape Library User s Guide ...

Page 197: ...a cartridge will not eject from the drive 2 Use the magazine removal process to release the magazine and remove it from the library To use the Operator Control Panel see Control Magazine on page 5 17 To use the Web User Interface see Manage Library Release Magazine on page 5 43 If neither one of these processes works see Releasing the Magazines Manually Releasing the Magazines Manually If the dire...

Page 198: ...gazine at the back of the library While holding the paper clip have a second person pull the magazine out of the front of the unit DO NOT push the paper clip in more than 1 2 inch a77ug024 Figure 9 2 Access holes for the right magazine 9 2 Dell PowerVault TL2000 Tape Library and TL4000 Tape Library User s Guide ...

Page 199: ...were unable to manually remove the magazines and drive contact technical support for further instructions a77ug023 Figure 9 3 Left magazine pulled out of the 2U library a77ug102 Figure 9 4 Left Magazines pulled out of the 4U Library Chapter 9 Service Procedures 9 3 ...

Page 200: ...ons v Retrieves firmware dumps from tape drives and libraries v Performs a firmware update on tape drives or libraries v Tests the performance of the environment by completely writing a cartridge and measuring performance v Retrieves and displays cartridge information v Verifies the encryption environment v Does not require special device drivers v Is available for most major platforms Note Before...

Page 201: ... and equipment If a ground strap is not available touch a metal surface to discharge any static electricity in your body v Keep the work area free of no conducting materials such as ordinary plastic assembly aids and foam packing v Make sure you are always properly grounded when touching a static sensitive component or assembly v Avoid touching pins leads or circuitry v Use conductive field servic...

Page 202: ...in its original packaging materials or equivalent packaging for moving or shipping Table 10 1 Shipping Lock Shipping Label 1 Shipping Lock 2 Shipping Label 1 2 a77ug019 Figure 10 2 Shipping Lock and Label Storage Location 1 2 a77ug018 Figure 10 3 Shipping Lock and Label 10 2 Dell PowerVault TL2000 Tape Library and TL4000 Tape Library User s Guide ...

Page 203: ...d without ElectroStatic Discharge ESD springs see Figure 10 4 ship group Drive sled without ESD springs Packet of conductive tape to be applied to the drive sled for ESD protection v Drive sled with ESD springs see Figure 10 5 on page 10 4 ship group Drive sled with ESD springs a77ug008 Figure 10 4 Library drive sled without ElectroStatic Discharge ESD springs SCSI sled shown Chapter 10 Check Adju...

Page 204: ...nd or installing a SCSI drive sled Fibre Channel and SAS drive sleds are hot pluggable and may be removed and installed while the library is powered ON 3 If necessary unload the tape cartridge from the drive to be removed v Using the Operator Control Panel Control Move Cartridges v Using the Web User Interface Manage Library Move Media 4 Remove the host interface cable 1 2 or 4 in Figure 10 6 on p...

Page 205: ...ed for instructions If you are not replacing the tape drive sled immediately you will need to perform the following procedures a Install a drive cover plate to protect your library from dust and debris b To remove the Missing drive indicators on the Operator Control Panel Attention LED and the Web User Interface System Status screen modify or resubmit logical library setting Operator Control Panel...

Page 206: ...bent contacts 2 Extend the black pull out tab 8 in Figure 10 6 on page 10 5 located underneath the library near the lower right corner of the drive sled 3 Slowly insert the new drive sled into the drive slot while supporting the bottom of the drive sled see Figure 10 8 on page 10 7 Ensure that the black tab remains extended 8 in Figure 10 6 on page 10 5 Important Push in on the drive sled handle 1...

Page 207: ...f you are installing a drive sled without ESD springs see Figure 10 4 on page 10 3 apply conductive tape to the sled as shown in Figure 10 9 on page 10 8 a77ug028 Figure 10 8 Pushing the drive sled into the library drive sled without ESD springs shown Chapter 10 Check Adjust Remove and Replace 10 7 ...

Page 208: ...y This test requires the use of a scratch blank cartridge v If the test passes When prompted by the Operator Control Panel display and the I O Station opens remove the cartridge used in the test Close the I O Station by pushing it back into the library Press Cancel to exit the Library Verify screen Resume normal library operations v If the test fails an error code will be displayed Make note of th...

Page 209: ... the drive slot while supporting the bottom of the drive sled see Figure 10 8 on page 10 7 If necessary ensure that the black tab remains extended 8 in Figure 10 6 on page 10 5 Push in on the drive sled handle 10 in Figure 10 6 on page 10 5 while supporting the bottom of the drive sled until it is properly seated Important Damage to the connector pins may occur if this procedure is not followed 3 ...

Page 210: ...Logical Libraries does not correctly refresh update the DTE addresses execute step 3 and step 4 Otherwise proceed to Step 5 4 Reconfigure your library using the OCP to configure your network settings then using the Web UI to complete your library configuration 5 Save your library configuration to your host computer or to a USB device 6 Update your Library Configuration Form with the new drive and ...

Page 211: ...contained within the electronics of the Library Enclosure When the Library Controller Card is replaced the new replacement card should contain zeros 0 s in key VPD locations Upon detection of these zeros the library will automatically attempt to write VPD data to the new Library Controller Card from the backup copy of the VPD contained in the Library Enclosure In rare occurrences the new Library C...

Page 212: ...e power supply or supplies at the back of the library then to the electrical source 9 Power ON the library using the power button on the front panel 10 After power is restored to the Library Controller Card the library will automatically restore the VPD on the new Library Controller Card from the Library Enclosure If a VPD Selection message is displayed in the Operator Control Panel see the Read M...

Page 213: ...safety agency requirements These unused parts will be removed from the replacement library enclosure and returned to Dell in the defective library The old parts currently in your defective library will be removed and installed into the replacement library enclosure Note To reduce the risk of personal injury or damage to equipment v observe local health and safety requirements and guidelines for ma...

Page 214: ...e without foot pads may damage your library or cause it not to function properly v Rack Mount temporary placement of the foot pads v Desktop permanent placement of the foot pads a For a rack mounted library 1 Lift the replacement library enclosure slightly above the work surface have another person place a foot pad under each corner of the library and on each side of the library halfway between th...

Page 215: ...y enclosure by pressing each foot into one of the six areas 1 as shown in Figure 10 13 3 Carefully return the library to an upright position 4 Remove the shipping lock from the top of the replacement library enclosure see Figure 10 14 on page 10 16 1 a77ug085 Figure 10 13 Foot pads installed on the bottom of the library enclosure Chapter 10 Check Adjust Remove and Replace 10 15 ...

Page 216: ...tall the drives from the defective library into the same positions in the replacement library enclosure in order to maintain your current library configuration a77ug195 Figure 10 14 Removing the shipping label and lock from the top of the library and storing on the rear panel 1 2 a77ug019 Figure 10 15 Library shipping lock and label storage location on the real panel of the library 10 16 Dell Powe...

Page 217: ...Ensure that the black pull out tab remains extended when inserting a drive sled in the lowest drive position in the library Important Damage to the connector pins may occur if this procedure is not followed f Place each tape drive into the replacement library enclosure in the same drive slot as it was positioned in the defective library v While supporting the drive assembly align the drive sled wi...

Page 218: ...erform Library Verify 2 Power Off and insert LCC from old library ok b The system will initialize completely c After confirming the pop up you should be able to use the interfaces d Run the Library Verify test Operator Control Panel Service Library Verify This diagnostic requires a blank or scratch data cartridge 2 Power OFF the replacement library enclosure 3 You must power down remove the CRU LC...

Page 219: ... captive thumbscrews on the power supply 2 Pull on two of the thumbscrews on opposite sides of the power supply and pull the unit away from the rear panel of the library 3 Grasp the top and bottom edges of the power supply and remove it from the library b Install the power supply removed from the replacement library enclosure in the defective library to return to Dell To install a power supply 1 W...

Page 220: ...entitled VPD Selection on the Operator Control Panel The library will need your input to determine which copy of VPD to write to the replacement library enclosure If you are replacing both the Library enclosure and the Library Controller Card transfer VPD after installing one part before installing the other If the message VPD Selection is displayed at the Operator Control Panel carefully highligh...

Page 221: ...ped into the new replacement library enclosure which will have to be ordered 2 Plug one end of the power cord removed earlier from the defective library into the rear panel of the replacement library enclosure and plug the other end into a power source 3 Power ON the replacement library enclosure a If power ON is successful 1 The Ready Activity LED 1 will turn ON indicating that all components are...

Page 222: ...on LED amber 2 Clean Drive LED amber 4 Error LED amber Swapping Cartridge Magazines 1 Manually release and remove all magazines from the defective library and from the replacement library enclosure To release and remove a cartridge magazine a Find the access holes for the right and left magazines see Figure 10 21 on page 10 23 and Figure 10 22 on page 10 24 1 2 3 4 a77ug258 Figure 10 20 Library fr...

Page 223: ...a77ug025 Figure 10 21 Access hole for the left magazine facing rear of library Chapter 10 Check Adjust Remove and Replace 10 23 ...

Page 224: ...ing the paper clip have a second person pull the magazine out from the front of the unit Note To prevent dropping the magazine support both ends of the magazine before it clears the front edge of the library a77ug024 Figure 10 22 Access hole for the right magazine facing rear of library 10 24 Dell PowerVault TL2000 Tape Library and TL4000 Tape Library User s Guide ...

Page 225: ...y is not successful 1 The Error LED 4 in Figure 10 20 on page 10 22 will turn ON 2 Power OFF the enclosure 3 Contact Technical Support for further instructions Installing the Replacement Library Enclosure Refer to the appropriate procedure in this section rack or desktop for installing the replacement library enclosure Note If you are shipping the replacement library enclosure to a remote location...

Page 226: ...hor the replacement library enclosure to the rack 4 Proceed to Completing the Installation of the Replacement Library Enclosure on page 10 27 a77ug252 Figure 10 24 Mounting brackets and anchors for securing the library in a rack one bracket and anchor on each side of the library Figure 10 25 Front view of rack showing screw placement 10 26 Dell PowerVault TL2000 Tape Library and TL4000 Tape Librar...

Page 227: ... This diagnostic requires a blank or scratch data cartridge 5 Proceed to Returning the Defective Library Enclosure Returning the Defective Library Enclosure 1 Remove the shipping label 2 in Figure 10 15 on page 10 16 and lock 1 from the rear panel of the defective library place the lock in the slot located in the top center of the library and secure with the shipping lock label This will secure th...

Page 228: ...10 28 Dell PowerVault TL2000 Tape Library and TL4000 Tape Library User s Guide ...

Page 229: ...Elements STE 4096 0x1000 4139 0x102B 2U Library I O Slot Storage Slots and Drive Slot Element Addresses and Physical Locations For an overview of library partitioning and element addressing see Library Partitioning and Element Addressing on page A 3 The following table contains the physical location and SCSI element address decimal and hexadecimal of the I O slot storage slots and drive slot in th...

Page 230: ...ibrary Partitioning and Element Addressing on page A 3 The following table contains the physical location Slot x and SCSI element address in decimal 4xxx and in hexadecimal 0x10xx of the I O slots storage slots and drive slots in the 4U library containing only two drive sleds In older 4U libraries where the Dedicated Cleaning Slot DCS is in a fixed location slot 9 and elected to be retained as a D...

Page 231: ...h the new library firmware and half high drive integration Now it is possible to configure 1 2 3 or 4 partitions in the 4U library Additionally the 2U library can now be configured into one or two partitions Each library must contain at least one drive per logical library partition In a partitioned library the Operator Control Panel OCP only reports the status of logical library 1 in the main menu...

Page 232: ...drive positions and it will contain all four magazines When configured with one logical partition the Element Address assignments will be as follows v DTE assignments will be as shown in Figure A 1 v STE assignments will be as shown in Figure A 4 on page A 6 Configuration of a 2 Partition System A two partition system must have a minimum of two drives but may have three or four drives Partition 1 ...

Page 233: ... with four logical partitions the Element Address assignments will be as follows DTE assignments will be as shown in Figure A 4 on page A 6 STE assignments v Logical Library 1 Slot 1 through slot 9 4096 x1000 through 4104 0x1008 v Logical Library 2 Slot 10 through slot 21 4096 x1000 through 4107 0x100B v Logical Library 3 Slot 22 through slot 33 4096 x1000 through 4107 0x100B a77ug162 Drive 3 256 ...

Page 234: ...so temporarily removed drives need to have their addresses preserved to not confuse the attached host and host application Generally only drives which are currently physically available or temporarily removed are reported Empty unused slots located at the bottom or the top should not be reported with an exception in case of a removed condition A drive slot which does not contain a drive and has a ...

Page 235: ...ng Updating the Logical Library configuration will also update the drive element addressing and drive numbering Replacing LTO half height drives with full height drives may require you to execute Restore Factory Defaults to correctly update the drive element addressing and drive numbering See Configure Library Save Restore Configuration on page 5 56 Appendix A SCSI Element Types SCSI Addresses and...

Page 236: ...A 8 Dell PowerVault TL2000 Tape Library and TL4000 Tape Library User s Guide ...

Page 237: ...ock MIB is written to minimize impact to the SNMP monitoring station At the time of this writing the TapeAlert flags in this appendix correctly represent TapeAlerts that will be sent The MIB file should not be taken to mean that all traps that are defined in the MIB refer to Appendix F SNMP Status MIB Variables and Traps on page F 1 will be sent by the library or that they will be sent in the futu...

Page 238: ...ibrary I O Station C There is a mechanical problem with the library media I O Station 19d Library Security W Library security has been compromised The door was opened then closed during operation 24d Library Inventory C The library has detected an inconsistency in its inventory v Redo the library inventory to correct inconsistency v Restart the operation Check the applications users manual or the ...

Page 239: ... data grade tape 9 Write protect Set when the tape drive detects that the tape cartridge is write protected Ensure that the cartridge s write protect switch is set so that the tape drive can write data to the tape see Write Protect Switch on page 6 6 10 No removal Set when the tape drive receives an UNLOAD command after the server prevented the tape cartridge from being removed Refer to the docume...

Page 240: ... media Set when a failure occurs that requires you to unload the cartridge from the drive Unload the tape cartridge then reinsert it and restart the operation 34 Download fail Set when an FMR image is unsuccessfully downloaded to the tape drive through the host interface Ensure that it is the correct FMR image Download the FMR image again 37 Drive voltage Set when the drive detects that the extern...

Page 241: ...on can prevent the tape from being ejected The tape may actually be stuck in the drive 1 Unload the cartridge from the drive using the Operator Control Panel Control Move Cartridge or the Web User Interface Manage Library Move Media 2 Cycle drive power using the Operator Control Panel Service Service Drive Power or the Web User Interface Configure Library Drives 3 Try unloading the cartridge from ...

Page 242: ...B 6 Dell PowerVault TL2000 Tape Library and TL4000 Tape Library User s Guide ...

Page 243: ...sociated with the reported Sense Keys A sense key of 00h no sense has no ASC ASCQ associated with it A few ASC ASCQs can be associated with more than one sense key The sense keys that can give a particular ASC ASCQ are indicated within the Sense Key column ASC ASCQs that can indicate an abnormal element state as part of element descriptor Table C 1 Library Sense Keys ASC and ASCQ Sense Key ASC ASC...

Page 244: ...nd ASCQ continued Sense Key ASC ASCQ Description Medium Error 03 30h 00h Incompatible media installed 30h 03h Cleaning tape installed 30h 07h Cleaning failure C 2 Dell PowerVault TL2000 Tape Library and TL4000 Tape Library User s Guide ...

Page 245: ...r block 81h 8Fh Cannot find slider block 81h 90h Cannot find elevator block 81h 91h Cannot find rotation block 81h 92h Cannot find sled block 81h 93h Gripper outside range 81h 94h Slider outside range 81h 95h Elevator outside range 81h 96h Rotation outside range 81h 97h Sled outside range 81h 98h No cartridge present sensor found 81h 99h No slider home sensor found 81h 9Ah No rotation home sensor ...

Page 246: ...80h C6h Ping command did not reach target 80h C7h Cannot upgrade from USB 80h D0h ROM error 80h D1h RAM error 80h D2h NVRAM error 80h D3h CTC error 80h D4h UART error 80h D5h Display error 80h D6h Memory error 80h D7h Fatal system error 80h D8h dBase error 80h D9h No SCSI IC detected 80h DAh Different bar code labels 80h DBh External cooling fan failure 80h DCh Internal I2C bus error 80h DFh Power...

Page 247: ...t empty 3Bh 11h Medium magazine not accessible 3Bh 81h Cartridge of other partition 3Bh A0h Medium transfer element full 53h 02h Library media removal prevented state set 53h 03h Drive media removal prevented state set 44h 80h Bad status library controller 44h 81h Source not ready 44h 82h Destination not ready 44h 83h Cannot make reservation 44h 84h Wrong drive type 44h 85h Invalid slave robotic c...

Page 248: ...e Bit Address or Name 7 6 5 4 3 2 1 0 0 Address valid When set to 1 the info byte field contains a valid logical block address Error Code 1 Segment Number 0 2 Filemark EOM end of medium ILI Incorrect length indicator Reserved Sense Key Description 0 No sense 1 Recovered error 2 Not ready 3 Media error 4 Hardware error 5 Illegal request 6 Unit attention 7 Data protect 8 Blank Check 9 Reserved A Res...

Page 249: ... unit not ready auxiliary memory not accessible 04 12 Logical unit not ready offline 08 01 Logical unit communication failure 09 00 Track following error servo 0C 00 Write Error A Write operation has failed This is probably due to bad media but may be hardware related 11 00 Unrecovered Read Error A Read operation failed This is probably due to bad media but may be hardware related 11 12 Auxiliary ...

Page 250: ... cleaning cartridge 30 05 Cannot write medium incompatible format 30 07 Cleaning Failure A cleaning operation was attempted but could not be completed for some reason 30 0C Data Protect WORM overwrite attempted The drive rejected a write operation because it would have resulted in an overwrite Overwrite is not allowed on WORM media 30 0D Medium Error WORM integrity check The drive rejected a Read ...

Page 251: ...e point at which to append data was unreadable 51 00 Erase failure An Erase command failed to erase the required area on the media 52 00 Cartridge fault A command could not be completed due to a fault in the tape cartridge 53 00 Media Load Eject Failed Sense Key 03 An attempt to load or eject the cartridge failed due to a problem with the cartridge 53 00 Media Load Eject Failed Sense Key 04 An att...

Page 252: ...n Key Service Not Available EE 10 Encryption Key Required EE 20 Encryption Key Count Exceeded EE 21 Encryption Key Alias Exceeded EE 22 Encryption Key Reserved EE 23 Encryption Key Conflict EE 24 Encryption Key Method Change EE 25 Encryption Key Format Not Supported EE 26 Encryption Unauthorized Request dAK EE 27 Encryption Unauthorized Request dSK EE 28 Encryption Unauthorized Request eAK EE 29 E...

Page 253: ...3 Encryption Key Translate EF 1A Encryption Key Optional EF C0 Encryption No Operation 26 10 Encryption Data Decryption Key Fail Limit 2A 13 Encryption Data Encryption Key Instance Counter Has Changed 74 00 Security Error 74 01 Encryption Unable to Decrypt Data 74 02 Encryption Unencrypted Data Encountered While Decrypting 74 03 Encryption Incorrect Data Encryption Key 74 04 Encryption Cryptograph...

Page 254: ...SI address i e byte 39 byte 34 40 Tape Directory Valid Reserved Reserved Reserved Reserved Relative Tgt Port Reporting Sense 0 Reserved 1 Relative Tgt Port 1 Port 0 2 Relative Tgt Port 2 Port 1 3 Relative Tgt Port 3 Library Port 41 Host Command SCSI Opcode 42 Density Type 0 No media present 1 Gen1 384 track 2 Gen2 512 track 3 Gen3 704 track Media Type Vendor Reserved 43 Volume Label Cartridge Type...

Page 255: ...Marks command completed in the early warning area Spacing into BOM also causes this flag to be set It is also set on an attempt to read or space past EOD or if an attempt is made to space into Beginning of Media 5 The Illegal Length Indicator ILI flag Byte 2 bit 5 is set if a Read or Verify ended because a block was read from tape that did not have the block length requested in the command 6 The I...

Page 256: ...elative LPOS fields Bytes 30 33 reports the current physical position on the tape 13 SCSI Address field Byte 34 reports the SCSI Bus Address for the drive Values returned range from 00h to 0Fh 14 This field Byte 35 contains the frame and drive number passed across the RS 422 serial interface C 14 Dell PowerVault TL2000 Tape Library and TL4000 Tape Library User s Guide ...

Page 257: ...each device at the given nexus 4 Type cat proc scsi scsi again to verify that all devices are now listed The output will look similar to the following Attached devices Host scsi0 Channel 00 Id 01 Lun 00 Vendor IBM Model ULT3580 HH3 Rev 88M3 Type Sequential Access ANSI SCSI revision 03 Attached devices Host scsi0 Channel 00 Id 02 Lun 01 Vendor IBM Model 3573 TL Rev 7 10 Type Medium Changer ANSI SCS...

Page 258: ...rd 2 4 9 e 38 img bak mkinitrd f v boot initrd 2 4 9 e 38 img 2 4 9 e 38 This should give some output then go to a new prompt If it gives any errors check the syntax you put into etc modules conf or contact someone knowledgeable with Linux 5 If successful the server WILL need to be rebooted Once it comes back up check proc scsi scsi again cat proc scsi scsi Attached devices Host scsi0 Channel 00 I...

Page 259: ...storage adapters command Typical output with both the tape drive and loader being recognized 0x08 V321 A3 Adaptec SCSI Card 39160 3960D Ultra160 SCSI slot 201 0x16 V321 A3 D5 1 DELL PV 124T 0031 0x15 V321 A3 D5 0 IBM ULT3580 TD3 5BG2 0x09 V321 A4 Adaptec SCSI Card 39160 3960D Ultra160 SCSI slot 202 Netware may display unbound device meaning a driver is not bound to the loader unless a driver from ...

Page 260: ...D 4 Dell PowerVault TL2000 Tape Library and TL4000 Tape Library User s Guide ...

Page 261: ...rt as the WinINet API is updated with the installation of Internet Explorer 7 Third party browsers such as Firefox also use the WinINet API either directly or indirectly so an upgrade to IE7 will be recommended for all users As multiple IPv6 addresses can be associated with one physical interface Windows 2003 and XP use an interface number associated with each link local IPv6 address that must be ...

Page 262: ...r can change with a reboot of the Windows host Windows 2008 Vista Windows 2008 and Vista natively support IPv6 Also interface numbers have been removed from these versions of Windows All that is needed to browse to an address would be to add brackets around the IPv6 address Thus if the TL2000 4000 IPv6 address is fe80 1234 5678 abc enter http fe80 1234 5678 abc into the browser window This is appl...

Page 263: ...5 Drive has requested a clean Drive Error 6 Drive has reported an error Loader Retries Excessive 7 Library has reported excessive load retries Loader OK 8 Library has resumed normal operations Account Password Change 9 Account password in the library has changed Note Trap ID 9 requires library firmware level 8 0 or greater and the latest SNMP MIB file Configuration Change 10 Library or drive confi...

Page 264: ...F 2 Dell PowerVault TL2000 Tape Library and TL4000 Tape Library User s Guide ...

Page 265: ...F Sequential ON OFF Autoload ON OFF Loop ON OFF Random ON OFF Sequential ON OFF Autoload ON OFF Loop ON OFF Random ON OFF Sequential ON OFF Autoload ON OFF Loop ON OFF Random ON OFF Sequential ON OFF Autoload ON OFF Loop ON OFF Magazine Assignment h Upper Left h Lower Left h Upper Right h Lower Right h Upper Left h Lower Left h Upper Right h Lower Right h Upper Left h Lower Left h Upper Right h Lo...

Page 266: ...peed Port type Loop ID Logical Library Position Speed Port type Loop ID Logical Library Position Speed Port type Loop ID Logical Library Position Speed Port type Loop ID SAS Drive settings Logical Library Position ID Logical Library Position ID Logical Library Position ID Logical Library Position ID SCSI Drive settings Logical Library Position ID Logical Library Position ID Logical Library Positio...

Page 267: ... combinations to perform operations and initiate many menu actions that can also be done through mouse actions You can navigate the HTML version of the Dell PowerVault TL2000 Tape Library and TL4000 Tape Library User s Guide help system from the keyboard by using the following key combinations v To traverse to the next link button or topic press Tab inside a frame page v To move to the previous to...

Page 268: ...H 2 Dell PowerVault TL2000 Tape Library and TL4000 Tape Library User s Guide ...

Page 269: ...s including parity check that consists of control characters and graphic characters assigning a device The establishing of the relationship of a device to a running task process job or program assignment The naming of a specific device to perform a function asynchronous Pertaining to two or more processes that do not depend upon the occurrence of specific events such as common timing signals atten...

Page 270: ...ath drive A drive that communicates messages from the host computer to the library in which the drive is installed CP Circuit protector ctrl Control CU Control unit D danger notice A word to call attention to possible lethal harm to people Contrast with attention and caution data Any representations such as characters or analog quantities to which meaning is or might be assigned data buffer The st...

Page 271: ...ror FC Feature code FCC Federal communications commission fiducial A target used for teaching a physical location to a robot field replaceable unit FRU An assembly that is replaced in its entirety when any one of its components fails file A named set of records stored or processed as a unit Also referred to as a dataset file protection The processes and procedures established in an information sys...

Page 272: ...igure initial microprogram load IML The action of loading a microprogram from an external storage to writable control storage initiator The component that executes a command The initiator can be the host system or the tape control unit INST Installation interface A shared boundary An interface might be a hardware component to link two devices or it might be a portion of storage or registers access...

Page 273: ...dressable 3 To design write and test one or more micro instructions 4 See also microprogram microdiagnostic routine A program that runs under the control of a supervisor usually to identify field replaceable units microdiagnostic utility A program that is run by the customer engineer to test the machine microinstruction A basic or elementary machine instruction microprogram A group of microinstruc...

Page 274: ...nstall the rack mounted version of the library RAM Random access memory Random access memory A storage device into which data is entered and from which data is retrieved in a nonsequential manner RAS Reliability availability and serviceability record A collection of related data or words treated as a unit recording density The number of bits in a single linear track measured per unit of length of ...

Page 275: ...us and supports data rates of 80 or 160 MBps v Ultra160 SCSI Uses a 16 bit bus and supports data rates of 80 or 160 MBps SNMP Simple Network Management Protocol a standard TCP IP protocol to send alerts about conditions such as need for operator intervention over a TCP IP LAN network to an SNMP monitoring station SNS Sense special feature A feature that can be ordered to enhance the capability sto...

Page 276: ...e drive and information required for manufacturing RAS and engineering W word A character string that is convenient for some purpose to consider as an entity World Wide Node Name WWNN In a fibre channel connected library the Drive ID as listed in the Web User Interface Write Write command WT world trade X XR External register XRA External register address register I 8 Dell PowerVault TL2000 Tape L...

Page 277: ...ll 7 12 Drive channel calibration 1 10 power management 1 10 speed matching 1 10 drive configuration 5 49 Drive Density 5 38 Drive Diagnostics 5 31 5 60 drive dump saving to host 5 60 drive firmware current version 5 35 drive interface 5 23 Drive Log 5 59 drive serial number 5 35 drive sled description 1 8 drive status 5 38 drive clean 5 57 E EC 5 14 ED 5 14 EKM 4 22 EKM Server Setting 4 22 elemen...

Page 278: ...ning your 4U library 5 45 path failover 4 21 5 29 physical specifications 1 11 power button 1 1 2 4 power connector 1 3 power management 1 10 power ON display 2 2 power source 4 1 power specifications 1 11 Power Supply Problem 7 7 product ID 5 34 PTF 7 12 Q Quiesce 5 61 R rack installation 4 1 4 5 rack mounting the library 4 5 rack requirements 4 1 RAID controllers 3 6 Read Write capability 6 2 re...

Page 279: ...tore 5 56 configuring library 4 15 drive information 4 24 event notification 4 29 general library information 4 19 logging on 4 17 logs and traces 4 28 user access information 4 26 Web User Interface menus Configure Library User Access 5 52 Web User InterfaceConfigure Library date and time 4 28 worldwide node name 5 34 WORM Write Once Read Many 6 3 Write Once Read Many see WORM 6 3 write protect s...

Page 280: ...X 4 Dell PowerVault TL2000 Tape Library and TL4000 Tape Library User s Guide ...

Page 281: ......

Page 282: ... Printed in USA ...

Page 283: ...Spine information Dell PowerVault TL2000 Tape Library and TL4000 Tape Library Dell PowerVault TL2000 Tape Library and TL4000 Tape Library User s Guide ...

Reviews: