


23
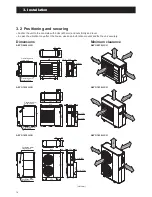
3. Installation
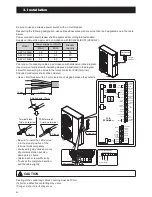
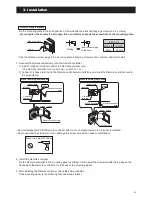
3. Connect the Remote controller cord to the Remote controller.
Install Y-shaped terminal to end of the Remote controller cord.
• The Remote controller cord is non-polar, so with no + or −.
Connect Y-shaped terminal to the Remote controller terminal firmly, and hook the Remote controller cord to
the wires clamp.
*Use the attached screw plugs if the mounting plate is fixed by screws to tile, concrete, and mortar wall.
Remote controller cord
hooks
gaps
wires clamp
Remote controller
cord
Hook
terminal
Y-shaped
terminal
hooks
gaps
knock out hole
Remote controller
cord
knock out hole
wires clamp
terminal
Y-shaped
terminal
Hook
When the wiring is embedded
When the wiring is exposed
• Do not damage the PCB of Remote controller with too much pressure when the terminal is installed.
• Never use electric screwdriver. It can damage the screw hole which cause contact failure.
When the wiring is exposed
Fix the mounting plate to the solid position of the wall with the attached tapping screws (L35, 2 screws).
•
If you tighten the screws too strongly, this can deform or break the screw hole of the mounting plate.
Drilling
Insert screw plugs
in the hole
Pilot hole
diameter
depth
6mm
30mm
Screw
Mounting plate
4. Install the Remote controller.
Fix the Remote controller to the mounting panel by sliding it from upward to downward with the 4 gaps on the
backside of the Remote controller fit to the hook of the mounting panel.
5. After installing the Remote controller, check the fixing condition.
If the mounting panel is not stable, tighten the screws further.
Never use electric driver
Summary of Contents for AEYC-0639U-CH
Page 156: ...20810030 M ...