


Note
When scanning starts, the progress will be displayed. Click Cancel to cancel the scan.
When scanning is completed, a dialog box prompting you to select the next action may open.
Follow the prompt to complete. For details, see Status of ScanGear dialog after scanning in "
Scan Tab
" (Preferences dialog box).
If the total size of the images to be scanned exceeds 100 MB, a message appears warning you
that scanning may take time. Click OK to continue, or Cancel to cancel the scan.
Preferences...
The Preferences dialog box opens and you can make scan/preview settings.
See "
Preferences Dialog Box
" for details.
Close
Close ScanGear (scanner driver).
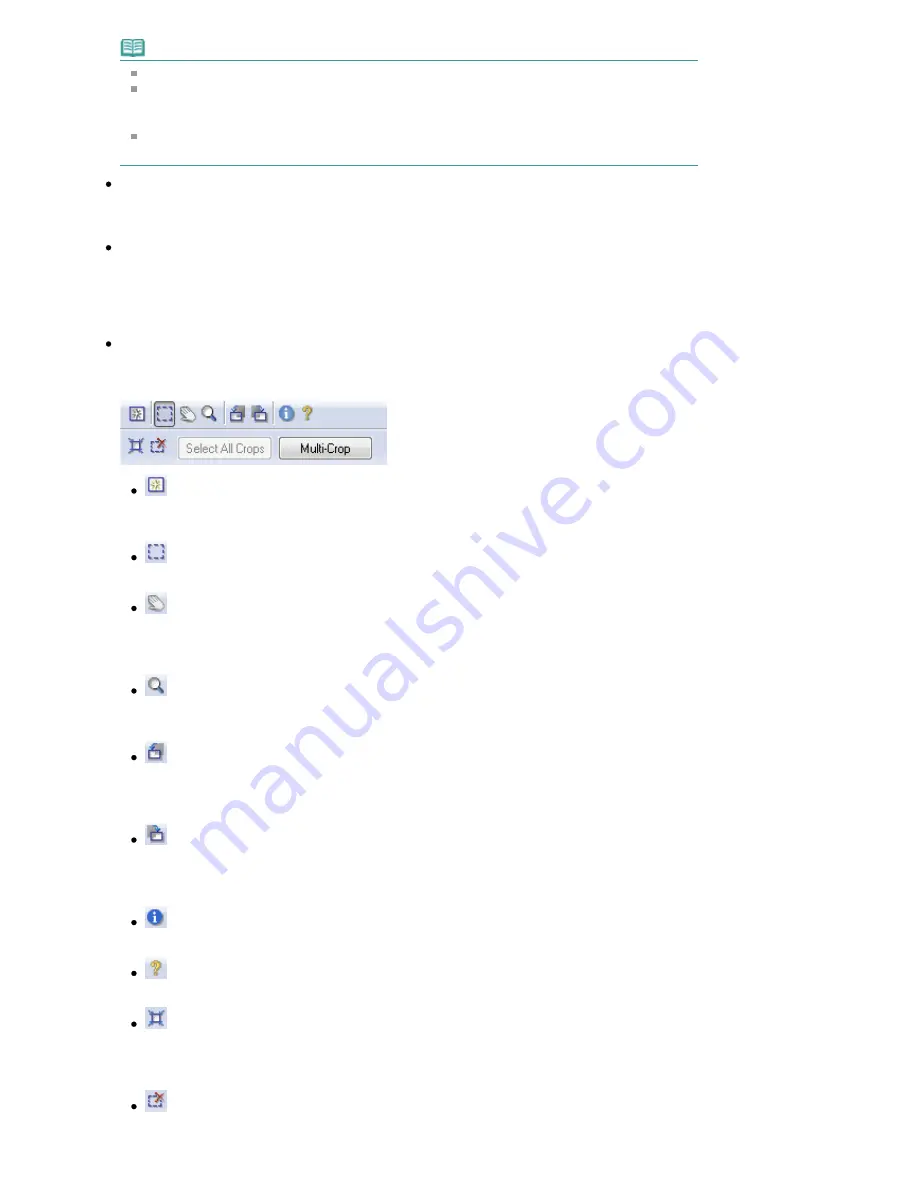
Toolbar
Toolbar
With the Advanced Mode Toolbar, you can make adjustments to the preview image and also select a
part of the displayed image.
(Clear)
Click this button to delete the preview image.
It also resets the Toolbar and color adjustment settings.
(Crop)
Allows you to specify the scan area by dragging the mouse.
(Move Image)
If an enlarged image is too large to fit in the Preview area, you can click this button and drag the
image across the screen until the part you want to see is displayed. You can also move the
image using the scroll bars.
(Enlarge/Reduce)
Click this button then click on the image to enlarge it (zoom in). Right-click on the image to
reduce it (zoom out).
(Rotate Left)
Rotates the preview image 90 degrees counter-clockwise.
- The result will be reflected in the scanned image.
- The image returns to its original state when you preview again.
(Rotate Right)
Rotates the preview image 90 degrees clockwise.
- The result will be reflected in the scanned image.
- The image returns to its original state when you preview again.
(Information)
Displays the version of ScanGear (scanner driver) and the current settings.
(Open Guide)
Open this guide.
(Auto Crop)
Displays and adjusts the cropping frame automatically to the size of the document displayed in
the Preview area. The scan area is reduced every time you click this button if there are cropping
area within the cropping frame.
(Remove Cropping Frame)
Removes the selected cropping frame.
Page 474 of 681 pages
Advanced Mode Tab
Summary of Contents for MP480 series
Page 29: ...Checklist Staff paper Page top Page 29 of 681 pages Printing a Notebook Paper ...
Page 41: ...position See Aligning the Print Head Page top Page 41 of 681 pages Printing Documents Windows ...
Page 59: ...Page top Page 59 of 681 pages Loading Paper ...
Page 62: ...Page top Page 62 of 681 pages Loading Envelopes ...
Page 65: ...Page top Page 65 of 681 pages Loading Originals ...
Page 71: ...Page top Page 71 of 681 pages Examining the Nozzle Check Pattern ...
Page 84: ...Page top Page 84 of 681 pages Cleaning the Paper Feed Roller ...
Page 128: ...Page top Page 128 of 681 pages Selecting a Photo ...
Page 130: ...Page top Page 130 of 681 pages Editing ...
Page 132: ...Page top Page 132 of 681 pages Printing ...
Page 204: ...Page top Page 204 of 681 pages Attaching Comments to Photos ...
Page 208: ...See Help for details on each dialog box Page top Page 208 of 681 pages Setting Holidays ...
Page 244: ...Page top Page 244 of 681 pages Setting Paper Dimensions Custom Size ...
Page 257: ...Page top Page 257 of 681 pages Printing with ICC Profiles ...
Page 343: ...Printing Photos Sending via E mail Editing Files Page top Page 343 of 681 pages Saving ...
Page 425: ...installed Page top Page 425 of 681 pages Custom Dialog Box ...
Page 553: ...Page top Page 553 of 681 pages Printing with Computers ...
Page 612: ...Page top Page 612 of 681 pages Paper Jams ...
Page 619: ...Page top Page 619 of 681 pages Error Message Appears on a PictBridge Compliant Device ...


