xGenConnect Installation and Programming Guide
61
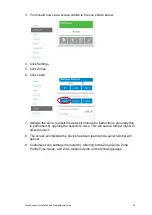
4. Use the drop-down menu to select the keyfob number you want to add to the
system.
5. Click Learn.
6. Trigger the keyfob learning function for 2 seconds (on 63-bit keyfobs hold
down the arm and disarm buttons, on 80plus keyfobs hold down the Arm +
2 buttons). The screen will show the keyfob has been found and the Serial
Number will appear.
The keyfob will have access to Partition 1 and the panel will report the
keyfob
number
to the Central Monitoring Station when it is used.
7. Click Save.
Advanced Keyfob Programming
Three levels of access are possible:
1. Partition 1 only: This is the default behaviour after learning a keyfob. The
User is set to
“Use FOB Number as Standard User”.
2. All partitions: Click the drop-down User menu to assign the keyfob a User
number. The keyfob will inherit partitions and permissions of that user. New
users and the default Master and Standard user accounts have access to ALL
partitions. This
user number
is reported to the Central Monitoring Station
when the keyfob is used.
3. Custom permissions > Keyfobs can be restricted to selected partitions.
Simple Method:
navigate to the User menu and select a suitable Partition
Group. The arm and disarm buttons on the keyfob will arm/disarm all
partitions in the Partition Group.
Advanced Method:
a. Create a new User.
Summary of Contents for xGenConnect
Page 1: ...xGenConnect Installation and Programming Guide P N 466 5545 EN REV J ISS 26OCT22...
Page 4: ......
Page 12: ...viii xGenConnect Installation and Programming Guide...
Page 93: ...xGenConnect Installation and Programming Guide 81 Web Page...
Page 109: ...xGenConnect Installation and Programming Guide 97 Instructions 1 Go to Zone Type...
Page 117: ...xGenConnect Installation and Programming Guide 105 Webpage...
Page 156: ...144 xGenConnect Installation and Programming Guide...
Page 166: ...154 xGenConnect Installation and Programming Guide...


