CHAPTER 5 EXTENDED OPTION OUTPUT
PD-3000
157
U
U
s
s
e
e
o
o
f
f
e
e
x
x
t
t
e
e
n
n
d
d
e
e
d
d
o
o
p
p
t
t
i
i
o
o
n
n
o
o
u
u
t
t
p
p
u
u
t
t
(
(
B
B
a
a
s
s
i
i
c
c
s
s
)
)
This section provides a comprehensive description of how to use the extended option output by providing a range of
examples so that many users will be able to use it easily.
The examples show programs that can be tried and tested only with an air-type sewing machine.
Necessary items
Air work clamp type sewing machine (an electromagnetic type is not applicable).
The
programmer
CF card
Programming instruction manual (See the instruction manual when a reference page is provided.)
Sewing machine adjustment manual (See the section on switching the memory switch.).
Simplified examples of the extended option output
Programming No. 1 to No. 20 is possible as option outputs; No. 15 is for the air valve output of the left work clamp and
No. 16 is for the air valve output of the right work clamp. If outputs No. 15 and 16 are programmed as option output,
the work clamp will not function as originally programmed, but will function as programmed as option output. The
examples show how to program option outputs No. 15 and 16 to confirm their operation (acceptable if the left and right
work clamps function as programmed).
Caution
One example shows how to sew with the work clamp raised. Please be careful when attempting it.
Be sure to remove the needle before confirming its operation.
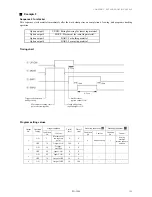
Turning the output interlocking on and off corresponding to sewing machine operations
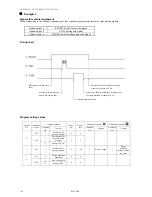
Create a program to automatically raise and lower the left work clamp (option output No. 15 ON and OFF) at the
sewing start point.
1. Load the CF card into the CF slot of the sewing machine. Turn on the sewing machine.
2. Have the programmer at hand. Display the output setting screen according to the extended option
output operation (see page 146).
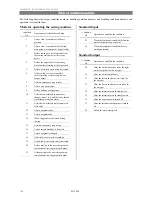
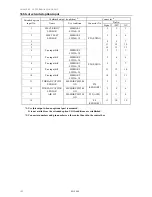
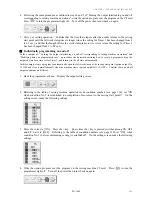
3. Referring to the table of sewing machine operation mode condition numbers (see page 150), set "ON
when condition No. 2 (on completion of movement to the sewing start point) is established". Set Timer
2 to 1 sec. (1000 ms). On the setting screen, make the following settings.
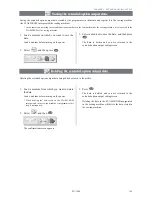
After inputting values, press
to confirm the settings.
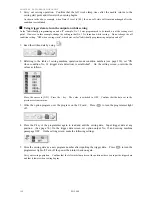
To confirm that the selected values were correctly input, move the cursor to
. Press the
key once to select
No. 16. Press the
key to return to No. 15.
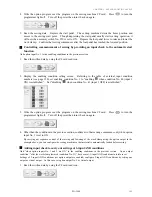
4. Press
.
Summary of Contents for PD-3000
Page 8: ...PD 3000 ...
Page 9: ...PD 3000 Chapter 1 Read Me ...
Page 12: ...CHAPTER 1 READ ME 4 PD 3000 ...
Page 13: ...PD 3000 Chapter 2 Setting Up Your Programmer ...
Page 28: ...CHAPTER 2 SETTING UP YOUR PROGRAMMER 20 PD 3000 ...
Page 29: ...PD 3000 Chapter 3 Programming with Icons ...
Page 95: ...PD 3000 Chapter 4 Programming with Commands ...
Page 152: ...CHAPTER 4 PROGRAMMING WITH COMMANDS 144 PD 3000 ...
Page 153: ...PD 3000 Chapter 5 Extended Option Output ...
Page 181: ...PD 3000 Chapter 6 Reading Saving Deleting Program and Formatting Media ...
Page 190: ...CHAPTER6 READING SAVING DELETING PROGRAM AND FORMATTING MEDIA 182 PD 3000 ...
Page 191: ...Chapter 7 Checking Copying Moving Changing Program ...
Page 199: ...PD 3000 Chapter 8 Displaying Sewing Machine Program ...
Page 201: ...PD 3000 Chapter 9 Displaying a Clock ...
Page 204: ...CHAPTER 9 DISPLAY A CLOCK 196 PD 3000 ...
Page 205: ...PD 3000 Additional Information ...


