background image

install - concepts - PixMaster - switcher - CG - clips - controls - team - appendix

Broadcast Pix 

V5

1.

Start the clip playing as described in 
section 6.3.

2.

Pause the clip when you have reached 
the desired image you wish to capture 
by pressing the 

[>] 

button again on the 

control panel.

3.

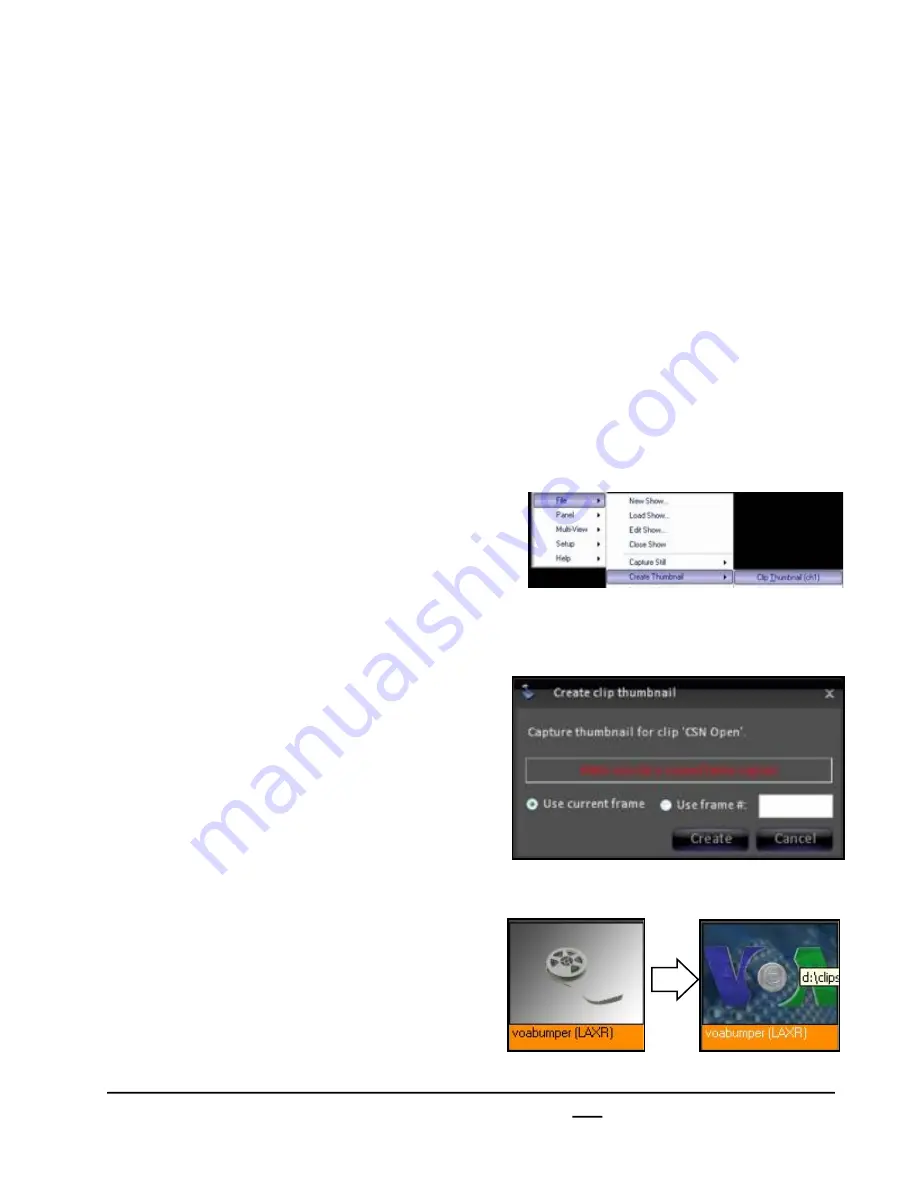
Click on the 

File 

menu in BPswitcher, 

then click on the 

Create Thumbnail 

menu.

4.

Select 

Clip Thumbnail  (ch1)

, as shown 

on the right.

The Create clip thumbnail window will 
appear.

5.

Click on the 

Create 

button, as shown on 

the right.

As an alternative, you may specify the 
frame number of the clip you wish to 
capture by selecting the Use frame # 
radio button and entering a frame 
number.

The desired image will then be captured 
and appear on the Multi-View.  The 
image will be saved in the same folder 
with the clip on the Servers D drive, and 
so if you use the same clip in another 
show, you will not have to create 
another thumbnail for it.

6.1.5  Creating Clip Thumbnails

Each clip can have its own thumbnail, which can be viewed on the Multi-View 
PixPad. By default there is no thumbnail, simply a generic film strip icon. It may be 
desired to change the clip’s thumbnail. Once a thumbnail is created it will be 
remembered for all shows. In addition, .mov files in the Animation store may also be 
created.

To create a clip thumbnail:

6.1.5

Summary of Contents for Granite 2000

Page 1: ...install concepts PixMaster switcher CG clips controls team appendix Broadcast Pix V5 Granite 2000 2000 1ME HD Video Switchers Operators Manual Granite Software Version 5 switchers graphics slow motion...

Page 2: ...ipmentfrom Manufacturer BroadcastPix will repair or at its sole option replace any componentfound to be faulty on any system returned to the service center of BroadcastPix in the USA for repair The co...

Page 3: ...ox a Granite 2000 2000 1 4 3 Installing Optional 8 port Tally Box 1 4 4 Installing Optional 24 port Tally Box 1 4 5 Installing Tally Box Drivers 1 4 6 Installing Multiple Tally Boxes 1 5 Audio I O 1 5...

Page 4: ...2 4 5 Floating PixPads 2 5 Multi View 2 5 1 Overview of the Multi View 2 5 2 Sources on Multi View 2 5 3 Keyer Windows on the Multi View 2 5 4 Program Preview Overlays on the Multi View 2 5 5 Counter...

Page 5: ...nt into a Subfolder 3 5 7 Fluent Watch Folders 3 5 8 Cloud Based Watch Folders 3 5 9 Resizing and Softening Images 3 5 10 Previewing Content 3 5 11 Renaming Content 3 5 12 Removing Content from a Show...

Page 6: ...ansition Rates 4 3 4 Reversing an Effect 4 3 5 Modifying an Effect 4 4 Keys 4 4 1 Key Controls 4 4 2 Assigning a Source to Keys 1 6 4 4 3 Direct Keys Controls 4 4 4 Transitioning Keys with other keys...

Page 7: ...iguration 4 11 8 Remote Panel Setup 4 11 9 Remote Panel Operation 4 12 SnapShot Memories 4 12 1 Saving a Mem 4 12 2 Recalling a Mem 4 12 3 Recalling a Mem by Number 4 13 Fluent Macros 4 13 1 Opening t...

Page 8: ...ing CG Graphics On the Fly 5 4 1 Quick Scribe Editing 5 4 2 Overwriting a File 5 5 Animation Store 5 5 1 Creating an Animated Graphic 5 5 2 Creating Animations in a 3rd Party Application 5 5 3 Basic A...

Page 9: ...Loop Clips 6 3 6 Cut Points 6 3 7 Auto Transition 6 3 8 Auto Next 6 3 9 AutoAspect Controls 6 3 10 Scrubbing a Clip 6 4 Exporting Compressed Clips from Final Cut Pro 6 5 Optional External DDR Control...

Page 10: ...hi Camera Control 7 7 4 Panasonic Camera Control Settings 7 7 5 Telemetrics Camera Control Settings 7 8 Adding Camera Control to a Show 7 9 Selecting Camera Control in a Production 7 10 Controlling a...

Page 11: ...Deck Control 7 18 1 Installing Deck Control 7 18 2 Adding Deck Control to a Show 7 18 3 Deck Control Settings 7 18 4 Selecting Deck Control in a Production 7 18 5 Controlling a Deck 7 18 6 Deck Contr...

Page 12: ...ors with Separate Graphics Operator and 2 Panels 8 6 Two Operators with Two Computers 8 7 Remote Operator in the Back Room 8 8 Dual Panels for Back Up Redundancy 8 9 Remote Control from a Distance 8 1...

Page 13: ...ware to control the software Take note to which model you have purchased and refer to that section in this manual prior to using your BroadcastPix Switcher Please refer to the Quick Start Guide for pr...

Page 14: ...ed for monitoring Program Preview or Clean Feed on inexpensive monitors or for feeding a video projector The DVI outputs supportthe video standard of 1920x1080i at59 94 50Hz Note thatdepending on your...

Page 15: ...the front logo side or the rear connector side The supplied rack ears are reversible and screw into the side of the Switcher with the supplied screws In addition a rear supportbracketis provided for p...

Page 16: ...he rack and screw in the support brackets to each side of the Granite Switcher using the guide below 3 Align the Granite Switcher with the rear support ears and slide the supportbrackets through the n...

Page 17: ...anite Switcher All graphics animations and show files live on the Systems C hard drive and all the clips live on the Video D drive 1 2 Granite Server Front Rear Panel Connections 1 2 NOTE The maximum...

Page 18: ...o remove the Server door 1 Open the Server Door by pulling on the top lip of the door so that the door hanging down or laying flat on a table top 2 On the left side rack ear pull the silver pin out to...

Page 19: ...BroadcastPix Granite 2000 is comprised ofthe following standard components Software BPswitcher Inscriber TitleMotion GS HD Character Generator Microsoft Windows 7 Paragon recovery 11 Broadcast Pix Sof...

Page 20: ...e installed internally in the Server at the factory USB Keyboard USB Mouse meter PCIe Cable Network Crossover Cable to connectpanel to Server 9 Pin Male to Female Straight Serial Cable for fail safe c...

Page 21: ...ps graphics Keyboard USB Mouse USB House Network 10 100 1000BASE BP Control 100BASE Blackburst Live Inputs Auto Detect HD SD SDI Cameras tape decks etc HD SD SDI Assignable in Granite Output Assignmen...

Page 22: ...6 Slot 5 File transfer for clips graphics Keyboard USB Mouse USB House Network 10 100 1000BASE BP Control 100BASE Blackburst Live Inputs Auto Detect HD SD SDI Cameras tape decks etc HD SD SDI Assignab...

Page 23: ...ircuitby sinking currentto ground or could be used in an environmentthatis looking for a 0 to 5V logic level The maximum currentis 350ma DC and the maximum voltage is 12V DC Pin 13 on both tally conne...

Page 24: ...switcher functions through the use of Fluent Macros More GPIs may be added to a Granite system by attaching external 8 porttally boxes as described in section 1 5 2 To assign Macros to GPIs see secti...

Page 25: ...e Inputs contact points for triggering Macros Up to 8 external sources plugged into the Granite Input board can be tallied as shown by the diagram below Input 1 on the Granite card corresponds to 0 on...

Page 26: ...rs USB ports and needs to be plugged into an electrical socketwith the supplied power supply NOTE The Tally Box does not supply any voltagefor tally Voltage must be provided by your Camera Control Uni...

Page 27: ...the Tally Box to each terminal on your camera camera unit one to Program and the other to the Ground as shown below NO Normally Open goes to Program and C Common goes to Ground NC Normally Closed is...

Page 28: ...en the install window as shown below left 3 Click on the Install button to install the drivers 4 Once the drivers are installed a pop up window will appear confirming the installation Click on the Fin...

Page 29: ...iple tally boxes 1 Ensure that the Measurement Computing InstaCal software is installed as described in section 1 5 5 and open the InstaCal software by navigating to Start Menu All Programs Measuremen...

Page 30: ...2 are both assignable in the System Settings tab and can be used for Clip store channel 1 Clip store channel 2 Animation store channel 1 or Animation channel 2 out You can not have all 4 channels have...

Page 31: ...elay your master audio outputfrom the audio mixer by the total amountof video processing delay i e 33ms in this case the clip and animation audio will need to be advanced separately by another 33ms or...

Page 32: ...15 frames The number entered will advance both the Clip Store and Animation Store Normally this number will be any where from 0 to 3 frames depending on how the video and audio is delayed An applicati...

Page 33: ...r Output 1 and Output 2 Select either Clips 1 Clips 2 Anims 1 or Anims 2 as shown on the right 3 Click on the OK button This will close the System Settings window To accept audio for embedding 1 In th...

Page 34: ...running when the Multi View is filled with content video To Run a Show 1 Double click on the Broadcast Pix Switcher application on the desktop and it will open and display an empty Multi View To have...

Page 35: ...nd feeds from servers and other external video devices Any input outputconnected to the I O cards on the Granite Switcher needs to be configured with this assignmentwindow to ensure proper operation A...

Page 36: ...utton as shown on the right The Mange custom names and labels will open as shown on the right To add a custom Label selectthe Labels tab and enter a custom label in the text field then click on the Ad...

Page 37: ...ay be used as another live input 8 For each input selectits native video AspectRatio either 16 9 or 4 3 from the Aspect Ratio drop down menu Use the Aspect Correction drop down menu to selectthe desir...

Page 38: ...MD PowerAux if enabled or Aux 2 Aux 6 as shown on the right You may assign the same function to multiple outputs as the output will be distributed All Aux outputs are un processed outputs that feed in...

Page 39: ...signed a default startup inputmay be assigned to each Auxiliary outputin the Default aux sources section For each assigned Aux outputclick on the source drop down menu and selectthe desired defaultsou...

Page 40: ...ssed Granite SDI outputs on all 16 channels Raw Aux outputs can nothave embedded audio routed to them however PowerAuxes can 1 Under each output selectthe Embedded audio drop down menu and selectthe E...

Page 41: ...that a 4 3 source can be treated in a 16 9 production If None is selected then the image is stretched to fill the space as is done on other switchers and the result makes the person look too wide If...

Page 42: ...ght Indicates Granite genlock Orange Granite Switcher has external blackburstreference Blue Granite Switcher has external 1080i reference Green Granite Switcher has external 720p reference Yellow Gran...

Page 43: ...ards shipped after March 1 2011 the reference outputs can output the format of the inputsignal The Refout LED will illuminate orange when outputting blackburst green when outputting 720p and blue when...

Page 44: ...ed Usually delay can be compensated in a studio environmentwith an audio delay In image magnification IMAG productions itis importantto have the leastamount of delay possible The values below include...

Page 45: ...oad a Show as described above To change which show auto loads 1 10 1 In BPswitcher click on Setup and a drop down window will appear then selectSystem Settings as shown on the right The System Setting...

Page 46: ...window will appear then select System Settings as shown on the right The System Settings window will appear as shown below 2 In System Settings window click on the Video Tab which will bring up the v...

Page 47: ...putting to SD to eliminate aliasing No check preserves the most detail of an SD source When this option is enabled all HD content video and graphics may show additional artifacts This setting does not...

Page 48: ...may also be recessed into a cut out of a table top or console If a cut out installation is desired then the following dimensions should be used to cut the hole in the console top 1 11 Tabletop install...

Page 49: ...graphics animations The D1 D4 drives are media drives that contain only clips from the Video D directory There is no hard drive in the C2 slot As an option more removable Video drives are available wh...

Page 50: ...he initial system purchase or if the RAID must be rebuilt Note that RAID 5 and the following steps are only available on Windows 7 systems shipped after April 2012 To create a RAID 5 Array 1 In the St...

Page 51: ...n on the right 7 Under the Specify the volume size section leave volume size at 100 8 Open Advanced tree and click on the Enable link nextto Write back cache as shown on the right 9 Click on the Next...

Page 52: ...ementwindow click on the Storage tree and select Disk Management icon under the Storage section in the left hand section as shown on the right 4 In the Initialize Disk pop up window click on the OK bu...

Page 53: ...n the Assign Drive Letter or Path window ensure D is selected for the drive letter and click on the Next button 9 In the Format Partition window change the Volume label to Video and click on the Next...

Page 54: ...d a restore CD to recover from It is recommended to create a restore point after your system has been installed and configured These instructions cover the basics of creating backup pointand recoverin...

Page 55: ...ing window selectthe Back up now radial button and then click on the Next button 11 In the summary window click on the Next button 12 In the Completing the Backup Wizard window click on the Finish but...

Page 56: ...the top right corner To restore a backup in Paragon 1 Quit all applications including BroadcastPix Switcher 2 Double click the green Paragonicon on the desktop If the icon is not on the desktop naviga...

Page 57: ...es in this window 8 In the Restore results window ensure that the Assign the following drive letter is set C Then click on the Next button 9 In the Completing the Restore Wizard window click on the Fi...

Page 58: ...matically reboot You are now ready to use your system To restore from a bootable CD All Server come with a bootable CD thatallows you to enter a Linux partition to launch and restore a Paragon back up...

Page 59: ...e system drive in the system there wont be any other choices in this window 8 In the Restore Summary window click on the Next button This will begin the restore process During the restore process a Pa...

Page 60: ...on the Delete button to permanently delete the backup file The file is erased from the backup capsule Since the Backup Capsule on the System drive is only 160GB the capsule may fill up with multiple r...

Page 61: ...yers 6 standard keyers each with 2 dimensional DVEs reposition and cropping capabilities In addition one linear key can acceptkey cut and fill from an external CG One ClearKey Chromakey is standard Co...

Page 62: ...the control panel consists of 2 buses the Source and Destination Rows which correspond with the display row below them They are used to change key and aux assignments The bottom of the panel consists...

Page 63: ...12 PixButtons 4 Motion Controls 4 multi purpose Knobs 8 ContentDevices 4 assignable wildcard device buttons 4 Switcher Controls a 3 axis joystick and a Display These are all used to control various s...

Page 64: ...lustration below the Character Generator CG is active as shown by the CG icon See Section 2 3 for all icons The remainder ofthe PixButton generally shows whatindividual contentelementis now active on...

Page 65: ...control panel 1 12 in a PixPad To selectcontent within a device and for modifiers 2 32 Source Displays To see whatdevice is on each source and to modify controls 3 6 Direct Keys To see whatis in each...

Page 66: ...nt access to clips importand play out Use motion controls and view time codes Plays compressed HD and SD clips with embedded audio ProRes DNxHD QT Animation DV DVCPro H 264 mov mp4 Harris Inscriber Ti...

Page 67: ...ms may have 2 channels of external keying This feature uses 2 inputs and supports clip and gain adjustments shaped and unshaped signals and key inversion Aux Up to 12 Auxiliary outputs and can be assi...

Page 68: ...ms and record form the control panel or Multi View Deck Control A standard feature which enables control ofexternal AJAKiPro and Blackmagic Hyperdeck recorders players through TCP IP Selectrecorded cl...

Page 69: ...upper middle halfof the panel is comprised of the device controls as shown in the illustration below The remainder ofthe panel is comprised of the fixed controls which are described in section 4 The d...

Page 70: ...ps Stills and Animations 4 Wildcard Device PixButtons To control the optional camera and server control 16 Destination PixButtons 6 Key buttons Up to 10 Aux buttons 1 Effects PixButton 1 Memory Button...

Page 71: ...s in the clip store shown below or to the numeric keypad such as in the Still Store To quickly jump to the first page of the content in the PixPad simply select the device button you are using in the...

Page 72: ...utton When selected the Multi View PixPad tallies red ifon air and orange if not the PixPad on the control panel will always tally red no matter if the content is on or off air use the Multi View to c...

Page 73: ...ent Selection Buttons Buttons 1 9 on control panel To move back to previous PixPad Button 10 on control panel To move ahead to the next PixPad Button 12 on control panel To move down to the Controls P...

Page 74: ...device not available for all devices Opens the Content Organizer of PixMaster to edit show contents or settings for devices 2 4 3 Device Select Controls Page of Multi View PixPad The control buttons b...

Page 75: ...Control is adjusted Joystick Control on the Multi View PixPad To control the Joystick selecthe Joystick button on the Multi View PixPad and itwill highlightblue and the PixPad will show a 2 axis joys...

Page 76: ...er PixPad and the PixPad order window will appear 3 Use the up and down arrows to move the highlighted selection to where on the list you wantit to appear Highlightother items and them move them with...

Page 77: ...virtually any size 3 Release unclick the mouse and the PixPad has been resized 2 4 5 Floating PixPads In addition to the Multi View PixPad in the top right corner of the Multi View you can create addi...

Page 78: ...w consists ofsource windows larger preview and program monitors a PixPad of thumbnails to correspond to the control panel PixPad keyer windows a status bar a clock timer clip counters as well as tally...

Page 79: ...Depending on the screen resolution the defaultlayoutmay appear slightly different However the basic concepts apply to all of Multi View layouts Multi View PixPad Keyer Windows Preview Monitor Program...

Page 80: ...own you may create your own custom layoutand float up to all 32 inputs See section 2 5 9 2 5 2 Sources on Multi View 2 5 2 ME Preview Tally Program Tally ME Program Tally Preview Tally Indicates Chrom...

Page 81: ...m 1 Any key that is off air grey or orange can be broughton air by clicking on its keyer thumbnail on the Multi View This will cause this key to fade on air at the rate for that keyer and the tally un...

Page 82: ...ure no video graphics are cutoff There are 3 overlays which may be selected on Preview and or Program Title Action Safe Zones Aqua colored lines 4 3 Video Safe Zone White colored lines and Center mark...

Page 83: ...e Tally information Red letters On Program Orange letters On Preview White letters Selected in the device store To set the clip counters to count down 1 Right click on the any counter window 2 In the...

Page 84: ...on the Device Tabs at the top of the PixPad To change content Click on the desired thumbnail in the PixPad To effect Preview to air Program Click on the Preview monitor Will perform the selected Mix...

Page 85: ...change showing a numeric pad or available effects Changing the transition rate will update the Rate display on the Preview window To transition only keyers in the next transition Click on the BGR butt...

Page 86: ...ce you wish to assign and its key thumbnail will change to show the new key source The mouse course will change to a key icon Once a source is selected the Assign button will turn off To assign a sour...

Page 87: ...ill bring up the various video settings as shown on the right 3 Deselectthe Show transition controls checkbox under the Options section The Mix Fx Rate and BGR controls on the Preview and Program outp...

Page 88: ...apply the changes Now all the source monitors preview monitors and tally in the Multi View PixPad will be green as shown on the right 4 To revert back to orange tally repeat steps 1 3 above To hide th...

Page 89: ...layouttailored to that specific show You may use the defaultlayouts as a starting pointand then modify save them to your needs To create a custom layout 1 In BPswitcher click the Multi View drop down...

Page 90: ...ptions under the Layout Colors menu as shown on the right To change the background color select the Multi View menu and select Use Colored Background by defaultthis option is selected on To change to...

Page 91: ...olor selectthe OK button The Use Granite option applies a subtle glow effect behind each window The Gray White Blue Font color option changes the font color of the under monitor displays on the Multi...

Page 92: ...out window will appear as to the right 3 Enter the name you wish to give the layoutin the Layout name field You may also save layouts in differentsub folders Simply click in the Layout folder field to...

Page 93: ...To rename a source monitor 1 Float the desired source monitor if not already open as described in section 2 5 8 2 Right click on the label name the bottom label 3 A white text box will appear enter t...

Page 94: ...ll labels on the Multi View i e Key and Device Names Right click contextual menus Pop up and warning messages Note to enter Unicode or Far East Languages the appropriate international fonts must be in...

Page 95: ...e right 4 A grid of all the English names and labels will appear with a blank text entry under the Translation column For each line item click in the blank Translation section and Enter the translated...

Page 96: ...the drop down menu select the desired language in this example Italian To revert to the default name of a window 1 When entering a custom name it may become difficultto remember which window is being...

Page 97: ...or Multi View PixPad as a device Multiple clocks and timers may be floated To have multiple timers be synced to each other place a checkmark next to Sync Timers in the Setup System Settings Multi Vie...

Page 98: ...e the countdown left click on the green play triangle button in the lower right hand corner of the timer window You may also double click in the middle ofthe timer to start pause the countdown 7 To st...

Page 99: ...the clock Color Changes the background face ofthe clock to either Blue Green Red White or Gray Offset from local time Time shifts the clock backwards or forwards both in hours and or minutes from the...

Page 100: ...on ofthe timer control 2 5 12 To add Timer Control to a show 1 Selectthe show to which you wish to add Timer Control by loading a show or creating a new one and then opening PixMaster by selecting Fil...

Page 101: ...es 3 pieces of information 1 The top left corner always shows status running stopped and type of the timer stopwatch In this case the words Timer Countdown from 00 01 00 indicates the type of counter...

Page 102: ...er will automatically start playing updating the Multi View and display The motion control button will illuminate orange signifying thatthe countdown is running as shown on the right To enter a custom...

Page 103: ...as shown on the right 2 To continue counting down from the paused time press the motion control button the button will illuminate orange 3 To reset the countdown to the start press the motion control...

Page 104: ...o pause the stopwatch press the motion control button and the timer will stop and the button will no longer be illuminated as shown on the right 2 To continue counting up from the paused time press th...

Page 105: ...modify and in the ScreenResolution section selectthe appropriate setting for your monitor 5 SelectOK to save your changes 2 6 List of ScreenResolutions Computer monitors should always be square pixel...

Page 106: ...t from a VHDCIto Quad DVI D male connectors as shown below The maximum resolution ofeach outputis 1920x1200 VGA Analog resolutions are notsupported on this graphics card When adding monitors to your s...

Page 107: ...n the C Drive for graphics each of which corresponds to a button on the panel They are Stills C graphics stills CG C graphics cg Animations C graphics animation 3 0 D clips Show 1 Pointers to clips Sh...

Page 108: ...on it is recommended to create a Generic Show that has all inputs sources mapped to the switcher and all devices pointed to the correct folders 3 1 To Create a New Show 1 Launch PixMaster by double cl...

Page 109: ...cher as well as the contentassigned to each source You can then edit from that starting point You may wantto create one or more defaultshows as your universal starting point 4 Give the new show a name...

Page 110: ...o single click on the show name and then press the Choose Show button From Switcher 1 Selectthe File menu as shown at the right and click on Edit Show The show that you have open with now open in PixM...

Page 111: ...gnments memories or extra devices assigned to the 4 wildcard buttons in the upper right corner of the panel 3 View and save the contentsummary for the show PixMaster Show Editor 1 Click on device name...

Page 112: ...ou click on Clips 1 its ContentWindow for this show will open Content Window The contentwindow in this case for the Clips 1 clip store enables you to Reorder the clips in the show Import new clips int...

Page 113: ...device from the PixPad either on the Multi View or Control Panel The device button will illuminate as shown on the right In this case Clips 1 2 On the Multi View PixPad click on the Controls button 3...

Page 114: ...er in which it will be played outduring the show again allowing for ease of use With the use of Fluent Watch folders you have the ability to automatically add clips and graphics to any show even ones...

Page 115: ...d hold itdown 3 Select the last item you wish to move and all the ones in between will highlight 4 Then click the up or down button one time for each position that you want the selected group to move...

Page 116: ...n the contentwindow This will open the complete library folder thatyour device is pointing to as shown below To have PixMaster automatically show the entire library check the Always show entire librar...

Page 117: ...to the show by clicking on the show s contentlist on the right side In the illustration below Hurricane is selected and so the 04 Milwaukee Weather clip will be inserted after the Hurricane clip 4 Pre...

Page 118: ...sh to move and it will highlight 2 Hold down shift on the keyboard 3 Click on the last item of the group you wish to move and it and all the ones in between will highlight 4 Then select the area in th...

Page 119: ...t box is checked as shown above If you do not wantthis and instead just wantto add it to the library but not the show then simply uncheck the box 4 Press OK A browser window opens 5 Use standard Micro...

Page 120: ...fill in its name on the blank line before you press OK This is handy for remembering a series of related clips especially when itcomes time to clean excess media off your drives remember uncompressed...

Page 121: ...olders enhances your workflow throughoutyour entire facility Watch Folders are show specific and each device and channel may have a watch folder enabled For any show the maximum number of watch folder...

Page 122: ...xisting files option is enabled the graphic contentwill update once the file is taken off air 6 Click on OK to save the Watch folder options 7 In the contentwindow click on OK to save and enable the w...

Page 123: ...e loaded show will be display as show on the right In this example 6pm News is the loaded show This text file is helpful when copying files from remote networked computers that may not be near the Bro...

Page 124: ...r these secondary watch folders are show specific and eachdevice and channel may have a watch folder enabled For any show the maximum number ofsecondary watch folders thatmay be enabled is 8 one for C...

Page 125: ...oftSkydrive navigate to C Users Broadcast Pix then selectthe Dropbox Skydrive or Google Drive subfolder This example will use Dropbox NOTE For the Dropbox Skydrive of Google Drive folder to appear you...

Page 126: ...ate contentfolder on the local BroadcastPix Server Please refer to the individual service providers on how to upload contentusing their application This allows you to upload contentfrom any web browse...

Page 127: ...s before see section 3 5 5 3 5 9 3 5 9 Resizing and Softening Images When contentis imported it can either come in as is or the images can be resized and softened upon import This is particularly usef...

Page 128: ...image will appear 3 To close the still being previewed click on the redX in its upper right corner 3 5 10 3 5 10 Previewing Content At any time you can see a large thumbnail ofany contentelementin an...

Page 129: ...NOTE This may take several seconds depending on much much contentis stored on the system Once complete the grid of contentwill show a thumbnail for all valid files as shown below 2 When you close out...

Page 130: ...tire Library button 2 Select the item you wish to rename in the Entire Library section of the window 3 Right click on the file and a drop down menu will appear with 3 options as shown below 4 Selecton...

Page 131: ...rary as removing a contentdoes not delete it from your system If you want to delete contentfrom the hard drive see section 3 5 12 3 5 12 6 If leadings numbers are being used on content you have the op...

Page 132: ...eted and it is not recommended To delete a Clip or Graphic from the library 1 Make sure your are viewing the entire library by clicking on the View entire library button and the content window will ex...

Page 133: ...entire library button as shown on the right 2 In the search bar at the top of the window type in a search word As you type the grid on contentwill filter out contentand show you contentthat only matc...

Page 134: ...reen to expose more options 2 For every piece ofcontentthere is a checkbox for every attribute allowing you to easily see which attributes are active in addition to easily modifying them To change an...

Page 135: ...s Content Summary On the PixMaster window for the desired show click on View show contents The View Show Contents window will open To Save the Content Summary You can save this by clicking on Save Lis...

Page 136: ...gs Windows for the Show will appear The Show Settings window enables you to edit Switcher Sources for re mapping adding and removing sources as well as assigning a fail safe source Memory Rows for ass...

Page 137: ...ents window will open showing all 32 mapable inputsources 2 Selectthe source number you wish to change by clicking on its name A drop down menu will appear with all your available source names created...

Page 138: ...lect the on the drop down menu Then when it goes intofail safe you can manually select thedesired source from the switcher panel 3 7 2 3 7 2 Auto Fail Safe Setting All BroadcastPix Granite Switchers h...

Page 139: ...om the drop down window 4 Click on OK to return to the Edit Show Settings window To remove a wildcard device 1 Repeatsteps 1 2 above 2 Selectremove from the drop down list 3 Click on OK to return to t...

Page 140: ...napShotMemories Macros may also be added and sorted in this menu if a Macro has a leading number applied to it See section 4 12 for more information aboutMacros The memory controls in PixMaster enable...

Page 141: ...window click on View all memories which will expand the memory window to include the central library of all memories For moving memories into a show and organizing them this window works same way as t...

Page 142: ...y window shown on the previous page 2 Click on Edit memory The Edit Memory window opens You may also double click the memory 3 Fill in the name you wish to give the Memory in the Name for memory x fie...

Page 143: ...ition the text with the 2 arrows and the position will show in the white preview window It is recommended to use the defaultfont if desired you may selectanother by un checking the Use default font bo...

Page 144: ...l for triggering Alpha Wipe transitions and other frequently used effects withouthaving the need to enter the MEM Device PixPad To assign MEMs to the Memory Rows 1 In the Edit Show Settings window sel...

Page 145: ...his option will continue to show the source name icon when in the memory mode 6 To view source names icons on unassigned memory buttons place a check mark next to Show source names on unassigned butto...

Page 146: ...only available when the optional external tally box is installed as described in section 1 4 2 Since this is an advanced feature in large installations itis advised to contact Technical Support regard...

Page 147: ...a Macro pre saved recordedto be availableas a selection To Link a Layout to a Show 3 9 1 Open PixMaster to its first editable screen the Selecta device to edit as shown to the right 2 Place a check m...

Page 148: ...hown to the right 2 Place a check mark nextto the Load memory with show 3 Click on the Load memory with show drop down menu and select the desired saved SnapShotMemory or Macro from the available list...

Page 149: ...the Backup Date column selectthe desired recovery date as shown on the right 4 Click on the OK button 5 A Restore FlintShow warning will appear Click on the OK button as shown on the right The show ma...

Page 150: ...s are clearly unusable Since these are system wide settings every show will be impacted 1 In BPswitcher click on Broadcast Pix menu icon selectthe Setup menu and select Restore System Settings as show...

Page 151: ...ncluded the Size offiles to exportwill increase in this example 11 2 GB in addition a Free space indicator for the specified locationwill be reported If the file size exceeds the amountof free space t...

Page 152: ...ght 4 Similar to the Exportshow window the ImportOptions window will appear showing all the exported file types Selectthe desired files by placing a check mark next to Show Stills CG Logos Clips Macro...

Page 153: ...ed files Place a check mark next to System settings Multi View layouts Virtual Sets Macros MacroBanks Macronames Device settings and or Registry settings as shown on the right 4 Click on the OK button...

Page 154: ...appear showing all the exported file types Selectthe desired files by placing a check mark next to System settings Multi View layouts Virtual Sets Macros MacroBanks Macronames Device settings and or R...

Page 155: ...SoftPanel 4 0 Switcher Controls When you launch BroadcastPix Switcher and a show is loaded see section 1 7 the switcher controls fill in on the panel as shown below Source Controls To selectsources fo...

Page 156: ...the optional tally box is installed the program tally is also sent out Panel Tally State Color Buttons PixButtons Selected and on Program Red Selected and on Preview Orange Off not selected White but...

Page 157: ...strated below These 16 sources are arrayed in columns of 4 buttons each The same source is assigned to all 4 buttons in each column The displays on the PixButtons in the display row indicate whatsourc...

Page 158: ...ew preset which will be illuminated orange during a transition the preview row illuminates red and returns to orange atthe end of the transition Source Row The Source Row is used to select which sourc...

Page 159: ...will change to the names of sources 17 32 There is no need to hold down shift since the panel will stay in the shifted state until it is deselected 2 Selecta button from the Program Preview or Source...

Page 160: ...withoutthe need of selecting shiftevery time for these occasions the shift function may be locked To turn on Lock Shift from the control panel 1 In the Program Bus Transition section double punch the...

Page 161: ...ves into the next Effect An effect is a transition that uses a pattern or special effect to change from one picture to the next Effects include wipes pushes squeezes and other 2D DVE moves The Transit...

Page 162: ...abled checked 5 Click on the OK button to save and exit the System Settings window 6 To turn off Transition Preview repeat these steps 4 2 1 4 2 1 Transition Preview Transition Preview adds confidence...

Page 163: ...and it will illuminate orange 2 On the preview bus select the source you wish to transition to by pressing its button The button will lightorange and the selected source is displayed in the preview mo...

Page 164: ...d source is displayed in the preview monitor 3 If not already lit press the Mix button which will illuminate orange The effects PixButton to the right of it will change to green 4 Press the Auto Trans...

Page 165: ...Device Controls will change to effect including the PixPad knobs and joystick The effect that is currently selected and ready to execute is shown in the effects PixButton in the transition section Its...

Page 166: ...ssing the Effect PixButton This will cause the following device controls to appear 4 Knobs for modifying effects LED Display shows selected device effect knob values and numeric keypad value Effects D...

Page 167: ...PixButton and the next 9 will appear 4 To see the 9 beyond that press the Next PixButton again You may press the Next button until PixPad runs out of assigned pages 5 To back up and look at the previ...

Page 168: ...reversed see section 4 3 5 Types of Transition Effects The BroadcastPix Switcher supports many types of transitions each has its own style PixButton icon For example if there was currently a picture o...

Page 169: ...k wipes which start in one position and then move in a circle Their icons show a black region where the foreground begins to enter and then a curved or diagonal arrow with the direction ofthe clock mo...

Page 170: ...Number you wish using the numeric keypad As you enter each number it will appear in the display For example Fx 122 as shown below If you enter a wrong number press the UP PixButton which will bring b...

Page 171: ...s are displayed in frames with 30 frames being equal to one second 60Hz and 25 being equal to one second in 50Hz The system defaults to 30 frames until another rate is selected To change the transitio...

Page 172: ...e OR 1 If the Device Controls are not already assigned to effects press the Effects PixButton 3 Press the Trans Rate PixButton and the following numeric keypad will appear 4 Enter the rate Number you...

Page 173: ...w start on the outside and go to the center etc To reverse aneffect To Reverse the direction ofall effects on the Effects PixPad press the Controls PixButton then press the Reverse PixButton To indica...

Page 174: ...to effects if they are not press the Effects PixButton in the transition section 3 Selectthe effect you wantwith either the numeric keypad or one of the Effect Pattern PixButtons 4 Click the Controls...

Page 175: ...FTB button on the Program monitor it will illuminate blue as shown on the right 3 The PixPad will change showing a numeric keypad as shown on the right Enter the desired fade to black rate with the Nu...

Page 176: ...e selected rate and the FTB button will illuminate red and startblinking 2 To fade from black press the FTB button in the transition section and the button will turn off To modify the FTB rate on the...

Page 177: ...ox Picture in Picture which can hold a camera still clip or any other source Any key may hold a Chroma Luma Key however only one source at a time may have a Chroma Luma key applied as an option multip...

Page 178: ...Manually turn keys on and off on Program Source Row Buttons For use with the Key Select Buttons to change which device is assigned to a key Key Select Buttons in the Destinations Row For assigning th...

Page 179: ...ifferentsource you will be impacting the on air content The lit source button will illuminate orange ifthis key is not on air If a shifted source 17 32 is currently in the key it will blink on the Con...

Page 180: ...is will cause this key to fade on at the rate for that keyer and the button will change color to red To Manually Take a Key Off Program 1 Any key that is on air red can be taken off program by pressin...

Page 181: ...be used with each Transition Controls section This enables key transitions to be combined with background transitions This also enables any effects such as a wipe or push off to be used for transition...

Page 182: ...the transition section of the control panel by default the buttons layers are added selected one ata time leaving the previously selected layers enabled For most users this method is acceptable howev...

Page 183: ...for left crop the R Knob for rightcrop T Knob for top crop and B Knob for bottom crop Once any side has been cropped the display and keyer window on the Multi View will read outCr next to the key rate...

Page 184: ...r X Axis control and or the 2nd Knob for Y Axis control using the knobs provides fine tuned control For quicker control the Joystick may also be used Move the Joystick Once a keyer has be repositioned...

Page 185: ...e desired keyer to assign the Device Controls to that key in this example Key 3 is being used 2 Turn the 1st knob to the desired transition rate which will be shown after the letters Ra in the display...

Page 186: ...ge the layer order of the keyers by bringing a keyer up towards the foreground or down towards the background This is useful when creating DVE boxes see next section and want to zoom a keyer full scre...

Page 187: ...buttons in preview or program will turn off 2 Selectthe desired key to move down in this case Key 3 by pressing the Key 3 transition button The keyer will move down one layer and the display will upd...

Page 188: ...ey 6 Select This will assign the Device Controls to the Keyer selected as described in section 4 4 2 3 Press the DVE OnOff PixButton on the Keyer Modifier PixPad which will cause the word DVE to appea...

Page 189: ...u would like to feed into the DVE Box by pressing another Source button in the Sources Row When pressed the contentwill appear in the DVE Box on the preview monitor 7 Bring the previewed DVE Box to ai...

Page 190: ...of the DVE Box may be modified by twisting the Joystick or The size may also be changed by pressing the Size PixButton and using the Knobs in Device Control by twisting the 1st Knob for overall size a...

Page 191: ...Green Blue Turn the corresponding knobs until the desired color is reached 4 5 3 4 5 3 Multiple DVE Boxes Two DVE Boxes may be used at once one on Key 1 and the other on Key 2 This is known as dual bo...

Page 192: ...ssociated source controls applied to it To activate source controls 1 Selecta Source PixButton in the Macro Row on the control panel or SoftPanel and it will illuminate orange as shown below Ensure th...

Page 193: ...on in the Source Controls PixPad For internal sources select the Next PixButton then the Asp Ctrls PixButton as shown on the right 2 Selectthe native aspect ratio of the source either Native 4 3 or Na...

Page 194: ...e source leftand or right 4 To scale the source larger or smaller turn the Z 3rd knob As the knobs are adjusted the source will be modified and the final resultwill appear when the source is applied t...

Page 195: ...ight 3 The display and knobs will update to show the Left Right Top and Bottom crop settings Turn the L 1st R 2nd T 3rd and or B 4th knobs to crop the sides of the image As the knobs are adjusted the...

Page 196: ...be used to confine the keying effectto certain areas of the screen by removing unwantedmaterial When using a chromakey all controls are accessed through the Source or Keyer Controls PixPad or through...

Page 197: ...rK at the end of the source attributes and the source window on the Multi View will now display a colored dotin the upper lefthand corner Both of these indicate thatClearKey is on and active for that...

Page 198: ...foreground where the matte is not totally opaque or transparent The more spill that is removed the more of the natural hues on the foreground may be removed resulting in a pink purple mask over your...

Page 199: ...xButton and the display will change to show Brightness Brit Contrast Cont and Spill Spil controls as shown on the right 3 Turn the 1st knob for Brightness until the background is as blue as possible s...

Page 200: ...tton as shown on the right 8 The display will change to show Hue Hue Tolerance Tol and Mode as shown on the right Turn the 3rd Knob to the according setting Keep Yellow Cyan Mode 1 Keep None Mode 2 Ke...

Page 201: ...sed through the Source Controls PixPad Also when a Luma key is applied to a source the Luma key will appear everywhere thatsource is applied to i e program preview key etc 4 8 1 Activating Adjusting t...

Page 202: ...The Brightness setting determines the range of the brightness thatis cut out removed The greater amountofclip the more transparent the source will be 7 Adjustthe 2nd Knob Contrastvalue by turning its...

Page 203: ...clicking on the Source pull down menu This example will use Clips 1 Any external or internal source may be selected however only external sources and clips may have ClearKey or luma key assigned You m...

Page 204: ...inputare copied to this newly selected input To adjust Lumakey controls 1 Repeatsteps 1 through 2 above by opening the FluentControls windows 2 Click on the Lumakey button and itwill illuminate blue...

Page 205: ...op 14 9 or Custom If the inputis set to 16 9 then all corrections will be ignored as systems process video at 16 9 If the Custom correction is selected enter the Width and Height values as shown on th...

Page 206: ...enabled they are temporally hidden from use until Virtual Studios are turned off Although there are up to 8 angles which can activated only 3 can be used on Preview Program or Keyer simultaneously Vir...

Page 207: ...ey may be used in up to 3 buses simultaneously AVirtual Setis in use when assigned to a Keyer Preview Program or PowerAux When a 4th Virtual Set is attempted to be selected on an output a warning will...

Page 208: ...l Set input Click on the VirtualAngles menu bar and drop down menu will appear 4 In the Angles To Display menu select how many inputs to show and use for Virtual Sets either 1 2 3 4 5 6 7 or 8 as show...

Page 209: ...ditor to save outour Virtual Set background see section 4 9 2 5 stock sets are provided with each system users may add or remove to this list using standard Windows conventions of copy paste save 3 Se...

Page 210: ...gle thumbnail and the Images pane will change as shown on the rightwith Angle 1 To adjust the chromakey settings 1 Once a background has been assigned to an angle all ClearKey controls can be modified...

Page 211: ...oduction 3 To view the positioning ofyour foreground with the background itis recommended to put the source angle in preview to see the composition Either manually place the source in Previewor select...

Page 212: ...solution limitof 1920x1080 9 To position the virtual set use the Pan and Tilt sliders to move the set Moving the slider to the rightpans left and tilts up the image and to the left pans rightand tilts...

Page 213: ...the Moves A B C or D button The Virtual Setwill move from the current position to the saved move atthe selected rate To control Virtual Studios from the Control Panel 1 Activate the source controls of...

Page 214: ...ally adjust tweak the Virtual Setpress the VS Set Cntrls PixButton as shown on the right The display will update showing the Pan Tilt and Zoom controls similar to the Move Editor 6 Either by using the...

Page 215: ...o a more complex graphic with the station logo AutoFlags uses the same techniques ofassigning a virtual background as described in the previous section To assignan image for AutoFlags 4 9 2 1 Activate...

Page 216: ...are included like brightness contrastand blur to give the right depth offield to your Virtual Set To import an image 1 Open the FluentControls window ifnot already open by selecting the Panel Fluent...

Page 217: ...lick and drag anywhere on the original image 3 In the middle ofthe Image Editor there are basic controls to modify the picture Move the sliders to the right to increase the Brightness Contrast Gamma B...

Page 218: ...ed Angle back to the assigned image Exporting an image 1 Once the image is modified to your liking the file can be exported for use in the Images section of the Virtual Set or the still store of the s...

Page 219: ...ernalKey 1 SelectSetup Granite IO Assignments then click on the Input Assignment button To assign the inputs being used for the Cut and Fill channels this step is usually done in pre production 2 Name...

Page 220: ...e Key 4 To operate the externalkeyer 1 Selectthe Key 4 Select PixButton in the Destinations Row it will illuminate orange as shown below 2 Selectthe CG Fill button using the Sources Row The PixPad wil...

Page 221: ...ed from the Control Panel Once an output is assigned as an Auxiliary outputin the Granite OutputAssignments see section 1 8 they are then available for use To operate Aux 1 6 1 On the Control Panel pr...

Page 222: ...tomatically routed to the outputs For rapid control of these outputs optional Remote Panels are needed 4 11 2 To assign default aux sources 1 Open the Granite OutputAssignment window SelectSetup Grani...

Page 223: ...ces are Program Preview and Clean Feed 1 Setup your Auxes as described in sections 4 11 When an Aux PixButton is selected in the Destinations Row the PixPad will show the selectable outputs as shown o...

Page 224: ...to 3 two PowerAux outputs which are applied to Aux 1 Aux 2 Controls are accessed through the Aux Modifier PixPads in the Device Control To Enable PowerAux 1 Click on the BroadcastPix menu button 2 Se...

Page 225: ...Pix V5 4 11 4 5 A restart message will appear on the bottom of the window Click on the OK button to close the window 6 Close the BroadcastPix Switcher application by selecting File Quit 7 Restart the...

Page 226: ...n The PowerAux PixPad will appear as shown above 4 Selectthe desired Key s to be overlaid onto the Aux outputeither Key 1 OnOff Key 2 OnOff Key 3 OnOff Key 4 OnOff Key 5 OnOff and or Key 6 OnOff The d...

Page 227: ...ed with differentuser modes which can restrict or allow access of any input or output 4 11 6 Remote Panel Wiring The Remote Panel Granite Server Granite Switcher and Control Panel all mustbe on the sa...

Page 228: ...Panel IP Address 1 On the Remote Panel selectand hold down the Shift button it will illuminate yellow Then select the Lock button as shown below This will putthe Remote Panel into an offline setup mod...

Page 229: ...exit out of the setup function 6 Click on the Output PixButton labeled Join The Show to connect to a running show To Change the Button Contrast 1 On the Remote Panel selectand hold down the Shift butt...

Page 230: ...n PixMaster Show Editor and every setting is show based meaning thatall the settings are saved and recalled on a show by show basis To Setup the Remote Panels 1 Launch BPswitcher and load a show as de...

Page 231: ...change showing green inputnumbers Grey PixButtons signify that the inputor output is blocked and not accessible from the Remote Panel Green PixButtons signify that the inputor outputis allowed for sel...

Page 232: ...all outputs may be cycled to 8 To assign Macro or SnapShotmemories in the Memoires section click on the desired memory button either 1 through 11 An assign memory window will appear as shown on the r...

Page 233: ...1 On the Remote Panel selectand hold down the Shift button it will illuminate yellow Then select the Lock button as shown below This will putthe Remote Panel into an offline setup mode as shown below...

Page 234: ...The button will illuminate orange red if Program is the selected output and the video will be routed to the SDI output on the Switcher 4 To access inputs 12 22 C or D selectthe Shift button it will i...

Page 235: ...use icon The Macro PixButton will illuminate red and the B PixButton will illuminate orangeand turn to a Play icon 4 To stop running a macro re selectthe macro SnapShot PixButton or selectthe A inputP...

Page 236: ...ort are generally saved during pre production before a show is on air The saving process takes several steps to indicate exactly which portions of the panel to save and whether to save just the set up...

Page 237: ...ou press each the display will keep track of them so you know what you saved For example to save key 1 press the Mem Save Key 1 PixButton Press it once for the key set up and the display will say 1k F...

Page 238: ...the content 5k 5s or 5c Mem Save Key 6 PixButton will save the Key 6 keyer set ups press again to save a specific source press once more to save the content 6k 6s or 6c Mem Save Prev PixButton will s...

Page 239: ...h for preview and program ofDirect Key 6 Useful for quickly brining on offKey 6 D6 Mem Save Direct All PixButton is a short cut for saving DirectKeys 1 to 6 Press again and it clears all 6 DirectKeys...

Page 240: ...10 Mem Save Aux 1 PixButton will save the source assigned to Aux 1 A1 Mem Save Aux 2 PixButton will save the source assigned to Aux 2 A2 Mem Save Aux 3 PixButton will save the source assigned to Aux...

Page 241: ...dels A9 Mem Save Aux 10 PixButton will save the source assigned to Aux 8 Only available on models A10 Mem Save Aux 11 PixButton will save the source assigned to Aux 8 Only available on models A11 Mem...

Page 242: ...ut the memory number and it s attributes plus the Status Bar on the Multi View will display which SnapShotMEM was recalled 4 12 3 To recalla Mem by number 1 Press the Mem device and the MEM PixPad wil...

Page 243: ...ger pre made effects MacroEditor Overview Action List Displays the list of commands steps in a selected macro Fields include Time to show duration Hold time to show how many frames a specific action w...

Page 244: ...nput trigger Up to 100 macros per bank can be assigned Counter Displays the running elapsed time ofthe active macro Display Shows the active macro file name and status information Details Panel Shows...

Page 245: ...4 13 3 To record a macrofrom the MacroEditor 1 Open the Macro window as described in section 4 12 1 2 If the Action List is blank proceed to step 3 if not click on the New button in the Toolbar as sho...

Page 246: ...he recorded macro onto the hard drive Enter a name and click on Save All macros will have a tln file extension and all SnapShotMems have a bpm file extension In order for Macros to be stored and recal...

Page 247: ...recording the counter in the lower right corner will start to move and the Play motion control button will illuminate red 7 When the macro is finished being recorded selectthe MEM button in the Devic...

Page 248: ...step will highlightwhite and the Details Panel will display the editable fields ofthat command each command will have slightly different panel 2 Modify the top timing information in the Details Panel...

Page 249: ...he drop down menu Contentselector displays a thumbnail and address bar for changing which clip or graphic is loaded in a specified store To selecta differentclip or graphic click on the Thumbnail or B...

Page 250: ...This function should only be used in pre production when creating Macros To turn off Live editing re click the Live button and the button will turn to grey 6 To move a step up or down in the Action L...

Page 251: ...command groups as shown on the right Selectthe desired Command Group and Action based on the description below Clicking on the CommandGroup drop down menu will list the available groups These windows...

Page 252: ...ar to the Note action allows a shortmessage to be displayed in the Status bar on the Multi View Source Border Color Allows a Macro to highlightthe window frame color ofmultiple sources on the Multi Vi...

Page 253: ...ght The Switcher ME 1 command group does the same functionality specifically for the ME Only available on 2ME systems The Content command group allows for control of any internal content such as a cli...

Page 254: ...camera control as well as preset position recalls Recorder Allows for start and stopping of the internal Flint Recording using the currently selected file name and path Streamer Allows for start and...

Page 255: ...ows for triggering of commands in Rapid CG channel A and B Useful for further automating the Rapid CG application as described below Show Next Content Selects the next piece of content in the Content...

Page 256: ...to a SnapShotmemory When using InsertSteps the recording will start above the selected step and the option Add Pause will be available to insertan indefinite pause which can be modified later Note wh...

Page 257: ...ginning with all the appropriate timing 2 To play one step at a time click on the Step button in the Control Bar This function will play out one step action for every button push Use Play Step for a m...

Page 258: ...13 6 Assigning Macros in the MacroPlayer After a macro has been created edited and saved itneeds to be assigned to the Macro Player to be triggered during a production There are 4 Macro Banks the fir...

Page 259: ...ilable button numbers click on the desired button 1 100 The selectMacro window willopen 7 Selectthe desired tln Macro file or bpm SnapShotMEM file and click on Open The Assign Button X window will app...

Page 260: ...ank 2 To assign a custom name to the selected bank click on the Rename Bank button in the Toolbar 3 In the Rename Banks window enter the custom name in the Bank Name text field as shown on the right O...

Page 261: ...to the top of the bank Clicking this button will open a confirmation box click on Yes or No Group Macros by Color organizes the buttons based on their assigned button color Clicking this button will o...

Page 262: ...o Use External GPI Box as shown on the right Now an external device may trigger a macro in the GPI banks from the external USB GPI Box To activate General Purpose Outputs GPOs on the external tally bo...

Page 263: ...ck on the desired MacroBank and it will illuminate white 5 To run a macro click on the desired MacroButton and the macro will start The Macro button will turn red and the Macro Display will read outth...

Page 264: ...king red Paused button clicking on Pausedagain will resume the macro 5 To end the macro entirely click on the Stop button in the Control Bar To control a macrofrom the control panel 1 Selectthe ALL ME...

Page 265: ...can also be trigger by the numeric PixPad similar to a SnapShot MEM as described in section 4 13 2 To control a macrofrom the MacroRow As described in section 3 7 7 SnapShotand Macro memories can be...

Page 266: ...d modified with a macro In this case the control panel will provide feedback offiles not in a show to advise the user The Multi View on the other hand will display the correctfile name and attributes...

Page 267: ...ded into your show Fluent Macros is used to rapidly recall the animation assign itto a keyer bring the keyer on air switch the background when the animation is full screen and finally bring the keyer...

Page 268: ...urce that you would like the system to automatically selectif there is ever a failure to the Server or network The Fail Safe Device is show specific so that differentshows may specify differentfail sa...

Page 269: ...air with the Cut button Note if no Preview is assigned in Granite Output Assignments then the Preview bus is not selectable These source numbers refer to the Switcher inputs Inputs 1 through 11 are t...

Page 270: ...1 and the button will illuminate orange The display will change to show the selected aux To assign a differentAux output repeatthis step The Auxiliary outputs correspond to the Switcher outputs assign...

Page 271: ...s assigned in Granite Output Assignments then the Preview bus is not selectable These source numbers refer to the Switcher inputs Inputs 1 through 16 are the cameras and other external sources connect...

Page 272: ...change to show the selected aux To assign a differentAux output repeatthis step Press the Shift button to access inputs 17 through 22 The Auxiliary outputs correspond to the Switcher outputs assigned...

Page 273: ...inputs as shown below On a 2000 these are after input22 3 Press the Show Prog preview button it will illuminate and startto blink indicating thatit is on the shifted row 4 Press the Cut button you ar...

Page 274: ...may take a few seconds for this window to appear In result a file named preview bmp or program bmp will be created in the Capture Folder 4 15 Capture of Stills Still capture is a feature enabled in a...

Page 275: ...you would like to keep your captures In the example shown below the SelectFolder window has selected a still folder that is used in a show When you choose the folder you wantclick on Select The defau...

Page 276: ...r TitleMotion GS software already installed The Inscriber box packed with the system includes a copy of the CG software and a purple application dongle The dongle mustbe attached to the system to be a...

Page 277: ...This will act as a guide when creating graphics so your text does not get cut off on theedges of TV screens Canvas Workspace in which you create CGs Libraries Shortcut to customizable styles for text...

Page 278: ...n is opened itwill automatically open TitleMotion and minimize it ready for use It is recommended notto close TitleMotion and use the minimize button to hide the application when notin use To create a...

Page 279: ...tion the cursor over the letters and then type in what you want That is all there is to creating a professional title If desired you can modify your title by changing the font pointsize position color...

Page 280: ...lready in your BroadcastPix show quickly and on the fly for immediate results see section 5 4 1 To Export a Still Graphic 1 On the Inscriber GUI at the top left click on the File menu and a drop down...

Page 281: ...right The Save As window will appear 3 Type in the File Name 4 Change the Save In storage location to the folder in which you wish to keep your titles In general all CG graphics are kept in the centra...

Page 282: ...nch in an 8 bit RGB color mode and a Pixel AspectRatio of square pixels HD using a transparentbackground Prior to exporting you will need to prepare your Photoshop documentin order for the alpha chann...

Page 283: ...nnels Tab will show the new channel as shown below 6 Save your file by selecting the File Save As menu Change the file Format to Targa Select 32 bits pixel under the Options Window so the transparency...

Page 284: ...rightof the template palette menu as shown on the right 3 Type in the desired text Note that a scroll bar appears below the text or to the rightto indicate where in the crawl roll you are The scroll...

Page 285: ...ontrol section and its timecode will show in the display 5 3 3 Motion Controls for Rolls and Crawls Ensure that the Device Controls are assigned to CG by checking in the top left corner of the display...

Page 286: ...blank page at the beginning and or end setting itto loop setting it to auto start when taken to air changing the read direction changing the aspectratio and changing its speed To modify a roll or a c...

Page 287: ...nge a crawl to a roll press the Roll Crawl PixButton on the CG Modifier PixPad The C in the display will change to a R 6 Sometimes it is desired to have the roll or crawl start out of view This way wh...

Page 288: ...econd will appear above the knob This illustration also shows a CG graphic with many modifiers set To make a roll crawl run faster turn the knob to the right to make it run slower turn it to the left...

Page 289: ...pid overwriting offiles even if the file is on program or preview 5 4 To Activate Scribe Editing 1 Create an Inscriber file in TitleMotion GS and exportit as a Scribe file as described in section 5 2...

Page 290: ...and saved The use of Watch Folders can assist in automatically replacing overwriting graphic files see section 3 5 7 for more information To Overwrite a File 1 Create a CG in either Inscriber or any...

Page 291: ...gth of the animations When using RLE files each animation in each store has a maximum of 400mb of data You may also configure the Granite System to have a 1 channel 100 frame uncompressed or 800mb com...

Page 292: ...ation by pressing the green button If you like it click on the Apply button 6 If desired you can move the animation movementpoints for the chosen animation by clicking on them in the large window show...

Page 293: ...ort and then selectExport All Frames as shown to the right 9 In the Save As insure that the file type is set to TGA Truevision and that the Compression check box is checked and enter the file name Sav...

Page 294: ...n codec may also be used however since these files are uncompressed there is a frame limitof 50 frames for each animation in each store or 100 frames when configured as one animation store In addition...

Page 295: ...n and it will illuminate orange The counter will also begin to countdown 4 To stop pause an animation press the motion control button again and the lightwill turn off 5 To rewind the animation to the...

Page 296: ...ample to the rightthe Ring Wipe is set to Auto Start Auto Stop and Auto Rewind 3 To set an animation to continuously loop press the Loop Anim OnOff PixButton on the Anim Controls PixPad The letter L w...

Page 297: ...ations and Clips have more modifiers controls since they involve motion where as Stills only have aspectratio controls To operate the Character Generator or Still Store substitute CG Still for Clip an...

Page 298: ...les ending in gif JointPhotographic Experts Group JPEG which are picture files ending in jpg The system accepts full screen stills in 1920x1080 1280x720square pixels in a 16 9 aspectratio for 50 and 6...

Page 299: ...orrectkeyboard needs to be added from the Windows Control Panel 5 8 1 Navigate to the Region and Language control panel by going to the Start Menu Control Panel Region and Language as shown on the rig...

Page 300: ...Bar in the Windows Taskbar which is application specific As you move from one application to another itwill change your settings In normal operation itwill display EN for English When Arabic is enable...

Page 301: ...ndown Creator to create their news scriptwith graphical elements then with a simple importfunction importgraphics in show rundown order basedoffof pre definedtemplates This offers a simple low costgra...

Page 302: ...B Both outputfiles can be added to the CG Stills or Logo device ofa BroadcastPix show using PixMaster Show Editor This method replicates a traditional CGwhere only one or two outputs from a CG is sen...

Page 303: ...is useful when the selected file in Rapid CG is on air with BroadcastPix but modifications needto be made to other files in Rapid CG 5 9 3 Adding the RTX Tags Rapid CGupdates textfields and logo objec...

Page 304: ...ow andrepeating this step 4 Once all the RTX tags have been entered click on the Red X button in the News Edit window to close the window 5 To view all the enabled RTX tags click on the Display Option...

Page 305: ...install concepts PixMaster switcher CG clips controls team appendix Broadcast Pix V5 5 9 3 RTX Tags on Text Logo Fields News Edit Display Options TitleMotion GS Canvas Window...

Page 306: ...w Rapid CGconsists of 4 main panels as shown below The entire Rapid CGwindowis scalable Content A bin where Scribe template files can be added removed andallows for playback of all files in the bin Ed...

Page 307: ...Scribe files Click on Add Content from Folder to clear the bank and to add a folder of files The newly added files will appear in the bank showing its thumbnail and file name To Sort Content 1 Right c...

Page 308: ...e desired file to be removed and it will highlightblue 2 Right click on the thumbnail and a drop down menu will appear as shown on the right 3 Selectthe Remove From Binoption and the file will be remo...

Page 309: ...ay be imported into the Contentpanel the alias name may be modified allowing for a more descriptive name Ifno alias name is entered and other files with the same file name are imported then the alias...

Page 310: ...he desired file path 4 Click on the Save button as shown on the right A single TGA file has been created 5 To exportall the files in the Contentpanel click on the Content panel menu bar 6 In the drop...

Page 311: ...right This will show all the assigned RTX tags from TitleMotion GS All assigned textfields will appear in yellowand all assigned logo fields will appear in blue as shown on the right This step provid...

Page 312: ...Panel or use the Back and Forward navigationbuttons atthe button of the Editor Panel as shown on the right Selecting a new file will also update the outputto the selected file iflive outputis turned o...

Page 313: ...rces which are then linked to RTX Tags inside the Editor Window To Configure Clocks 1 Click on the Data Sources Menuand a drop down menu will appear as shown on the right 2 Selectthe Clocks option and...

Page 314: ...imer 1 drop down menu selecteither Countdown or Stopwatch for the type of timer to be used 5 To change the display format click on the Format drop down menu Alist of available display formats will app...

Page 315: ...ck on the Format drop down menu Alist of available display formats will appear as shown on the right Select the desired format The Date1 display will update showing the new format 5 In addition each d...

Page 316: ...ific title from the RSS feed either click on the Titles drop down menu or the Previous or Next navigation buttons as shown on the right 6 To have the RSS Feeds cycle through the entire list of titles...

Page 317: ...consists ofan 140 character message in addition a person s name accountname and image can also be linked in Rapid CG Abuiltin editor provides a powerful yetsimple interface to manage editand sorttwee...

Page 318: ...minutes from 1 60 and click on the Auto Searchbutton it will illuminate blue as shown on the right and the status will display how long until the nextsearch To pull in tweets from the active Twitter...

Page 319: ...weets from the Input Section click on the Move All button and all the searched Tweets will move to the OutputSection In addition the pop up buttons in the InputSection can be used to move a Tweet to t...

Page 320: ...r click on the Remove button as shown ofthe right On in the Edit Section click on the Remove button The Tweet will be completely removedfrom the Twitter Editor NOTE If you re search thatTweetmay reapp...

Page 321: ...witter or a combination ofboth Selectwith Mixed Popular or Recent as shown on the right The defaultis Mixed 4 The Retrieve option allows you to specify how many Tweets are gathered ateach search The h...

Page 322: ...check mark next to Direct Output Now any searches thatcome in will jump rightto the OutputSection 9 As Tweets are searched they can be displayed in the order they were posted causing multiple search t...

Page 323: ...nce one can search for the hashtag and getthe set of messages that contain it As on option the hashtag can be hidden from the Tweet so it is not displayed on air To do so place a check mark next to Re...

Page 324: ...OK button and a web browser will open 3 If you are logged into your Twitter accountan authorization page from Twitter will automatically open if notlog into your Twitter accountand then the page will...

Page 325: ...l highlightblue then selectthe Go button 6 To remove a data file from the list of available databases click on the Data Sources Menu then selectthe Data WatchFiles option and selectthe the desired dat...

Page 326: ...me there is an option to auto advance through all the Search fields Enter an update rate between 5 60 seconds in the middle ofthe Data Panel as shown on the right To activate the advance selectthe Aut...

Page 327: ...ection from a Daktronics All Sport CGinterface box which mustbe purchased through Daktronics to the Broadcast Pix Server You may either use a straightRS 232 to RS 232 Male to Female cable into the Fli...

Page 328: ...lly COM1 or COM2 as shown on the right Note If using an EdgeportUSB to Serial extender more com ports will appear Ensure to selectthe correctcom port depending on which portthe serial cable is connect...

Page 329: ...estling The OES feed is connected using a RS 232 serial connection from the Game Out 2 porton the controller to the BroadcastPix Server with a DP 9 pin Female to Female cable You may either use a stra...

Page 330: ...COM2 as shown on the right Note If using an EdgeportUSB to Serial extender more com ports will appear Ensure to selectthe correctcom port depending on which portthe serial cable is connected to and t...

Page 331: ...condition applied to it and there is no limiton the amountof conditions however a Taglink can only be setto one condition Right click on the desired tagname and a menu will appear as shown on the rig...

Page 332: ...le the Period date into Qtr as shown on the right 7 To use specific case for text there are options to convertthe text so all your text looks similar click on the Off To UPPERCASE or tolowercase radio...

Page 333: ...tart text box enter the folder file path of the images ideally there are all in one sub folder 4 At the end of the file path enter filename In the example on the rightthe file name is TO 5 In the Add...

Page 334: ...enter 0 because we wantany value greater than 0 to be displayed butifnot no text 6 In the THEN value drop down menu selectUse text or File Path or any of the available fields from the sports controll...

Page 335: ...ed since the we programmed the ShotClock field to disappear at0 10 To save the condition and allow itto be linked to a taglink click on the Save button as shown on the right To remove a condition 1 On...

Page 336: ...or Panel mouse over the desired tag field and a yellow tag name will appear Right click on the tag name A pop up menu will appear as shown on the right 4 Depending on how the file is created and how t...

Page 337: ...to option as shown on the right 6 Repeatsteps 2 4 above to link other data fields Selectother data sources by selecting the Data Panel and selecting another source 7 To add a TagLink to another templ...

Page 338: ...he Editor panel and the data source it is linked to will appear in the Data Sources panel If multiple data sources are used in the template the first data source file will be opened 2 Once a template...

Page 339: ...ction 5 9 7 2 In the Data Sources panel openthe desired Data Source this example will use an XML file 3 Selectthe desired field to use as the activator this example will use the Name field Right click...

Page 340: ...ted In the example when BLANCHARD Michael is selected its graphic will appear and when BAGGETT Daniel is selected its graphic will appear as shown on the right 9 Only one Page Link can be set at time...

Page 341: ...ht 3 The Action Button window will appear as shown on the right ensure that the Primary Tag tab is selected Each text action button may have a value equal to added or subtracted from the currenttext T...

Page 342: ...Use on all pages with matchingTag Name checkbox as shown on the right The word All will appear in the upper leftcorner of the action button signifying thatall TagNames will be updated 6 In some cases...

Page 343: ...added to the Action Button Select one of the 21 colors from the color palette as shown on the right 8 To save the Action Button click on the Add Button button as shown on the right and the Action But...

Page 344: ...n Button this serves as a caption The image may reside anywhere on the local area network The image is scaled to fit the size of the original file created in TitleMotion 4 If multiple pages use the ex...

Page 345: ...menu will appear as shown on the right 2 To move the Action Button one space to the right selectthe Move to Next option 3 To move the Action Button one space to the left selectthe Move to Previous op...

Page 346: ...unctional To start running a Timer click on the Action Button is will illuminate green as shown on the right To pause a Timer click on the Action button again itwill now illuminate orange as shown on...

Page 347: ...ween differentproductions with differentcontent When quittingthe application if changes have been made a pop up message will appear asking to save the Project To Save a Project 1 Click on the Fluent R...

Page 348: ...mation on creating Dialog Boxes in EZNews and for technical supporton their products please contactAutomated Data Systems directly at608 785 1415 To create anEZNews Dialog Box 1 Launch EZNewsAdminappl...

Page 349: ...ust be used NO SPACES PUNCTUATION OR SPECIAL CHARACTERS AREALLOWED IN THIS FIELD 10 In Metafile Options section check the Send to Metafile option 11 Click on the Setup button and the Metafile Options...

Page 350: ...Metafile Options section check the Send to Metafile option and click on the Setup button The Metafile Options windowwill appear as shown on the right 20 In the Pre string textfield enter five 5 blank...

Page 351: ...toolbar as shown on the right Resize and repositionthese controls as desired 27 Double click on an Label control open a Label window allowing you to name the label in this case Name and Title 28 On t...

Page 352: ...ing thatthe Contentpanel will be cleared and replaced with the EZNews contents After ensuring thatyour Projectis safe to be replaced click on the OK button as shown on the right 5 In the Windows Open...

Page 353: ...Settings link on the top leftcorner of the browser 2 SelectScript Templates on the left hand side as shown on the right Note This step requires administrator privileges in Rundown Creator 3 Click on...

Page 354: ...e2 image NOTE You must use the exact tag names given in TitleMotion In the example above all of the values are blank but if you d like to enter some defaultvalues to override those in the template you...

Page 355: ...he Insert a drop down menu in the lower right hand corner 3 Select one of the script templates created earlier for example 2line seg as shown on the right 4 Enter the desired data for text or image in...

Page 356: ...n Templates NOTE If you have administrator privileges you can save this so you and your team don t have to retype it every time you export by clicking on the Save these settings as the group s default...

Page 357: ...tension 1920x1080i HD 29 97 25 29 97 25 29 97 25 29 97 25 29 97 25 29 97 25 29 97 25 29 97 25 29 97 25 29 97 25 16x9 16x9 16x9 16x9 16x9 16x9 16x9 16x9 16x9 16x9 Apple ProRes PX Apple ProRes LT Apple...

Page 358: ...he top left corner of the display 3 The number and name of the currently selected clip will be in the display 4 The PixPad will change to clips including the firstnine clips which correspond to the ni...

Page 359: ...in the the display as well as the Multi View 6 1 2 To Select a Clip by Number 1 Press the Clips Button if it is not already illuminated 2 On the Clip Store PixPad press the Controls PixButton which w...

Page 360: ...ion buttons at the bottom of the PixPad the left and rightarrows To modify clip settings click on the Controls button to bring up the Clip Controls PixPad as shown below 6 1 4 Viewing More Clips in th...

Page 361: ...of the clip you wish to capture by selecting the Use frame radio button and entering a frame number The desired image will then be captured and appear on the Multi View The image will be saved in the...

Page 362: ...ing as shown on the right The Create clip thumbnail window will appear 5 Click on the Create button as shown on the right As an alternative you may specify the frame number in the animation you wish t...

Page 363: ...ng again 4 To return to the beginning ofthe clip press the l button 5 To jump to the end of the clip press the motion control 6 2 1 Clip Counter The runtime of the clip is displayed in lower rightcorn...

Page 364: ...controls 1 Selectthe Controls button on the Multi View PixPad either using the control panel or mouse This will bring up the Clip modifiers PixPad as shown on the right 2 The motion control buttons wo...

Page 365: ...laying at its mark outpoint These are helpful for temporarily trimming off unused portions ofa clip when ingested To set mark points on a clip 1 Selectthe Clips 1 button in the Device Selectsection of...

Page 366: ...ually started with the motion button Instead the auto start function may be set to automatically begin playing from its Mark In point or from the beginning ifno mark in point is set when taken to air...

Page 367: ...en turned on for that clip 6 3 3 NOTE If a clip has audio associated with it the audiowill cut off once the clip is taken off of program if it is desired to be able to keep playing theaudio oncetransi...

Page 368: ...at clip as illustrated below ifmark in and out points are also set then LIO will appear 5 To remove the Loop pointand to enter a new one selectthe Rem Loop Point 6 3 5 Loop Clips When a clip reaches i...

Page 369: ...ned on for that clip as illustrated below 5 To remove the Cut pointand to enter a new one selectthe Rem Cut Point Only one cut point may be marked at a time per clip 6 3 6 Cut Points Similar to a loop...

Page 370: ...e end whatever is in preview including keyers will flip flop to program and place the clipstore in preview 4 To turn off the Auto Trans select the Auto Trans PixButton until the display clears the T a...

Page 371: ...til the display clears the N 6 3 8 Auto Next So far this section has described playing one clip attime using various attributes If you wish to string multiple clips together so they play out one after...

Page 372: ...section 1 7 1 To change a clip s aspect 1 Selectthe desired clip and press the Controls button on any Clip PixPad 2 Press the Next PixButton and the PixPad will change showing the source controls PixP...

Page 373: ...10 1 If the Clip button is notilluminated assign the device controls to clips by pressing the Clip button and it will illuminate 2 Put the desired clip on preview by pressing the Clip Store button in...

Page 374: ...To export from Final Cut Pro 1 On your Final Cut Pro computer selectthe File drop down menu 1 SelectExport Using QuickTime Conversion as shown on the right 3 A Save pop up window will appear as shown...

Page 375: ...r ProRes as shown on the right Choosing any other setting will not create a file recognizable in BroadcastPix 7 Under the Motion section selectthe Frame Rate drop down menu and select29 97 for NTSC 60...

Page 376: ...he Sound section to change the audio compression settings 15 The Sound Settings window will appear as shown on the right Under the Format drop down menu select Linear PCM 12 Under the Channels drop do...

Page 377: ...gs 23 In the Save window name your file in the Save As text field and choose a destination to save the file in the Where drop down menu If your Final Cut Pro system is on the same network as the Grani...

Page 378: ...annel ofthe DDR that you wish to control as shown below ensuring thatyou align Channel 1 with Port1 Channel 2 with Port 2 and Channel 3 with Port 3 3 Ensure that the external DDR is set to be controll...

Page 379: ...ight 2 Selectthe Serial Ports option 3 SelectCom1 from the Port drop down menu 4 In the Protocol drop down menu select VDCP as shown on the right Repeatsteps 7 8 for each com port 5 Under the VDCP Opt...

Page 380: ...ation screen click on the RS 422 Control button as shown on the right 4 For each Com Port 1 4 click on the Protocol drop down menu and select the Louth option as shown on the right 5 For each Com Port...

Page 381: ...the desktop as shown on the right Enter your username and password 10 Selectthe File System System Setup menu as shown on the right 11 In the Setup window place a check mark in the Remote column next...

Page 382: ...u as shown on the right 3 Click on the Player Configuration link in the Configuration section as shown on the right 4 Selectthe MediaDirector in the Player Configuration section as shown on the right...

Page 383: ...or 4 9 Assign the MediaPortto be controlled under the MediaPort Name drop down menu 10 Assign which channel Aor B to be controlled under the Channel drop drop menu 11 Click on the Done button to retur...

Page 384: ...nel C1 C4 click on the Options link in the player section as shown on the right 3 In the Options window click on the Control menu 4 Under the Remote section click either the Remote or Remote and Local...

Page 385: ...Configuration Utility This will bring up the window below If this utility is not installed on your workstation it may be necessary to install the driver CD which came with your Edge Port contacttechn...

Page 386: ...evices to open the Add Device window as shown below 3 Assign the DDR Control device to a Device Button 1 4 by selecting the drop down menu and choosing DDR Control or Omneon Server Control 4 Click on...

Page 387: ...ver Control for Omneon control It will highlightorange as shown on the right 4 Click on the Settings button and the DDR settings window willappear The Setup PixButton from the Controls PixPad may also...

Page 388: ...panel by clicking on eachclip individually and each it will highlight as shown To deselecta clip click on it again and itwill revert to white 10 To have all the clips Auto Start place a check mark nex...

Page 389: ...t will illuminate orange The device controls will show the 4 channels for control as shown below The large display will also say DDR or OMN in it s top left corner to let you know the device controls...

Page 390: ...ton 7 To rewind the clip to the beginning press the I button 3 Selectthe desired clip and by pressing its PixButton and the information for that clip will appear in the large display as shown below 6...

Page 391: ...op Clip OnOff PixButton The letter L will be appended to the clip name in the display to let you know that it has been set to loop as shown below 4 To turn off looping press the Loop Clip OnOff PixBut...

Page 392: ...f the PixPad which will bring up a new PixPad as shown on the right 2 Press the Start Record PixButton The display will change to a generic clip name of Clip_XXX with the status changing to Record The...

Page 393: ...as shown on the right The new clip WILL NOT appear in the PixPad as it needs to be added to the clip list To add a newly recorded to the PixPad 1 Ensure that the DDR control is selected and a record...

Page 394: ...pper right corner of every PixButton as shown below for channel 2 6 5 8 DDR Error Message If there is no wire connection between the RS422 Edgeportand a desired channel then an error message will appe...

Page 395: ...enables control of the following features Sony Lumens Vaddio Marshall Control up to 12 cameras with tilt pan zoom focus iris up to 16 presetpositions per camera white balance and tally control Hitachi...

Page 396: ...adapter is supplied either a RS 232 cable or a converter to RS 422 B B 422 PP9TB Sony PTZ cameras also support daisy chain as well as star configurations using a USB to Serial Edgeport If using the US...

Page 397: ...r several long runs to a set of cameras then connecting each camera in a daisy chain configuration In some installations this will reduce the amountof cable run See diagrams on next page It is importa...

Page 398: ...in Set Up RS 422 Star Configuration RS 422 Star with Daisy Chain Configuration 7 2 1 Sony VISCA Cable Sony VISCA Cable BroadcastPix RS 232 to VISCA Cable Server Server 4 8 port Edgeport USB A B Cable...

Page 399: ...x 2p FF p Socket No 1 2 CAM_Power On Off 8x 01 04 00 02 FF 8x 01 04 00 03 FF Power on Power off CAM_Zoom Stop Tele std Wide std Tele variable Wide variable Direct 8x 01 04 07 00 FF 8x 01 04 07 02 FF 8...

Page 400: ...further instructions please refer to the Sony IP Setup Guide To change the IP address of a Sony Camera 7 2 3 1 Ensure thatall the cameras have been powered on and plugged into the Panel network 2 Once...

Page 401: ...ddio Camera 7 2 4 1 Navigate to the Windows Control Panel Start Menu Control Panel as shown on the right 2 In the Windows Control Panel double click the Network and Sharing Center icon as shown on the...

Page 402: ...ton In the IP address textbox enter the following address 169 254 1 250 In the Subnetmask text box enter the following address 255 255 255 0 As shown on the right 7 Click on the OK button 8 Ensure tha...

Page 403: ...the Static radio button as shown on the right 16 In the IP Address text field enter the new IP address ensuring thateach camera has a unique IP address thatdoes notconflict with other devices on the s...

Page 404: ...ng steps 1 5 above 22 In the Properties window click on the Obtain an IP address automatically radio button as shown on the right If the BroadcastPix Control Panel portwas used enter the static IP Add...

Page 405: ...ay Devices and others that need to be acquired before installation Parts supplied by BroadcastPix Software Installation CD with option code comes pre installed on new systems This Operations and Insta...

Page 406: ...ly into on the workstation s COM port if desired 3 Run a three wire cable from the converter plug to the 5 pin connector on the pan tilt head If a 24 AWG wire is used then the maximum length for commu...

Page 407: ...three wires leaving the RS 232 to RS 485 converter need to be multiplied to go to each head This can be done with a multiplexer or by splicing wires together The 485 Multiplexer sends all 5 wires to e...

Page 408: ...the correctadapter is supplied either a converter to RS 422 B B 422 PP9TB or a 4 8 port USB extender Edgeport Panasonic PTZ cameras supportstar configurations using a USB to Serial Edgeport You may ei...

Page 409: ...RS 422 Configuration Panasonic Controller Configuration Connectup to 5 cameras through the AW RP655 then connectto the BroadcastPix with a RS 232 serial cable 7 4 1 Screw terminal to RJ 45 RS 422 Seri...

Page 410: ...nce of100 meters 328 feet IP SerialControl of Panasonic Cameras In some installations itis desired to have a Panasonic controller for a dedicated operator and have the BroadcastPix system used to trig...

Page 411: ...o the Windows Control Panel Start Menu Control Panel as shown on the right 2 In the Windows Control Panel double click the Network and Sharing Center icon as shown on the right Note These instructions...

Page 412: ...xt box enter the following address 255 255 255 0 As shown on the right 7 Click on the OK button 8 Ensure thatyour IP Panasonic camerais powered on and connected to the system you are configuringwith O...

Page 413: ...appear click on the OK button as shown on the right 15 Click on the Network button on the right side of the web browser as shown on the right 16 In the Network tab enter the address 192 168 53 10 in t...

Page 414: ...ional camera individually using differentIP addresses 19 Once all the cameras have been configured close all the open web browsers and navigate back to the TCP IPv4 Properties window following steps 1...

Page 415: ...to connectmultiple serial cables BroadcastPix control of the camera systems through the Telemetrics Studio Software CPS ST S This configuration allows for up to 50 cameras to be controlled through the...

Page 416: ...iple Camera Telemetrics Configuration The Telemetrics STS 12 Control Transfer Switch is needed The STS 12 must be ordered with at least 1 RS 232 portif connecting directly to the BroadcastPix workstat...

Page 417: ...t be set for RS 232 or RS 422 control The Controller Board is located on the same side as the connecters on the pan tilthead Unscrew the 2 screws and the board will swing open Dip switch labeled S2 as...

Page 418: ...ed to be resaved 7 7 1 Sony Camera ControlSettings 7 7 1 In BPswitcher go to the Setup menu and selectSystem Settings as shown on the right 2 In the System settings window selectthe Devices tab 3 In t...

Page 419: ...mentplace a check mark nextto Reverse Up Down as shown on the right In the normal unchecked mode movingthe joystick up tilts the camera up and moving down tilts down 9 When using multiple cameras the...

Page 420: ...ary To reduce any unwanted fastmovement the Slow speed setting can automatically be turned on when thatcamera number is switched on Program If desired place a check mark nextto the Auto Slow when on P...

Page 421: ...Setup menu and selectSystem Settings as shown on the right 2 In the System settings window selectthe Devices tab 3 In the list of enabled devices selectHitachi Camera Control and selectthe Settings b...

Page 422: ...is knob 2 You may enter a number from 1 254 for focus and 1 10 for iris These values dynamically change the faster the knob is turned the maximum number is used the slower the the knob turns the minim...

Page 423: ...n section 3 2 Add camera control to that show as described in section 7 8 3 Decide whataddress each Pan TiltHead is going to be In order to set the address of the head the panel sends outa command to...

Page 424: ...s the desired number 8 Press the Enter PixButton and the PixPad shown in the upper rightwill appear 9 Press the Change Address PixButton and the selected camera number will be assigned to the head tha...

Page 425: ...o having BroadcastPix being the camera controller the first 5 cameras may also be controlled with a Panasonic controller like the AW RP655 This type ofconfiguration is useful for having a secondary op...

Page 426: ...ntrollable cameras Ifselected a TCP IP address textbox will appear as shown on the right to enter the dedicated IP address for each camera 6 If the camera head has built in tally enter the FlintSwitch...

Page 427: ...cting the correctcamera providing an easier method ofcontrolling cameras Note This setting only functions when the Panasonic Camera Controldevice is selected in the Device Controls section 10 During a...

Page 428: ...troland selectthe Settings button The Camera Control Settings window will appear as shown on the right 4 In the Camera Control Settings window click the Camera Number dropdown menuto selecta camera 1...

Page 429: ...ed by a Macro As you selectdifferentcameras on Preview the device will follow withoutthe need of reselecting the correctcamera providing an easier method ofcontrolling cameras Note This setting only f...

Page 430: ...e Load Show 2 Open PixMaster by selecting File Edit Show 3 Click on Edit Show Settings and the Edit Show Settings window will open 4 Click on More Devices and the More Devices window will open as show...

Page 431: ...en you press the Camera Control PixButton the active camera will be whichever camera was lastused or Cam 1 if you are just starting To selecta differentcamera to control press the camera number on the...

Page 432: ...y be manually controlled with the joystick and knobs To control camera 1 the display mustshow that it is active as follows 1 To manually control the active camera s pan and tilt position move the joys...

Page 433: ...the Camera twist the Joystick To the right to zoom in To the left to zoom out For a Slow zoom twist the joystick a little For a fast zoom twist the joystick a lot 3 To adjustthe focus of the active c...

Page 434: ...ou wish to move faster before touching the joystick press the motion button and it will illuminate Now when you move the joystick the motion will be at the fast speed specified in Camera Control Setti...

Page 435: ...unctions Slow If you wish to move slower before touching the joystick or knobs press the motion button and it will illuminate orange The display will read out Slow controls as shown below now when you...

Page 436: ...ols apply only to the Telemetrics Camera Control and notto Sony Hitachi or Panasonic To control the speed of manual camera functions Default If you wish to use the default normal speed for the joystic...

Page 437: ...tions when moved up and down The defaultstate of the joystick is to control the Pan and Tiltcommands on the camera head If a TelePod or TeleGlide system is install Pedestal and Dolly movements may als...

Page 438: ...may not be stored saved by BroadcastPix this function must be done with the Studio Software CTS ST S Only snapshotpresets can be saved from the BroadcastPix Device Icon indicates Camera Control Camera...

Page 439: ...you wish to save by using the Joystick and the Knobs as described in section 7 10 Bring the desired camera up on the preview monitor by pressing its source button in the preview row so you can see it...

Page 440: ...ress Next button and the following PixPad will appear If desired keep pressing the Next button until you reach the Preset Position you wish to use On Panasonic cameras you may selectthe numeric PixBut...

Page 441: ...peed To recalla preset position 1 Selectthe desired camera from the listavailable on the top level PixPad for camera control as shown on the lower left such as Camera 1 The Preset Positions PixPad for...

Page 442: ...next9 will appear as shown below On Panasonic cameras you may selectthe numeric PixButton to enter a preset number Keep pressing the Next PixButton to reach the preset you desire You can back up by pr...

Page 443: ...call speed either fast medium or slow When each presetposition is saved it will automatically setthis recall speed atwhatever speed the system is currently set to To set the RecallSpeed 1 On the camer...

Page 444: ...Pset PixButton 2 times as shown on the right Note The Save PresetPixButton will change to a Delete PsetPixButton The thumbnail on the Fluent View PixPad will be removed showingthe generic Camera X Pr...

Page 445: ...ator to go past the normal or usable limits There are 2 for Tilt Up and Down and 2 for Pan Left and Right all of which need to be set prior to saving any camera presets Travel limits must be set on ea...

Page 446: ...ystick to manually move the camera to each position For example move the camera to the upper limityou wish to set and then press the Save PixButton Repeatfor any other limits you wish to set As soon a...

Page 447: ...e display will show whatis illustrated below Turn the 3rd knob to select either Preset Memory 1 or Memory 2 2 To adjustthe Shutter Speed Press the Shutter PixButton and the display will show whatis il...

Page 448: ...display will show whatis illustrated below Turn the 3rd knob to display the color bars 7 To adjustDetail Press the Set Detail PixButton and the display will show whatis illustrated below Turn the 3rd...

Page 449: ...ither Auto for the camera to automatically set the Iris Remote for the middle knob on the BroadcastPix panel to control Iris Manual for manual control ofthe Iris by the iris ring on the camera 10 To I...

Page 450: ...ert Horz Motn PixButton as shown below and the large display will add the add H as shown below 7 12 2 NOTE When the camera is mounted upside down andso these two invert commands are applied care must...

Page 451: ...ntrol the Focus Turn the first knob labeled Focus To set the camera to automatic focus press the Start Auto Focus PixButton in the PixPad The display will show Auto Focus On as shown below To turn off...

Page 452: ...cenarios press the White BalA T W PixButton in the PixPad The display will show White BalATW as shown below To set the camera to an indoor 3200K color temperature preset press the White BalInside PixB...

Page 453: ...for thatparticular camera 7 14 1 Adjusting CCU Functions The Camera Settings PixPad can be accessed by selecting the Camera Control device selectPixButton then selecting a Camera PixButton and select...

Page 454: ...he amountof gain Depending on the Panasonic camera the range is 0db to 12db in step 15db 18db or AGC on 4 To control the White Balance There are 4 options for white balance from preset to manual to au...

Page 455: ...wn below Depending on which Panasonic camera is used the online menu has access to more advance CCU functions like color balancing genlock phasing and outputformats Use the Next Menu PixButton to sele...

Page 456: ...e control must be done through a 3rd party controller or by using the Telemetrics Studio Software 7 15 1 Adjusting CCU Functions The Camera Settings PixPad can be accessed by selecting the Camera Cont...

Page 457: ...edestal amount The display will update showing positive or negative Master Black numbers Master black only works when Telemetrics has a controller that can initialize the cameras or when using the Stu...

Page 458: ...ni din to DB9 serial cable the same which is used for Sony Camera Control For assistance aboutwhich connection to use please contacttechnical support 7 16 1 Enabling Audio Follow To use the Audio Foll...

Page 459: ...control Audio Followwill notwork You need to disable thatporton the device to make it active in Audio Follow 3 Under the Mixer drop down menu selectthe type of audio mixer you are controlling either Y...

Page 460: ...ing faders 1 and 2 up at 50 volume type c1 63 2 63 in the On Air column If more space is needed you may type in the bar below the grid as shown on the right Ensure thatyou selectthe Update Command but...

Page 461: ...n the right Only one scene change is allowed per source 3 You may also Tie one or more video sources together When a source is tied to other sources the on air command is executed for all the sources...

Page 462: ...n on the right On the audio mixer adjust the desired control settings As settings are changed the text box will populate all the commands When complete click on the red Capture On Press Againto Stop b...

Page 463: ...unctions are not undoable Information will be lost when the buttons are selected 7 16 4 Audio Follow Operation Once set up operation is completely automatic Whenever a source goes on or off Program th...

Page 464: ...n the VU meter will also change To re enable AudioFollow repeatthis step 4 Similar to the Capture Mixer button in the Audio Follow window commands can be updated through the VU Meter without having to...

Page 465: ...S file system The recorded file may also be played back from the BroadcastPix clip store The Streamer device gives you access to start and stop the stream record and to view status All the configurati...

Page 466: ...s admin 5 To editthe streaming and or recording settings click on the Edit Settings button 6 A web browser will open showing the Command Center Click on the Settings drop down menu and selectthe Strea...

Page 467: ...art streaming to your CDN server using the settings from the Monarch as shown on the right The status will change to Starting please waiting as shown on the right If any of the settings in the profile...

Page 468: ...to which you wantto add camera control Selectthe File Load Show 2 Open PixMaster by selecting File Edit Show 3 Click on Edit Show Settings and the Edit Show Settings window will open 4 Click on More...

Page 469: ...s the Stream Control PixButton the active profile or job will appear The display indicates 4 pieces ofinformation 1 The top left corner always shows thatthe Stream device is currently assigned to the...

Page 470: ...counter will startto advance and the motion control button will illuminate red as shown on the right The motion control button may also be used to start streaming To stop streaming 1 In Device Control...

Page 471: ...clips for review after a record or selecting clips in preview prior to taking them to air Clips appear on the PixPad in the order in which they are stored recorded on the KiPro 7 18 1 Installing Deck...

Page 472: ...pen PixMaster by selecting File Edit Show 3 Click on Edit Show Settings and the Edit Show Settings window will open 4 Click on More Devices and the More Devices window will open as shown below 5 Selec...

Page 473: ...e right Up to 12 IP addresses may be added as each number is entered the system attempts to verify if the connection is valid this may resultin a slightdelay as numbers are entered 5 For each deck sel...

Page 474: ...e just starting The display indicates 4 pieces ofinformation 1 The top left corner always shows the deck currently assigned to the panel s bank of device controls In this case the words KiPro1 indicat...

Page 475: ...the available controls Selectthe Start Record PixButton as shown on the right The display will update with the words Recording Clip and the motion control button will illuminate red as shown on the ri...

Page 476: ...red clip by selecting the Clip Name PixButton The display will update showing the selected clip and timecode and the PixPad will automatically change to show the Controls PixPad NOTE Clip selection fr...

Page 477: ...button will turn off as shown on the right The timecode will stop in the display To rewind a clip 1 Ensue thatthe desired clip is selected as described in the previous section 2 In the Controls PixPa...

Page 478: ...as shown on the right The clip will fastforward at 2X speed 3 Selectthe Fast Fwd PixButton again The clip will fastforward at 4X speed 4 Selectthe Fast Fwd PixButton again The clip will fastforward a...

Page 479: ...ightly differentbased on the available features on the specific deck Under the Format drop down menu selectthe desired codec for recording and playback Only clips with the selected codec will be visib...

Page 480: ...Enter a number in the Frame number for thumbnail capture text box Setting it to 0 will use the first frame of the record 8 The AJA KiPro decks offer a web based interface to change many more menu sett...

Page 481: ...d in the Setup Installed Option menu ContactBroadcastPix Sales for more information Ganging Decks 1 As described in section 7 18 3 open the Deck Assignments menu from the Setup System Settings Devices...

Page 482: ...deck can be selectedand the following steps will continue to function 3 In the PixPad ofavailable clips selectthe Controls PixButton as shown on the right 4 The PixPad will changeshowing the availabl...

Page 483: ...own on the right Clip names are based offthe record name set in the Deck Control Settings as described in section 7 18 6 Marks are numbered in parentheses i e 1 Note as clips and marks are selected th...

Page 484: ...first level on the PixPad shows the clips On the Multi View thumbnails will appear along with the clip name Selectthe Control PixButton 8 In the Controls PixPad selectthe Select Mark PixButton as sho...

Page 485: ...Jog Knob knob 1 can be used to scrub frame by frame as shown on the right Turning to the rightwill scrub the deck s forward Turning to the left will scrub backwards 4 To move the deck s slightly faste...

Page 486: ...s 7 19 1 Installing VOX Each VOX unithas 8 line level audio inputs using an XLR Phono jack combo connecter Up to 13 units may be cascaded together for control of up to 104 audio inputs VOX does not do...

Page 487: ...d Red LEDs Indicate that the VOX unit and BPSwitcher Application are communicating with each other will blink at a fast rate Yellow LEDs Indicate that signal is present on the audio inputs Level adjus...

Page 488: ...s connected to the 15 pin GPI panel connecter on the rear of the VOX unit The panel is designed to be flush mounted to a desk or to a table top box A custom overrode button panel may also be made and...

Page 489: ...Pin connector is the loop outputfrom the first VOX unit which is then connected to the Bpix Next VOX 9 Pin connector on the second unitand following units You may continue to loop through other units...

Page 490: ...Prior to configuring the VOX unit it is importantto create the Macros used for the production as described in section 4 13 Macros may need to be refined to ensure that each switch is perfectly timed T...

Page 491: ...the Microphone settings tab on the top of the window A listof all available mic inputs will appear 1 8 for each VOX unit connected as shown on the right Each labeled inputcorresponds to the physical...

Page 492: ...ailable macros click on the Reload macros button at the top of the window as shown on the right To assign a Title Macroto an input In addition to having macros assigned to an input a Title Macro may o...

Page 493: ...ophone settings tab at the top of the window 2 To the rightof each input selectthe Down Arrow button to move the mic to a lower priority as shown on the right 3 To the rightof each input selectthe Up...

Page 494: ...duction macros will randomly be triggered from this list depending on the time settings configured for the production To have a greater chance to run a certain macro simply add the macro to the listag...

Page 495: ...ngs to adjustwhen the assigned Macros as described above are triggered There are settings for when the mic and general titles are repeated as well settings for how frequentthe various Macros are trigg...

Page 496: ...o as shown on the right is how long a source stays on air when there is no other mic activation and one mic continues to speak for a longer period of time This setting is the longest amountof time aft...

Page 497: ...minimum time This option adds a more dynamic and lively look to the production Under the Addition settings section place a checkmark next to Switch through mic macros after minimum time as shown on t...

Page 498: ...ated solid red then a Macro has been assigned When the LED is flashing slowly the GPI has been triggered and it is waiting for the previous Macro to end before the new Macro will start If the LED is f...

Page 499: ...e audio mix to select pre defined Macros This allow for a basic operator to take control at certain points of the production These Macros can then be selected on a control panel Multi View PixPad or t...

Page 500: ...appear enter a name in the File name text box in this example Town Meeting it is recommended to save these files in one common folder i e C BroadcastPix Vox 3 Click on the Save button A voxc file will...

Page 501: ...right This software may also be launched from the VOX Editor On the top window ofthe VOX Editor click on the Run configuration button as shown on the right 3 A window with all the available inputs wi...

Page 502: ...minate to representthat a signal is active those LEDs are also visible in the VOX software under the Active row as shown with input1 on the right A Mic Macro should now be running followed by its corr...

Page 503: ...n as shown on the right and it will turn grey re enabling the Pause button option VOX will continue with the automation where it left off 11 To stop cancel the automation click on the Stop button as s...

Page 504: ...Show 2 Open PixMaster by selecting File Edit Show 3 Click on Edit Show Settings and the Edit Show Settings window will open 4 Click on More Devices and the More Devices window will open as shown below...

Page 505: ...select which Macro to run and to Start Stop Pause automation 7 19 7 Pressing the VOX Macro 1 9 PixButtons will trigger the assigned Macro from the VOX editor as soon as a Mic or General Macro finishe...

Page 506: ...er Control requires a System Option Code see section A 2 for more information For more information on how to configure and operate the KUMOrouter please refer to their manual 7 20 1 Installing Router...

Page 507: ...into the router The installation can be completely customized to fit the production needs Some sources may feed the BroadcastPix directly withoutthe need to going into the router if desired Atleaston...

Page 508: ...as to be adjusted 5 Click on the Open Web Page button to open the KUMOcontrol webpage as shown on the right 6 Here you may control the KUMOrouter using the Home tab and label inputs and outputs Click...

Page 509: ...e input The bottom name on each source monitor represents the assigned Router Input Source Name or the BroadcastPix Label This name can be updated from the Multi View or InputAssignments window and wi...

Page 510: ...the Control PixButton then the Number PixButton and enter the desired router inputnumber and selectthe Enter PixButton 7 20 4 Router Control Multi View Operation 1 Ensure thatthe gear icon is visible...

Page 511: ...sed to control the show For example if the control panel is the one primarily used and should fail and lose its network connection then the SoftPanel can be used or visa versa Only 1 panel can be used...

Page 512: ...ny size screen To access a 1ME SoftPanel 1 In BPswitcher click on the Panel drop down menu 2 Select1ME Soft Panel 3 In the drop down menu that appears select either Internet Explorer or Flash as shown...

Page 513: ...erent devices and operated independently while the fixed switcher control are still locked together For example itmay be desirable for the graphics person to always be able control the CG no matter wh...

Page 514: ...ight click and the following drop down menu will appear 3 Click on Zoom In and then just a portion of the panel will be shown The resulting portion ofthe SoftPanel can then be sized and positioned lik...

Page 515: ...s so complex that the primary operator wants help 8 5 1 Two Operators with Separate Graphics Operator and 1 Panel To enable this environment a second monitor should be added all Granite systems suppor...

Page 516: ...a portion of the Broadcast Pix SoftPanel This enables the graphics person to view exactly whatthe state of the panel is on the show creator s system The graphics operator can use the portion of the co...

Page 517: ...comes with the system You will need to set a static IP address to each computer Do not use the same IP address as the one used for the control network 192 168 53 250 as this will cause performance iss...

Page 518: ...00 html This will open a 1ME SoftPanel 6 Click on returnon the keyboard to launch the SoftPanel in the web browser 7 If at any time the SoftPanel loses connection to the main workstation the words Rec...

Page 519: ...ted below use the SoftPanel option and dual monitor option to attach a second SoftPanel for the back room operator In this illustration this SoftPanel has been reduced to justan aux panel see section...

Page 520: ...Granite system The second control panel needs to have a differentIP address than the main control panel This is accomplished with changingthe Panel IP address on the control panel in the Panel Setup...

Page 521: ...the subnet 5 When complete selectthe motion button in the Device Control This will save the new IP address to the control panel and change the PixPad back to the main Setup Test menu The panel is now...

Page 522: ...hernet port via an appropriate Internet connection DSL is fine 2 In BPswitcher selectthe Setup menu 3 Then selectSystem Settings 4 In the System Settings window click on the Other tab 5 The Switcher S...

Page 523: ...d selectManage in the pop up menu as shown on the right 10 In the Computer Managementwindow double click Services andApplications then double click Internet Information Services IIS Manager as shown o...

Page 524: ...o to www whatsmyip com Your IP address will be displayed in the web browser for example 67 152 12 226 Enter that IP address followed by the Web Server Port number assigned for example http 67 152 12 2...

Page 525: ...wn on the right The PixPad will change to a numeric PixPad 4 Selectthe Clear PixButton 14 times to clear the existing IP address The display will update accordingly until Workstation URL is left as sh...

Page 526: ...endix Broadcast Pix V5 8 9 6 Press the back motion control button to save the new IP address and the display will update 7 If multiple panels are connected ensure thatthe Panel IP addresses are differ...

Page 527: ...he iPixPad is a free download from the Apple Application Store which can be accessed at http itunes apple com us app ipixpad id333188743 mt 8 The iPixPanel replicates a BroadcastPix 1ME control panel...

Page 528: ...ve a Successfully Connected message If no wireless network can be found a message CannotConnectto the BroadcastPix Studio will appear Go to the wireless network settings on the iPhone iPod to configur...

Page 529: ...roadcastPix splash screen will appear Enter the IP address of the BroadcastPix system In the IP Address text box in this case 10 0 0 51 Click the Keyboard key on the virtual keyboard to hide the keybo...

Page 530: ...Home button on the iPad The multitasking tray will appear as shown on the right Slide the tray to the rightuntil the Lock icon appears Selectthe Orientation Lock icon and a lock will appear as shown o...

Page 531: ...ot connectthe BroadcastPix system to the internet To Download New Software 1 Register your unitby going to http www broadcastpix com support html where you will have access to the customer download pa...

Page 532: ...he right and click on the Uninstall at the top of the screen button It is importantnotto remove any other software as this may effect system performance 4 A pop up message will appear asking if you wa...

Page 533: ...rd Click on the Next button 4 The nextscreen will ask to add the BPswitcher applicationto the Startup menu if desired check the Add Broadcast Pix Switcher to Startup box and click on the Next button 5...

Page 534: ...ions and then click on the Close button as shown on the right 8 An Installation Complete window will be present click on the Close button as shown on the right 9 Shutdown the Server by selecting the S...

Page 535: ...ess bar has disappeared reattach the supplied orange crossover cat5e network cable from the Granite Server to the Control Panel so that there is a connection from the Control Panel to the Granite Serv...

Page 536: ...again it is available from customer supportby providing the Granite board number ofyour system which is also displayed on the Installed Options menu 1 In BPswitcher selectSetup menu 2 Then selectInsta...

Page 537: ...he panel always responds These keep alive ping messages letboth the panel and the workstation know that the situation is normal A watchdog process in the panel software notices if these signals stop I...

Page 538: ...Cut button is also illuminated indicating thatit can be used to perform cuts between program and preview When entering the Fail Safe mode program and preview are automatically connected to the inputt...

Page 539: ...d PixButtons Turn off Sleep Normally the panel falls asleep after 30 minutes of inactivity While asleep all panel buttons are extinguished and a single dotscrolls through the display A press of any bu...

Page 540: ...ded along with longer thread screws to secure the cable in place on both the control panel Switcher ends If a longer serial cable is needed only 3 pins are necessary for operation Pins 2 3 and 5 A 4 N...

Page 541: ...D F G H J K L Enter X C V Cut B Key 1 4 Key 2 5 Key 3 6 Auto Take N M Shift Shift Ctrl Alt Alt Ctrl Enter 0 Del Caps Lock Clip1 WC1 WC3 Logo MEM Still1 PixPad Aux 1 Z Aux 2 BGR PixPad PixPad PixPad Pi...

Page 542: ...cifications Dimensions w o rack ears Inches 17 4 x 16 5 x 5 2 Centimeters 44 2 x 41 9 x 13 2 Rack units 3 RU Weight 16 Lbs 7 Kg Power 350 watts Power Consumption Typical 120VA 240VAC 410 BTU hr Max 18...

Page 543: ...html for access to the latestsoftware downloads and support information SupportE mail support broadcastpix com Mailing Address 3 Federal Street Billerica Massachusetts 01821 USA Broadcast Pix welcomes...

Page 544: ...install concepts PixMaster switcher CG clips controls team appendix Broadcast Pix V5 Notes...

Reviews: