


UM353-1B
Controller and System Test
April 2012
9-5
9.1.7 TAG
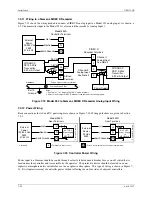
Press the TAG button. Note that Loop01.* (*= P, S, V, X or Y) will scroll across the screen. To change the tag,
refer to the Configuration Road Map in Figure 2-1 or the following instructions.
Note that although 12 characters are available for the tag, it is suggested that loop names be limited to 6 characters
so that the complete tag name will be displayed during normal operation. The additional 6 characters can be
displayed by scrolling the tag. The last two digits of the alphanumeric displayed during normal operation will be
used to identify the variable currently being displayed, P, S, V, X or Y.
1.
Press ENTER/EXIT CONF. LOOP will be displayed.
2.
Press STEP DOWN twice until VIEW appears on display.
3.
Press the right arrow button or the turn pulser knob until EDIT TAG appears on the display.
4.
Press STEP DOWN. LOOP01 will appear on the display with the 1 digit flashing. Use the pulser knob to
change the value of the flashing character and press store to save the change. Use the arrow buttons to move to
another character. Try changing the TAG to TC101.
5.
Press ENTER/EXIT CONF to return to normal operation mode.
6.
Press TAG to view tag names longer than 6 characters.
9.1.8 QUICK
When in normal operation mode the QUICK button can be used to step through the QUICK SET parameters of any
function block which has this feature enabled. In FCO101, the SETPT function block has the QUICK SET feature
enabled as a default. Press the QUICK button and note that you can scroll through the following Setpoint features:
RAMP ON/OFF, Ramp RATE, TARGET setpoint, and POWER UP SETPOINT. The ramp feature can either use a
ramp TIME or a ramp RATE. USE RATE is set to YES as the default (see SETPT function block details in Section
3.2.82).
To see how the Ramp rate works, make sure the controller is in AUTO mode and do the following steps.
1.
Press QUICK to display RRATE.
2.
Rotate the pulser knob to set the ramp RATE to 300 and press STORE. Since the SETPT range pointer is
configured for AIN1 scaled 100 to 500 DEG F, 300 will represent a ramp rate of 300 DEG F/min.
3.
Press QUICK to display TARGET. Set the target to 250% and press STORE.
4.
Press QUICK to display R ON OFF. Turn the pulser knob to change the setting to ON and press STORE.
5.
Press ENTER/EXIT to display the setpoint on the numeric display. The setpoint should ramp to 25% in 30
seconds.
To change from a Ramp RATE to a Ramp TIME do the following steps.
1.
Press ENTER/EXIT CONF to display LOOP.
2.
Press STEP DOWN twice to display VIEW.
3.
Press the right arrow button or turn the pulser knob to display EDIT FB.
4.
Press STEP DOWN to display A/M.
5.
Turn the pulser knob to display SETPT.
6.
Press STEP DOWN to display RG PTR.
7.
Turn the pulser knob to display USE RATE.
8.
Press STEP DOWN to display YES.
9.
Turn the pulser knob to change to NO, and press STORE. Press STEP UP.
10.
Turn pulser knob counterclockwise or use left arrow button to display RTIME.
Содержание 353
Страница 12: ...Contents UM353 1B x April 2012 ...
Страница 22: ...Introduction UM353 1B April 2012 1 10 ...
Страница 30: ...Configuration Overview UM353 1B April 2012 2 8 ...
Страница 122: ...Function Blocks UM353 1B April 2012 3 92 ...
Страница 168: ...Data Mapping UM353 1B April 2012 6 28 ...
Страница 204: ...Controller and System Test UM353 1B April 2012 9 8 ...
Страница 222: ...Calibration UM353 1B April 2012 11 4 ...
Страница 226: ...Circuit Description UM353 1B April 2012 12 4 ...
Страница 238: ...Model Designation and Specifications UM353 1B April 2012 13 12 EC Declaration of Conformity ...
Страница 239: ...UM353 1B Model Designation and Specifications April 2012 13 13 Annex A to the EC Declaration of Conformity ...
Страница 240: ...Model Designation and Specifications UM353 1B April 2012 13 14 ...
Страница 244: ...Abbreviations And Acronyms UM353 1B 14 4 April 2012 ...