

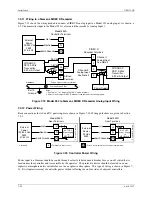
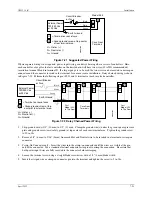


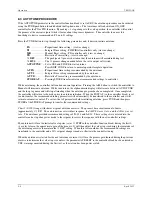


Controller and System Test
UM353-1B
April
2012
9-4
9.1.6 Alarms
Upon power up, FCO101 has 4 alarms enabled:
•
Hi alarm at 110% on AIN1
•
Lo alarm at -10% on AIN1
•
Deviation alarm of 110% between AIN1 and SETPT
•
No alarm
1.
Press the ALARM/STEP DOWN button to step through the Alarm limits and Enable/Disable Status. Notice all
the alarms are enabled and the alarm limits are displayed in engineering units on the numeric display and as a
percentage of range by a flashing LED on the S bargraph. If security clearance is satisfied, the alarm limits can
be changed by rotating the pulser knob. Try changing the alarm limit A1 to 50% (300 DEG F) and press
STORE to save the new value.
2.
Press EXIT to return to normal operation mode.
3.
Enter manual mode to display Loop01.V.
4.
Turn the pulser knob until both the valve output and process input are greater than 50%. Note that the
alphanumeric display will flash “A1 HI” and the L and S LEDs will flash. Press the ACK button to
acknowledge the alarm.
Alarms have a default priority of 3 (see Alarm block in Section 3.2.10), meaning that the alarms must be
acknowledged to clear the flashing. Alarms may also be configured as self clearing. Try changing the alarm
priority to 4 using the Configuration Road Map in Figure 2-1 or the following steps:
1.
Press ENTER/EXIT CONF. LOOP should be displayed.
2.
Press STEP DOWN twice until VIEW appears on the display.
3.
Press the right arrow button 3 times or turn the pulser knob until EDIT FB appears on the display.
4.
Press STEP DOWN. A/M will be displayed.
5.
Press the right arrow button 3 times or the turn pulser knob until ALARM appears on the display.
6.
Press STEP DOWN to display RG PTR.
7.
Press the right arrow button or turn the pulser knob until A1 PRIOR appears on the display.
8.
Press STEP DOWN to display 3 on the numeric display.
9.
To change the priority of alarm 1 from 3 to 4, rotate the pulser knob until 4 appears on the numeric display.
10.
Press STORE to save the configuration change.
11.
Press ENTER/EXIT CONF to return to normal operation.
Try adjusting the process above and below 50% (300 DEG F). Notice that the alarm will clear without pressing the
ACK button if the process drops below the alarm limit - deadband. Use the ALARM QUICK button to return the
Alarm Limit A1 to the default 110% (540 DEG F) and press STORE to save. Other alarm parameters referenced in
the ALARM function block description may be changed in a similar manner.
Содержание 353
Страница 12: ...Contents UM353 1B x April 2012 ...
Страница 22: ...Introduction UM353 1B April 2012 1 10 ...
Страница 30: ...Configuration Overview UM353 1B April 2012 2 8 ...
Страница 122: ...Function Blocks UM353 1B April 2012 3 92 ...
Страница 168: ...Data Mapping UM353 1B April 2012 6 28 ...
Страница 204: ...Controller and System Test UM353 1B April 2012 9 8 ...
Страница 222: ...Calibration UM353 1B April 2012 11 4 ...
Страница 226: ...Circuit Description UM353 1B April 2012 12 4 ...
Страница 238: ...Model Designation and Specifications UM353 1B April 2012 13 12 EC Declaration of Conformity ...
Страница 239: ...UM353 1B Model Designation and Specifications April 2012 13 13 Annex A to the EC Declaration of Conformity ...
Страница 240: ...Model Designation and Specifications UM353 1B April 2012 13 14 ...
Страница 244: ...Abbreviations And Acronyms UM353 1B 14 4 April 2012 ...