background image

21

1. Introduction

Control panel overview

12 

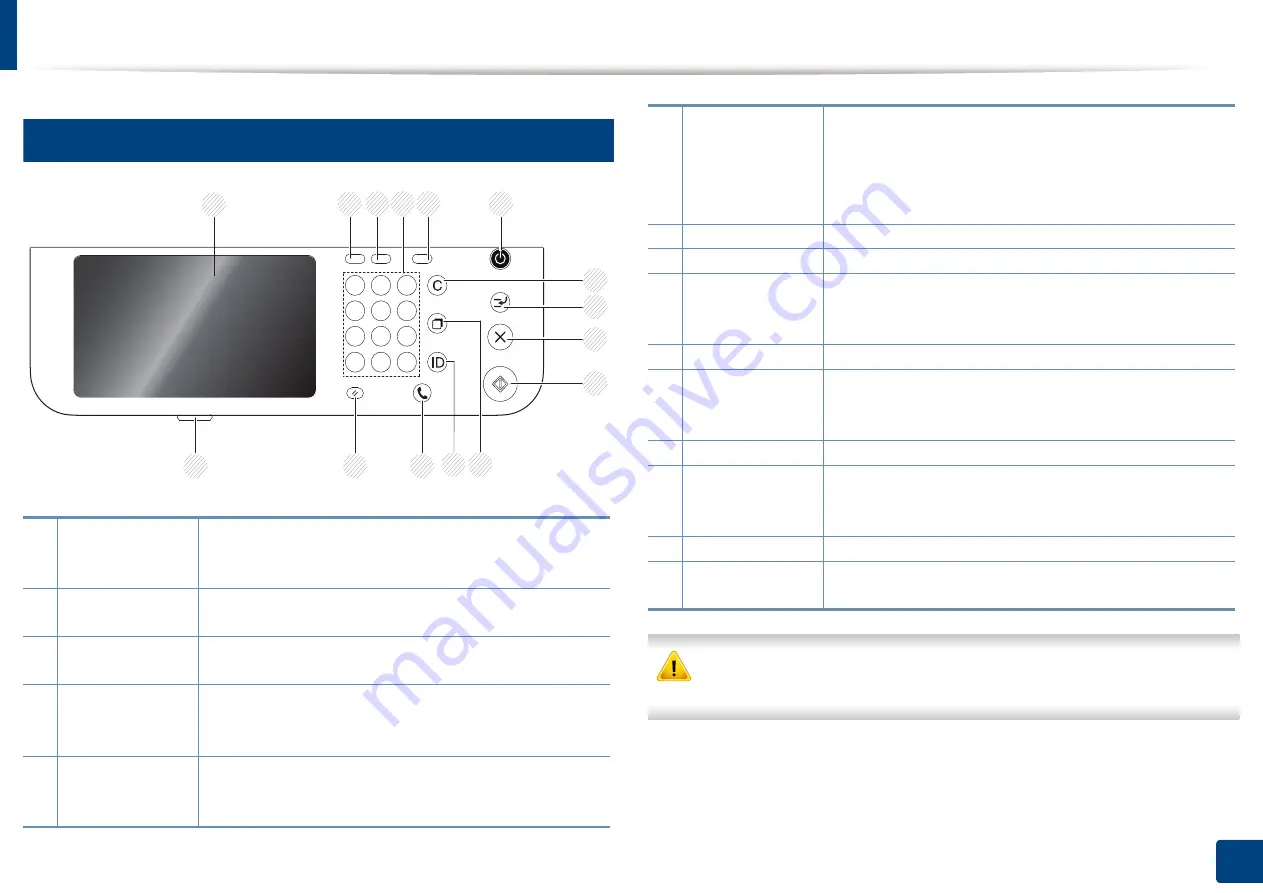
Control panel


When you use the display screen, use your finger only. The screen may be 
damaged with a sharp pen or anything else.


1

Display screen

Shows the current machine status and prompts during 
an operation. You can set menus easily using the display 
screen.

2

Job Status

Shows the jobs currently running, queued jobs, 
completed jobs, current error code or secured jobs. 

3

Counter

Shows the amount of paper used (see "Counter button" 
on page 27).

4

Numeric keypad

Dials numbers and enters alphanumeric characters. You 
can also enter the number value for document copies or 
other options.

5

Eco

Turn on Eco mode. Turn on the Eco mode to reduce 
toner consumption and paper usage when pc-printing 
and copying only (see "Eco button" on page 27).

2

3

4

5

15

6

7

8

9

10

13

14

12

11

1

6

Power/Wakeup

Turns the power on or off. When the blue LED is on, the 
machine is powered on and you can use it. To turn the 
machine off, press and hole this button for at least 3 
seconds. Press 

Yes

 when the confirmation window 

appears.

7

Clear

Deletes characters in the edit area.

8

Interrupt

Stops a job in operation for urgent copying.

9

Stop

Stops an operation at any time. The pop-up window 
appears on the screen showing the current job that the 
user can stop or resume.

10

Start

Starts a job.

11

Redial/Pause

Redials the recently sent fax number or received caller 
ID in ready mode, or inserts a pause (-) into a fax number 
in edit mode.

12

Logout

Allows user to log out.

13

On Hook Dial

When you press this button, you can hear a dial tone. 
Then enter a fax number. It is similar to making a call 
using a speaker phone.

14

Reset

Resets the current machine setup.

15

Status LED

Shows the status of your machine (see "Understanding 
the LEDs" on page 23)
.

Содержание ProCpress M408 Series

Страница 1: ...User s Guide User s Guide Thank you for purchasing a Samsung product This guide provides information concerning installation operation and troubleshooting on various operating system ...

Страница 2: ...yboard 30 2 Software Installation Installing the driver 32 Reinstalling the driver 35 3 Using a Network Connected Machine Network environment 38 Accessing network setup 39 Network settings TCP IP 40 Setting IP address 42 Installing driver over the network 47 Wireless network setup Optional 54 4 Media and Tray Preparing originals 63 Loading originals 64 Selecting print media 67 Loading paper in the...

Страница 3: ...ng special copy features 117 Using a program s setting 122 7 Scanning Understanding the scan methods 125 Scanning and sending through email 126 Scanning and sending via SMB FTP 130 Scanning and sending to your computer 135 Scanning and sending to USB shared folder 136 Changing the scan feature settings 138 Using a programs setting 142 Scanning with TWAIN enabled software 143 Scanning with Samsung ...

Страница 4: ...Stored Document and USB About SmarThru Workflow 201 Understanding the SmarThru Workflow screen 202 Workform Creation Screen 203 Understanding the Shared Folder screen 204 Using the Shared Folder 205 Understanding the Stored Document screen 207 Saving documents in the Stored Document 208 Understanding the USB screen 209 About USB memory device 210 Printing from a USB memory device 211 Scanning to a...

Страница 5: ...75 Redistributing toner 277 Replacing the toner cartridge 279 Installing accessories 282 Monitoring the supplies life 286 Cleaning the machine 287 Tips for moving storing the machine 293 15 Troubleshooting Tips for avoiding paper jams 295 Clearing paper jams 296 Understanding display messages 315 Paper feeding problems 321 Power and cable connecting problems 322 Printing problems 323 Printing qual...

Страница 6: ...ludes Key benefits 6 Features by model 8 Useful to know 10 About this user s guide 11 Safety information 12 Machine overview 18 Control panel overview 21 Turning on the machine 22 Understanding the LEDs 23 Display screen and useful button 26 Understanding the pop up keyboard 30 ...

Страница 7: ...rom your smartphone or computer using Google Cloud Print enabled apps see Google Cloud Print on page 198 Easy Capture Manager allows you to easily edit and print whatever you captured using the Print Screen key on the keyboard see Easy Capture Manager on page 253 Samsung Easy Printer Manager and Printing Status is a program that monitors and informs you of the machine s status and allows you to cu...

Страница 8: ...per sizes see Print media specifications on page 346 Print watermark You can customize your documents with words such as Confidential see Using watermarks on page 95 You can print in various operating systems see System requirements on page 349 Your machine is equipped with a USB interface and or a network interface Support XOA applications The machine supports XOA custom applications Regarding th...

Страница 9: ...ter Manager Scan to PC Settings Fax to PC Settings Advanced Setting Samsung Printer Status Samsung AnyWeb Printa Samsung Easy Document Creator Easy Capture Manager Samsung Eco Driver Packb Samsung Stylish Driver Packc SyncThru Web Service Fax Samsung Network PC Fax Scan Scan driver a Download the software from the Samsung website and install it http www samsung com find your product Support or Dow...

Страница 10: ...ng on your country wireless LAN card may not be available For some countries only 802 11 b g can be applied Contact your local Samsung dealer or the retailer where you bought your machine NFC Near Field Communication Google Cloud Print Samsung Cloud Print AirPrint Mopria Eco printing Duplex 2 sided printing USB memory interface Memory module Optional trays Tray2 Tray3 Tray4 Document Feeder Dual Sc...

Страница 11: ... The status LED flashes or remains constantly on Turn the product off and on again Check the meanings of LED indications in this manual and troubleshoot accordingly see Understanding the LEDs on page 23 A paper jam has occurred Open and close the cover see Front view on page 19 Check the instructions on removing jammed paper in this manual and troubleshoot accordingly see Clearing paper jams on pa...

Страница 12: ...s options or model you purchased The screenshots some menus in this user s guide may differ from your machine depending on the machine s firmware driver version The procedures in this user s guide are mainly based on Windows 7 1 Conventions Some terms in this guide are used interchangeably as below Document is synonymous with original Paper is synonymous with media or print media Machine refers to...

Страница 13: ...d is damaged or if the electrical outlet is not grounded This could result in electric shock or fire Do not place anything on top of the machine water small metal or heavy objects candles lit cigarettes etc This could result in electric shock or fire If the machine gets overheated it releases smoke makes strange noises or generates an odd odor immediately turn off the power switch and unplug the m...

Страница 14: ...tric shock or fire If the plug does not easily enter the electrical outlet do not attempt to force it in Call an electrician to change the electrical outlet or this could result in electric shock Do not allow pets to chew on the AC power telephone or PC interface cords This could result in electric shock or fire and or injury to your pet Do not forcefully pull the paper out during printing It can ...

Страница 15: ...rd from the electrical outlet Do not place the machine in an area with dust humidity or water leaks This could result in electric shock or fire Place the machine in the environment where it meets the operating temperature and humidity specification Do not use the machine when it is below freezing temperature or has recently been moved from a location below freezing temperature Doing so may damage ...

Страница 16: ...rmful to your health Place the machine in a well ventilated space or open a window to circulate the air periodically Do not place the machine on an unstable surface The machine could fall causing injury or machine damage Use only No 26 AWGa or larger telephone line cord if necessary Otherwise it can cause damage to the machine Make sure you plug the power cord into a grounded electrical outlet Oth...

Страница 17: ...ll a certified technician when the machine needs repairing To clean and operate the machine strictly follow the user s guide provided with the machine Otherwise you could damage the machine Keep the power cable and the contact surface of the plug clean from dust or water Otherwise this could result in electric shock or fire Do not remove any covers or guards that are fastened with screws Fuser uni...

Страница 18: ...osing of the consumables followthe instructions for disposal Refer to the reseller for disposal instructions Do not wash the consumables For a waste toner bottle do not reuse it after emptying the bottle If you do not follow the instructions above it may cause machine malfunction and environmental pollution The warranty does not cover damages caused by a user s carelessness When toner gets on your...

Страница 19: ...omponents may change depending on the configuration Machine Quick installation guide Power cord Software CDa a The software CD contains the print drivers user s guide and software applications Misc accessoriesb b Miscellaneous accessories included with your machine may vary by country of purchase and specific model ...

Страница 20: ...ment feeder width guides 13 Multi purpose tray 3 Dual scan document feeder input tray 14 USB memory port 4 Dual scan document feeder output tray 15 Output support tray 5 Push release of front cover 16 Output tray 6 Control panel 17 Scanner lid 7 Cover for optional memory and optional traya a Open this cover to install the optional memory and optional tray 18 Scanner glass 8 Front cover 19 Paper wi...

Страница 21: ...vailable depending on model or country 1 EDI 8 7 6 5 4 11 2 3 9 10 1 Cover for optional Wireless NFC kita a Open this cover to install the optional wireless NFC kit required for the wireless NFC features 2 Rear cover 3 Rear cover handle 4 Power receptacle 5 Power switch 6 USB port 7 Network port 8 EDI port for card reader 9 Telephone line socket LINE 10 Extension telephone socket EXT 11 Duplex uni...

Страница 22: ...7 2 3 4 5 15 6 7 8 9 10 13 14 12 11 1 6 Power Wakeup Turns the power on or off When the blue LED is on the machine is powered on and you can use it To turn the machine off press and hole this button for at least 3 seconds Press Yes when the confirmation window appears 7 Clear Deletes characters in the edit area 8 Interrupt Stops a job in operation for urgent copying 9 Stop Stops an operation at an...

Страница 23: ... is turned on automatically You can also turn the machine on pressing the Power Wakeup Some parts inside of the machine may be hot when power is on or after printing Be careful not to burn yourself when working inside the machine Do not disassemble the machine when it is turned on or plugged in Doing so may give you an electric shock If you turn the machine off directly using the power switch it c...

Страница 24: ...ng Printer Status on page 262 If the problem persists call a service representative 13 Status LED The color of the status LED indicates the machine s current status Status Description Off The machine is off line The machine is in power saver mode When data is received or any button is pressed it switches to on line automatically Blue On The machine is on line and can be used Blinking Fax The machi...

Страница 25: ...anding display messages on page 315 Blinking A minor error has occurred and the machine is waiting for the error to be cleared Check the display message see Understanding display messages on page 315 When the problem is cleared the machine resumes its original task The toner cartridge lifea is near the end of its life Order a new toner cartridge You can temporarily improve print quality by redistr...

Страница 26: ...he instructions in the message or refer to the troubleshooting chapter see Understanding display messages on page 315 If the problem persists call for service Status Description Off The machine is off line Blue On The machine is on line and can be used The machine is in power save mode When data is received or any screen is pressed it switches to on line automatically ...

Страница 27: ...ct the machine s administrator Copy Enters the Copy menu see Copying on page 109 Fax Enters the Fax menu see Faxing on page 147 Stored Document Enters the Stored Document menu see Understanding the Stored Document screen on page 207 Shared Folder Enters the Shared Folder menu see Understanding the Shared Folder screen on page 204 Scan to Email Enters the Scan to Email menu see Scanning and sending...

Страница 28: ...act your local Samsung dealer or the retailer where you purchased your machine see About SmarThru Workflow on page 201 16 Counter button When you press the Counter button on the control panel You can see the number of impressions When you select Device you can see the number of impressions by device An impression typically refers to a single side of a sheet and not a one sided print Total Usage Di...

Страница 29: ...f the job owner Status Displays the status of each completed job Secured Job Displays the list of secured jobs the user has set in the printer driver see Print Mode on page 89 You need to enter the ID and Password set in the printer driver No Gives the order of jobs Job Type Displays type of the job Job Name Displays the name of the job User Displays the name of the job owner Detail Displays detai...

Страница 30: ...tton the machine goes into interrupt mode which means it stops the current printing job for an urgent copy job When the urgent copy job is completed the previous printing job continues Status Description Off The machine is not in interrupt printing mode Green On The machine is in interrupt printing mode ...

Страница 31: ...bers or special symbols using the pop up keyboard on the display screen This keyboard is the same as a normal keyboard for easy usability Touch the input area where you need to enter characters then the keyboard pops up on the screen The keyboard is the default showing the lowercase letters ...

Страница 32: ...n This chapter gives you step by step instructions for installing the machine driver Read this chapter carefully to use different installation methods This chapter includes Installing the driver 32 Reinstalling the driver 35 ...

Страница 33: ...ows 8 If the installation window does not appear from Charms select Search Apps and search for Run Type in X Setup exe replacing X with the letter that represents your CD ROM drive and click OK If Tap to choose what happens with this disc pop up window appears click the window and select Run Setup exe 3 Review and accept the installation agreements in the installation window and then click Next 4 ...

Страница 34: ...re CD 1 Make sure that your computer is connected to the Internet and powered on 2 Make sure that the machine is powered on 3 Connect the computer and the machine with a USB cable The driver is automatically installed from the Windows Update 2 Mac 1 Make sure that the machine is connected to your computer and powered on 2 Insert the supplied software CD into your CD ROM drive 3 Select the CD ROM v...

Страница 35: ... machine is connected to your computer and powered on 2 Copy Unified Linux Driver package to your system 3 Open Terminal program and go to the folder that you copied the package to 4 Extract the package 5 Move to uld folder 6 Execute install sh command If you re not logged in as root execute the command with sudo as sudo install sh 7 Proceed with installation 8 When installation finished launch pr...

Страница 36: ...low the instructions in the window 3 Follow the instructions in the installation window 4 Insert the software CD into your CD ROM drive and install the driver again see Installing the driver on page 32 From the Windows 8 Start Screen 1 Make sure that the machine is connected to your computer and powered on 2 Click on the Uninstall Samsung Printer Software tile in the Start screen 3 Follow the inst...

Страница 37: ...Uninstall 4 Enter the password and click OK 5 After the uninstallation is finished click Close If a machine has already been added delete it from the Print Setup Utility or Print Fax 6 Linux If the printer driver does not work properly uninstall the driver and reinstall it 1 Open Terminal program 2 Move to uld folder extracted from Unified Linux Driver package 3 Execute uninstall sh command If you...

Страница 38: ...You need to be familiar with the terms used for setting up the network environment Refer to the glossary for terms you do not understand Glossary on page 374 This chapter includes Network environment 38 Accessing network setup 39 Network settings TCP IP 40 Setting IP address 42 Installing driver over the network 47 Wireless network setup Optional 54 ...

Страница 39: ...Specifications Network interface Ethernet 10 100 1000 Base TX Wired Lan 802 11b g n Wireless LAN a Network operating system Windows XP Service Pack 3 Windows Server 2003 Windows Vista Windows 7 8 Windows Server 2008 R2 Various Linux OS Mac OS X 10 6 10 10 UNIX OS Network protocols TCP IPv4 DHCP BOOTP DNS WINS Bonjour SLP UPnP Standard TCP IP Printing RAW LPR IPP WSD SNMPv 1 2 3 HTTP IPSec TCP IPv6...

Страница 40: ...e following screen appears Enter the ID Password and Domain using the pop up keyboard which appears when you press each field Enter the ID and password you first set when you turned on the machine Initial Settings see Initial Settings on page 238 You can also use the Recent Users button to find the recently used ID and Domain List button to find the domain from the list stored in the machine When ...

Страница 41: ...of your machine see Settings tab on page 249 Ethernet You can enable disable ethernet port Speed Rate Choose the speed rate of ethernet MAC Address Shows the Mac address of the machine 2 TCP IP Protocol You can set IPv4 settings Press Machine Setup Network Settings TCP IP TCP IPv4 from the display screen You can also use this feature from the SyncThru Web Service Open the Web browser from your net...

Страница 42: ... use as an alternative Dynamic DNS Registration If you want to use check the checkbox es of dynamic DNS registration If this option is checked the machine registers its host name and domain name to configured DNS servers dynamically Also if this option is checked and DHCP is selected DHCP FQDN options are automatically disabled WINS Windows Internet Name Service You can configure the WINS server W...

Страница 43: ...e computer firewall from Control Panel Security Center Windows Firewall The following instructions may differ for your model 1 Download the software from the Samsung website then unpack and install it http www samsung com find your product Support or Downloads 2 Follow the instructions in the installation window 3 Connect your machine to the network with a network cable 4 Turn on the machine 5 Fro...

Страница 44: ... 99 29 51 A8 becomes 0015992951A8 6 Click Apply and then click OK The machine will automatically print the Network Configuration Report Confirm that all the settings are correct IPv4 configuration using SetIP Linux Before using the SetIP program disable the computer firewall from System Preferences or Administrator The following instructions may vary from your model or operating systems 1 Download...

Страница 45: ...rn it on again When you install the printer driver do not configure both IPv4 and IPv6 We recommend to configure either IPv4 or IPv6 DHCPv6 address configuration If you have a DHCPv6 server on your network you can set one of the following options for default dynamic host configuration 1 Press Machine Setup Network Settings TCP IP TCP IPv6 from the display screen 2 Press DHCPv6 Configuration 3 Sele...

Страница 46: ...ivate IPv6 6 Click the Apply button 7 Turn the machine off and turn it on again You can also set the DHCPv6 To manually set the IPv6 address Check the Manual Address check box Then the Address Prefix text box is activated Enter the rest of the address e g 3FFE 10 88 194 AAAA A is the hexadecimal 0 through 9 A through F IPv6 address configuration 1 Access a web browser such as Internet Explorer fro...

Страница 47: ...ss Address starts with FE80 Stateless Address Automatically configured IPv6 address by a network router Stateful Address IPv6 address configured by a DHCPv6 server Manual Address Manually configured IPv6 address by a user Default Gateway Default gageway configured IPv6 address by a network router 6 Enter the IPv6 addresses e g http FE80 215 99FF FE66 7701 Address must be enclosed in brackets ...

Страница 48: ...r from Charms select Search Apps and search for Run Type in X Setup exe replacing X with the letter that represents your CD ROM drive and click OK If Tap to choose what happens with this disc pop up window appears click the window and select Run Setup exe 3 Review and accept the installation agreements in the installation window Then click Next 4 Select Network on the Printer Connection Type scree...

Страница 49: ...me or host name you wish to use You can print a Network Configuration Report from the machine s control panel that will show the current machine s host name 5 The driver is automatically installed from the Windows Update Silent installation Mode Silent installation mode is an installation method that does not require any user intervention Once you start the installation the machine driver and soft...

Страница 50: ...he PC sharing the printer and then the share name of the printer Command line Definition Description a dest_path or A dest_path Specifies destination path for installation The destination path should be a fully qualified path Since machine drivers should be installed on the OS specific location this command applies to only application software n Printer name or N Printer name Specifies printer nam...

Страница 51: ... up printer name or UP printer name Removes only specified printer instance and not the driver files This command provides a way to remove only specified printer instance from your system without effecting other printer drivers It will not remove printer driver files from your system d or D Uninstalls all device drivers and applications from your system Thiscommandwillremoveall installed device dr...

Страница 52: ...l program 9 Click Add button 10 Select AppSocket HP JetDirect and enter your machine s IP address 11 Click Forward button and add it to your system 8 UNIX Make sure your machine supports the UNIX operating system before installing the UNIX printer driver see Operating System on page 8 The commands are marked with when typing the commands do not type Some features and optional goods may not be avai...

Страница 53: ...er Wizard window Setup the printer in this window referring to the following procedures On some UNIX OS for example on Solaris 10 just added printers may not be enabled and or may not accept jobs In this case run the following two commands on the root terminal accept printer_name enable printer_name Uninstalling the printer driver package The utility should be used to delete the printer installed ...

Страница 54: ...ption in the Description field This is optional 5 Specify the printer location in the Location field 6 Type the IP address or DNS name of the printer in the Device textbox for network connected printers On IBM AIX with jetdirect Queue type only the DNS name is possible numeric IP address is not allowed 7 Queue type shows the connection as lpd or jetdirect in the corresponding list box Additionally...

Страница 55: ...Password are created for the network Ask your network administrator about this information before proceeding with the machine installation 9 Introducing wireless set up methods You can set wireless settings either from the machine or the computer Choose the setting method from the below table Some wireless network installation types may not be available depending on the model or country It is stro...

Страница 56: ... may change To prevent this lock the WPS option for the current wireless security settings The option name may differ depending on the access point or wireless router you are using Items to prepare Check if the access point or wireless router supports Wi Fi Protected Setup WPS Check if your machine supports Wi Fi Protected Setup WPS Networked computer PIN mode only Choosing your type There are two...

Страница 57: ...on the display screen Connecting in PIN mode Type in the ID and Password Use the same login ID Password Domain as when logging in from the machine see Log in on page 220 If you want to create a new user or change the password see Security tab on page 250 1 Press Machine Setup Network Settings from the display screen 2 Press Wi Fi 3 Press WPS PIN 4 Press Start 5 The eight digit PIN appears on the d...

Страница 58: ...ss Wi Fi 3 Press Wi Fi Settings 4 The machine will display a list of available networks from which to choose After a network is chosen then printer will prompt for the corresponding security key 5 Select the Wi Fi network option you want 12 Using a network cable See your network administrator or the person that set up your wireless network for information about your network configuration Your mach...

Страница 59: ...e ask the person who set up your network To configure wireless parameters you can use SyncThru Web Service Using SyncThru Web Service Before starting wireless parameter configuration check the cable connection status 1 Check whether or not the network cable is connected to the machine If not connect the machine with a standard network cable 2 Start a web browser such as Internet Explorer Safari or...

Страница 60: ...yncThru Web Service website 4 Type in the ID and Password Use the same login ID Password Domain as when logging in from the machine see Log in on page 220 If you want to create a new user or change the password see Security tab on page 250 5 When the SyncThru Web Service window opens click Settings Network Settings 6 Click Wi Fi 7 You can turn the Wi Fi network on off 14 Setting the Wi Fi Direct f...

Страница 61: ...Wi Fi Direct From the network connected computer If your printer is using a network cable or a wireless access point you can enable and configure Wi Fi Direct from SyncThru Web Service 1 Access SyncThru Web Service and select Settings Network Settings Wi Fi Wi Fi Direct 2 Enable Wi Fi Direct and set other options Setting up the mobile device After setting up Wi Fi Direct from the printer refer to ...

Страница 62: ...to the machine on the network Due to the characteristics of DHCP theallocatedIPaddresscouldchangeifthemachineisnotusedforalong time or if the access point has been reset Register the product s MACaddress when you configuretheDHCP serveronthe access point or wireless router Then you can always use the IP address that is set with the MAC address You can identify the Mac address of your machine by pr...

Страница 63: ...ow to load originals and print media into your machine This chapter includes Preparing originals 63 Loading originals 64 Selecting print media 67 Loading paper in the tray 68 Printing on special media 73 Setting the paper size and type 78 Output location 79 ...

Страница 64: ...event paper jam low print quality and machine damage Carbon paper or carbon backed paper Coated paper Onion skin or thin paper Wrinkled or creased paper Curled or rolled paper Torn paper Remove all staples and paper clips before loading Make sure any glue ink or correction fluid on the paper is completely dry before loading Do not load originals that include different sizes or weights of paper Do ...

Страница 65: ...pe see Front view on page 19 1 On the scanner glass Using the scanner glass you can copy or scan originals You can get the best scan quality Make sure that no originals are in the document feeder If an original is detected in the document feeder the machine gives it priority over the original on the scanner glass 1 Lift and open the scanner lid 2 Place the original face down on the scanner glass A...

Страница 66: ... lid open Be careful not to break the scanner glass You may get hurt Do not put hands while closing the scanner lid The scanner lid may fall on your hands and get hurt Do not look into the light from inside of the scanner while copying or scanning It is harmful to eyes 2 In the document feeder Using the Dual Scan Document Feeder DSDF you can load up to 50 sheets of paper 80 g m2 21 lbs bond for on...

Страница 67: ...s 66 4 Media and Tray 3 Adjust the document feeder width guides to the paper size Dust on the document feeder glass may cause black lines on the printout Always keep the glass clean see Cleaning the machine on page 287 ...

Страница 68: ...affects how crisp the printing looks on the paper Some print media may meet all of the guidelines in this user s guide and still not produce satisfactory results This may be the result of the sheets characteristics improper handling unacceptable temperature and humidity levels or other variables over which cannot be controlled Before purchasing large quantities of print media ensure that it meets ...

Страница 69: ...s 1 Paper length guide 2 Paper level indicator 3 Paper width guide 4 Paper limit mark If you do not adjust the guide it may cause paper registration image skew or jamming of the paper Push button as shown and pull out the tray Paper quantity indicator shows the amount of paper in the tray 1 Full 2 Empty 2 4 1 3 2 1 ...

Страница 70: ...d the paper width guide and paper length lever to locate them in the correct paper size slot marked at the bottom of the tray to adjust to the size see Tray overview on page 68 3 Flex or fan the edge of the paper stack to separate the pages before loading papers 4 After inserting paper into the tray squeeze the paper width guides and paper length guide ...

Страница 71: ...he media to buckle If you do not adjust the paper width guide it may cause paper jams Do not use a paper with a leading edge curl it may cause a paper jam or the paper can be wrinkled 5 Insert the tray back into the machine 6 When you print a document set the paper type and size for tray see Setting the paper size and type on page 78 1 2 ...

Страница 72: ...i purpose tray To prevent paper jams do not add paper while printing when there is still paper in the multi purpose tray This also applies to other types of print media Always load the specified print media only to avoid paper jams and print quality problems see Print media specifications on page 346 Flatten any curl on postcards envelopes and labels before loading them into the multi purpose tray...

Страница 73: ... bent resulting in a paper jam or skew When printing the special media you must follow the loading guideline See Printing on special media on page 73 When papers overlap when printing using Multi purpose tray open tray 1 and remove overlapping papers then try printing again 4 When you print a document set the paper type and size for tray see Setting the paper size and type on page 78 ...

Страница 74: ...age 260 If your machine is connected to the network you can set the machine s setting from SyncThru Web Service Settings tab Machine Settings see SyncThru Web Service on page 247 You can set it using Machine Setup Tray Settings Settings select the tray you want Paper Size or Paper Type on the control panel To see paper weights for each sheet refer to Print media specifications on page 346 Supporte...

Страница 75: ...er on the side about 90 degrees and try printing again Keep the rear cover opened during printing 1 Pressure lever When selecting envelopes consider the following factors Weight should not exceed 90 g m2 otherwise jams may occur Construction should lie flat with less than 6 mm curl and should not contain air Condition should not be wrinkled nicked nor damaged Temperature should resist the heat and...

Страница 76: ...second about 170 C 338 F The extra flaps and strips might cause wrinkling creasing or jams and may even damage the fuser For the best print quality position margins no closer than 15 mm from the edges of the envelope Avoid printing over the area where the envelope s seams meet 8 Labels To avoid damaging the machine use only labels designed for use in laser printers When selecting labels consider t...

Страница 77: ...n cause paper jams Exposed adhesive can also cause damage to machine components Do not run a sheet of labels through the machine more than once The adhesive backing is designed for only a single pass through the machine Do not use labels that are separating from the backing sheet or are wrinkled bubbled or otherwise damaged 9 Card stock Custom sized paper In the software application set the margin...

Страница 78: ...lity is not guaranteed Must be printed with heat resistant ink that will not melt vaporize or release hazardous emissions when subjected to the machine s fusing temperature for 0 1 second about 170 C 338 F Preprinted paper ink must be non flammable and should not adversely affect machine rollers Before you load preprinted paper verify that the ink on the paper is dry During the fusing process wet ...

Страница 79: ...ected to the network you can set the machine s setting from SyncThru Web Service Settings tab Machine Settings see SyncThru Web Service on page 247 You can set it using MachineSetup TraySettings Settings select the tray you want Paper Size or Paper Type on the control panel 11 Setting the paper size 1 Press Machine Setup Tray Settings Settings select the tray you want from the display screen 2 Pre...

Страница 80: ... a large number of pages at once Make sure that you do not touch the surface and do not allow children near it The machine sends output to the output tray by default The printed pages stack on the output support and the output support will help the printed pages to align Open the output support ...

Страница 81: ...features 81 Basic printing 82 Opening printing preferences 84 Using special print features 91 Using direct printing utility 99 Changing the default print settings 101 Setting your machine as a default machine 102 Printing to a file PRN 103 Mac printing 104 Linux printing 106 Unix printing 107 ...

Страница 82: ...e PCL PSab XPSbc PSb Windows Mac Linux Unix Machine quality option Poster printing Multiple pages per sheet Booklet printing Fit to page printing Reduce and enlarge printing Different source for first page Cover page options Raster compression PCL only Output options Watermark Overlay PCL only Double sided printing duplex a The PostScript driver is recommended for best print image quality from Pos...

Страница 83: ...tion you are using 1 Open the document you want to print 2 Select Print from the File menu 3 Select your machine from the Select Printer list The basic print settings including the number of copies and print range are selected within the Print window To take advantage of the printer features provided by your printer driver click Properties or Preferences in the application s Print window to change...

Страница 84: ...e print job is waiting in the print queue or print spooler cancel the job as follows You can access this window by simply double clicking the machine icon in the Windows task bar You can also cancel the current job by pressing Stop button on the control panel ...

Страница 85: ...lect your printer driver from the Select Printer list 4 Click Properties or Preferences The screenshot may differ depending on model You can apply Eco features to save paper and toner before printing see Easy Eco Driver on page 255 You can check the machine s current status pressing the Printer Status button see Using Samsung Printer Status on page 262 The printer driver includes a user interface ...

Страница 86: ...tions This option allows you to select various ways to layout your document SinglePagePerSide Thisoptionisabasiclayoutoption Thisoptionallows you to print a page on one side of a paper Multiple Pages Per Side See Printing multiple pages on one sheet of paper on page 91 Poster Printing See Printing posters on page 92 Booklet Printing See Printing booklets on page 92 Page Border This option allows y...

Страница 87: ...ted paper size on page 94 Percentage This option allows you to change the size of a page s contents to appear larger or smaller on the printed page by typing in a percentage you want see Change the size by percentage of your document on page 94 Source Make sure that Source is set to the corresponding paper tray Use MP Tray when printing on special materials such as envelopes and transparencies Pap...

Страница 88: ...nting mode Toner Save The Toner Save setting allows the user to save printing toner when printing a draft version of a document Select Off to print in normal mode and select On to print with less toner applied to the page 6 Advanced tab Use the Advanced tab to set various printing options Watermark See Using watermarks on page 95 Overlay See Using overlay on page 97 Output options Print Order This...

Страница 89: ...n about them refer to the Administrator s Guide 7 Eco tab The Eco tab allows you to save print resources and lead you to eco friendly printing When you select Eco Printing you can see the eco image on some options Also Some options are not available to use in the eco mode Eco Options Printer Default If you select this option this feature is determined by the setting you ve made on the control pane...

Страница 90: ...Samsung tab to display the copyright and the version number of the driver If your computer is connected to the Internet you can have access to services 9 Print Mode The Print Mode option which is visible on each preferences tab except for the Favorites tab and Samsung tab This option allows you to choose how to print or save the printing file by using the HDD in your machine The default Print Mode...

Страница 91: ...e setting The Favorites option which is visible on each preferences tab except for the Favorites tab and Samsung tab allows you to save the current preferences for future use To save a Favorites item follow these steps 1 Change the settings as needed on each tab 2 Enter a name for the item in the Favorites input box 3 Click Save 4 Enter name and description and then select the desired icon 5 Click...

Страница 92: ...int more than one page per sheet the pages will be reduced in size and arranged in the order you specify You can print up to 16 pages on one sheet 1 To change the print settings from your software application access Printing Preferences see Opening printing preferences on page 84 2 Click the Basic tab select Multiple Pages per Side in the Type drop down list 3 Select Page Border to print a border ...

Страница 93: ...ndow 7 You can complete the poster by pasting the sheets together 14 Printing booklets This feature prints your document on both sides of a paper and arranges the pages so that the paper can be folded in half after printing to produce a booklet 1 To change the print settings from your software application access the Printing Preferences see Opening printing preferences on page 84 2 Click the Basic...

Страница 94: ...references see Opening printing preferences on page 84 2 Click the Basic tab 3 From the Double Sided Printing section select the binding option you want Printer Default If you select this option this feature is determined by the setting you ve made on the control panel of the machine This option is available only when you use the PCL printer driver None Disables this feature Long Edge This option ...

Страница 95: ...eature when you select a size of paper from the Output Size 5 Select the Source and Paper Type 6 Click OK or Print until you exit the Print window 17 Fitting your document to a selected paper size This printer feature allows you to scale your print job to any selected paper size regardless of the document size This option can be useful when you want to check fine details on a small document 1 To c...

Страница 96: ...s from your software application access Printing Preferences see Opening printing preferences on page 84 2 Click the Advanced tab and select the desired watermark from the Watermark drop down list 3 Click OK or Print until you exit the print window Creating a watermark 1 To change the print settings from your software application access Printing Preferences see Opening printing preferences on page...

Страница 97: ...he Advanced tab select Edit from the Watermark drop down list 3 Selectthewatermark youwanttoeditfromtheCurrentWatermarkslist and change the watermark message and options 4 Click Update to save the changes 5 Click OK or Print until you exit the Print window Deleting a watermark 1 To change the print settings from your software application access Printing Preferences see Opening printing preferences...

Страница 98: ...verlay you must create a new page overlay containing your logo or image 1 Create or open a document containing text or an image for use in a new page overlay Position the items exactly as you wish them to appear when printed as an overlay 2 To save the document as an overlay access Printing Preferences see Opening printing preferences on page 84 3 Click the Advanced tab and select Create from the ...

Страница 99: ... the Overlay List box 6 If necessary check Confirm Page Overlay When Printing box If this box is checked a message window appears each time you submit a document for printing asking you to confirm your wish to print an overlay on your document If this box is not checked and an overlay has been selected the overlay automatically prints with your document 7 Click OK or Print until you exit the Print...

Страница 100: ...ds a PDF file directly to your machine to print without having to open the file It sends data through the Windows spooler using the port of the printer driver It only supports PDF format To install this program Download the software from the Samsung website then unpack and install it http www samsung com find your product Support or Downloads 21 Printing There are several ways you can print using ...

Страница 101: ...t click on the PDF file you wish to print and select Direct Printing The Direct Printing Utility window appears with the PDF file is added 2 Select the machine you wish to use 3 Customize the machine settings for your needs 4 Click Print The selected PDF file is sent to the machine ...

Страница 102: ...Vista select Control Panel Hardware and Sound Printers For Windows 7 8 select Control Panel Devices and Printers For Windows Server 2008 R2 select Control Panel Hardware Devices and Printers 3 Right click on your machine 4 For Windows Windows XP Service Pack 3 Server 2003 Server 2008 Vista select Printing Preferences For Windows 7 8 or Windows Server 2008 R2 from context menus select Printing pref...

Страница 103: ...s Server 2008 Vista select Control Panel Hardware and Sound Printers For Windows 7 8 select Control Panel Devices and Printers For Windows Server 2008 R2 select Control Panel Hardware Devices and Printers 3 Select your machine 4 Right click your machine and select Set as Default Printer For Windows 7 or Windows Server 2008 R2 if Set as default printer has a you can select other printer drivers con...

Страница 104: ...x at the Print window 2 Click Print 3 Type in the destination path and the file name and then click OK For example c Temp file name If you type in only the file name the file is automatically saved in My Documents Documents and Settings or Users The saved folder may differ depending on your operating system or the application you are using ...

Страница 105: ...printer settings You can use advanced printing features when using your machine Open an application and select Print from the File menu The machine name which appears in the printer properties window may differ depending on the machine in use Except for the name the composition of the printer properties window is similar to the following 25 Printing multiple pages on one sheet You can print more t...

Страница 106: ...ars 1 From your Mac application select Print from the File menu 2 Select Layout from the drop down list under Orientation 3 Select a binding orientation from the Two Sided option 4 Select the other options to use 5 Click Print and the machine prints on both sides of the paper If you print more than 2 copies the first copy and the second copy might print on the same sheet of paper Avoid printing on...

Страница 107: ...int Automatic manual duplex printing may not be available depending on models You can alternatively use the lpr printing system or other applications for odd even printing see Features by model on page 8 29 Printing files You can print text image pdf files on your machine using the standard CUPS directly from the command line interface The CUPS lp or lpr utility allows you to do that You can print...

Страница 108: ...ress Properties 5 Press OK to start the print job 32 Changing the machine settings The UNIX printer driver Print Job Manager in which the user can select various print options in printer Properties The following hot keys may also be used H for Help O for OK A for Apply and C for Cancel General tab Paper Size Set the paper size as A4 Letter or other paper sizes according to your requirements Paper ...

Страница 109: ...l print output Margins tab Use Margins Set the margins for the document By default margins are not enabled The user can change the margin settings by changing the values in the respective fields Set by default these values depend on the page size selected Unit Change the units to points inches or centimeters Printer Specific Settings tab Select various options in the JCL and General frames to cust...

Страница 110: ...es you step by step instructions for copying documents This chapter includes Understanding the copy screen 110 Basic copying 112 Quick copying 114 ID card copying 115 Using special copy features 117 Using a program s setting 122 ...

Страница 111: ...es Enters the number of copies Paper Source Selects the paper source tray Reduce Enlarge Reduces or enlarges the size of a copied image Duplex Sets the machine to print copies on both sides of the paper Color Mode Selects a black white mode for making copies Output Sets the machine s various output options Darkness Adjusts the brightness level to make a copy for easier reading when the original co...

Страница 112: ...lows you to print a watermark on printouts Stamp Allows you to print with some information such as date and time BuildJob After thescanningisfinished the ScanMorePages windowappears to ask if you want to scan another page If you select Yes then you can scan another page in the current job If you select No then the scanning process is completed and the remainder of the job is performed 3 Image tab ...

Страница 113: ...r Source Reduce Enlarge Duplex and more in the Basic tab 4 Set the copy features in the Advanced or Image tabs if necessary see Using special copy features on page 117 5 Enter the number of copies using the numeric keypad on the control panel if necessary 6 Press Start from the control panel to begin copying To cancel the current copy job press Stop on the control panel You can delete current and ...

Страница 114: ...nter side of the DSDF width guide 3 Press the Advanced tab Original Size Mixed Size from the display screen Mixed Size is activated when the originals are placed in the DSDF When using the Mixed Size option the machine can detect only the length of the originals and print them on A4 LTR or Legal size paper 4 Adjust the settings for each copy such as Paper Source Duplex and more in the Basic tab 5 ...

Страница 115: ...creen 2 Place the originals face up in the DSDF or place a single original face down on the scanner glass and close the DSDF see Loading originals on page 64 3 Adjust the settings for each copy such as Reduce Enlarge Duplex N Up Output Paper Source etc You can set the default Quick Copy options from Machine Setup Application Settings Copy Settings from the display screen Set the most frequently us...

Страница 116: ... won t be copied 1 Press Copy from the display screen 2 Press the Advanced tab ID Copy from the display screen 3 Select a tray in Paper Source 4 Follow the steps on the display screen 5 Place the front side of an original facing down on the scanner glass as shown below and close the DSDF When you place an original on the scanner glass leave a little space between the edge of the scanner glass and ...

Страница 117: ...riginal Otherwise part of original may not be printed 8 Press Start on the control panel to begin copying If the original is larger than the printable area some portions may not be printed If you do not press the Start button only the front side will be copied If you press the Stop button the machine cancels the copy job and returns to ready mode ...

Страница 118: ...screen 4 Press the Basic Advanced or Image tab from the display screen 5 Press the appropriate option Item Description Paper Source Paper Source sets the tray containing the paper to be used for printing The machine prints the scanned image on the paper in the selected tray You can see the icons that show paper sizes and the remaining amount of paper in each tray Reduce Enlarge Reduces or enlarges...

Страница 119: ...he machine to print copies on both sides of paper 1 1 Sided Scans one side of an original and prints it on one side of the paper 1 2 Sided 2 1 Sided 2 2 Sided If an original is placed on the scanner glass and you press 1 2 Sided 2 1 Sided or 2 2 Sided the message Do you want to scan another page appears after the first page is copied Load another original and press Yes When you finish press No on ...

Страница 120: ...op toward the back of the machine Sideways Images Select this setting for an original document loaded into the DSDF with the top of the original document toward the left side of the machine or an original document placed on the scanner glass with the top of the original document toward the right side of the machine Item Description Original Type The original type setting is used to improve copy qu...

Страница 121: ...n entire book If the book is too thick lift the cover until its hinges are caught by the stopper and then close the cover If the book is thicker than 30 mm start copying with the cover open Off Disables this feature Left Page Prints only the left page of the book Right Page Prints only the right page of the book Both Pages From Left Prints both facing pages from the left page Both Pages From Right...

Страница 122: ... printouts Comment This option allows you to print your comment on the printouts Date Time This option allows you to print time and date stamps on the printouts Page Number This option allows you to print page number on the printouts Item Description Watermark The watermark option allows you to print text over an existing document For example you use it when you want to have large gray letters rea...

Страница 123: ...tures in the Advanced or Image tabs if necessary see Using special copy features on page 117 4 Press the Basic tab or Back 5 Enter the number of copies using the numeric keypad on the control panel if necessary 6 Press Programs 7 Press Save 8 Press Program Name input area The pop up keyboard appears Enter the program name you want Press Done You can see the values of set Programs by scrolling up o...

Страница 124: ... the DSDF or place a single original face down on the scanner glass and close the DSDF see Loading originals on page 64 3 Press Programs Load 4 Press a program name you want to use on the list 5 Press Apply The machine is now set to copy according to the setting you selected 6 Press Start from the control panel to begin copying ...

Страница 125: ...d folder 139 Changing the scan feature settings 141 Using a programs setting 145 Scanning with TWAIN enabled software 146 Scanning with Samsung Easy Document Creator 147 Mac scanning 148 Linux scanning 149 The maximum resolution that can be achieved depends upon various factors including computer speed available disk space memory the size of the image being scanned and bit depth settings Thus depe...

Страница 126: ...er Scans and sends scanned output to the destination with SMB or FTP see Scanning and sending via SMB FTP on page 132 Scan to PC Scans and sends scanned output to a computer see Scanning and sending to your computer on page 138 Scan to Shared Folder Scans and stores scanned output in the shared folder see Scanning and sending to USB shared folder on page 139 Scan to USB Scans and stores scanned ou...

Страница 127: ...tings then type the sender s email address Clcik the checkbox on the right to send to yourself Input Address Tap the screen to add recipient s email addresses File Name Makes the file name for the file to be sent File Format Select the file format before you proceed with the scanning job Resolution Selects scanning resolution value Darkness Adjusts the degree of darkness of scanned output AddressB...

Страница 128: ...or originals that are scanned on both sides Build Job After the scanning is finished the Scan More Pages window appears to ask if you want to scan another page If you select Yes then you can scan another page in the current job If you select No then the scanning process is completed and the remainder of the job is performed Image tab You can move to the next or previous page using the up down arro...

Страница 129: ...ru Web Service website 4 Type in the ID and Password Use the same login ID Password Domain as when logging in from the machine see Log in on page 220 If you want to create a new user or change the password see Security tab on page 250 5 Select Settings Network Settings and Outgoing Mail Server SMTP 6 Enter the IP address in dotted decimal notation or as a host name 7 Enter the server port number f...

Страница 130: ... original face down on the scanner glass and close the DSDF see Loading originals on page 64 2 Press Scan to Email from the display screen 3 Set the scan features in the Advanced Image or Output tabs 4 Press the Basic tab 5 Enter the login name and password if you configured on SyncThru Web Service 6 Enter the sender s and recipient s email address Add to Address Allows you to add an email address...

Страница 131: ... and press Delete see Job Status button on page 28 While the machine is sending a scanned data you cannot use the machine to copy or to send a fax 4 Resending to the last email address To resend to the last used email address 1 Place the originals face up in the DSDF or place a single original face down on the scanner glass and close the DSDF see Loading originals on page 64 2 Press Scan to Email ...

Страница 132: ...Load another original and press Yes When you finish press No on this window 5 Printing an email confirmation report You can set the machine to print a report whether an email transmission is successfully completed or not If a report contains characters or fonts that the machine does not support Unknown could be printed instead of the characters fonts in the report 1 Press Machine Setup Application...

Страница 133: ...6 Understanding the Scan to Server screen Press Scan to Server in the display screen Basic tab File Name Makes the file name for the file to be sent File Format Select the file format before you proceed with the scanning job Recent Shows the latest email addresses used Also you can choose email addresses instead of pressing the pop up keyboard see Resending to the last email address on page 130 Re...

Страница 134: ...entation of the originals Duplex For originals that are scanned on both sides Build Job After the scanning is finished the Scan More Pages window appears to ask if you want to scan another page If you select Yes then you can scan another page in the current job If you select No then the scanning process is completed and the remainder of the job is performed Image tab You can move to the next or pr...

Страница 135: ...site 4 Type in the ID and Password Use the same login ID Password Domain as when logging in from the machine see Log in on page 220 If you want to create a new user or change the password see Security tab on page 250 5 Select Address Book Individual Add 6 Check the box next to Add FTP or Add SMB 7 Enter the IP address in dotted decimal notation or as a host name 8 Enter the server port number from...

Страница 136: ...ns using SMB or FTP servers To scan and send an image to a server you need to set up network parameters using the control panel or SyncThru Web Service see Setting up an FTP SMB server on page 134 1 Place the originals face up in the DSDF or place a single original face down on the scanner glass and close the DSDF see Loading originals on page 64 2 Press Scan to Server from the display screen 3 Se...

Страница 137: ...g and then sends the scanned image to the specified server If an original is placed on the scanner glass the machine shows the window asking if you want to place another page Load another original and press Yes When you finish press No on this window To cancel the current scan job press Stop on the control panel Or you can delete current and pending jobs using Job Status on the control panel Selec...

Страница 138: ...er address to which you want to resend Then press OK Add to Address Allows you to add a server address in the Recentresults to the Address Book Delete Allows you to delete a server address in the Recent results Press the server address you want to delete Then press Delete 7 Set the scan quality by Duplex and Resolution 8 Press the Start button to scan and send the file If an original is placed on ...

Страница 139: ...en 4 Select your computer name and press OK If the machine requests a password enter the password using the numeric keypad on the control panel 5 Press the application program you want and press Select Default setting is My Documents 6 Set the scan quality with Resolution in the Basic tab 7 Set the size of original in the Advanced tab If you are not sure of the original size select Auto 8 Set the ...

Страница 140: ... originals Original Orientation Selects the orientation of the originals Build Job After the scanning is finished the Scan More Pages window appears to ask if you want to scan another page If you select Yes then you can scan another page in the current job If you select No then the scanning process is completed and the remainder of the job is performed Image tab You can move to next or previous pa...

Страница 141: ... folder for storingthe scanned image If you do not select a folder the scanned image is stored in root directory 5 Press the File Name input area The pop up keyboard appears 6 Enter a file name to store the scan data Press Done 7 Set the File format Resolution and Darkness 8 Set the scan features in the Advanced Image or Output tabs if necessary see Changing the scan feature settings on page 141 9...

Страница 142: ...s original type and more from the display screen 4 Press the Basic Advanced Image or Output tab from the display screen 5 Press the appropriate option Item Description Original Size Sets the image size Original Orientation Upright Images Select this setting for an original document loaded with the top toward the back of the machine Sideways Images Select this setting for an original document loade...

Страница 143: ...the black gradation to display an image 8 bits per pixel Mono Displays an image in black and white 1 bit per pixel Item Description Duplex 1 Sided For originals that are scanned on one side only 2 Sided Book For originals that are scanned on both sides 2 Sided Calendar For originals that are scanned on both sides but the back is rotated 180 degrees If an original is placed on the scanner glass the...

Страница 144: ...ile with the Adobe Acrobat Reader Multi Page If you want several originals to be scanned as one file press Multi Page Searchable The machine detects text in the scanned image and creates a searchable PDF for text searching Press this button and select a language that is used in the scanned image Press OK Compact You can compress originals to create a small sizedfile pressCompact Thiscompression me...

Страница 145: ...Erase Lightens the background Use the left right arrows to toggle the values Erase Backside Image This feature prevents scanning the other side s image shown through the original paper Off Turns this option off Erase Lightens the background Use the left right arrow s to toggle the values Item Description Quality You can use this option to produce a high quality document The higher quality you sele...

Страница 146: ...pop up keyboard appears Enter the program name you want Then press OK You can see the values of set Programs by scrolling up or down and check the values using the up down arrows 7 Press Save 8 You can check the settings again If everything is fine press Add to home to make a shortcut on the main screen Save to save current settings or Cancel to quit without saving 14 Loading 1 Press Scan to Email...

Страница 147: ...w to scan with TWAIN compliant software 1 Make sure that the machine is connected to your computer and powered on 2 Place the originals face up in the DSDF or place a single original face down on the scanner glass and close the DSDF see Loading originals on page 64 3 Open an application such as Adobe Photoshop 4 Open the TWAIN window and set the scan options 5 Scan and save your scanned images ...

Страница 148: ...56 1 Place the originals face up in the DSDF or place a single original face down on the scanner glass and close the DSDF see Loading originals on page 64 2 From the Start menu select Programs or All Programs Samsung Printers For Mac open the Applications folder Samsung folder Samsung Easy Document Creator 3 Click Samsung Easy Document Creator 4 Click Advanced Scan from the home screen 5 Select th...

Страница 149: ...ng originals on page 64 3 Open the Applications folder and run Image Capture 4 Select your device below SHARED 5 Set the scan options on this program 6 Scan and save your scanned image If scanning does not operate in Image Capture update Mac OS to the latest version For more information refer to the Image Capture s help You can also scan using TWAIN compliant software such as Adobe Photoshop You c...

Страница 150: ...pplication such as xsane or simple scan If it s not installed please install it manually to use scan features For example you may use yum install xsane for rpm package systems and apt get install xsane for deb package systems to install xsane 3 Select your device from the list and set the scan options to apply 4 Click the Scan button ...

Страница 151: ...hine as a fax machine This chapter includes Preparing to fax 148 Sending a fax from your computer 149 Understanding the fax screen 151 Sending a fax 153 Receiving a fax 160 Adjusting the document settings 163 Printing a fax report 166 Using a programs setting 167 ...

Страница 152: ...ask the internet service provider We recommend you to use traditional analog phone services PSTN public switched telephone network when connecting telephone lines to use Fax If you use other Internet services DSL ISDN VolP you can improve the connection quality by using the Micro filter The Micro filter eliminatesunnecessarynoisesignalsandimprovesconnectionqualityor Internet quality Since the DSL ...

Страница 153: ...dow 4 Click Print or OK 5 Enter the recipient s fax number and set the options if necessary 6 Click Send 2 Checking the sent fax list Windows You can check the sent fax list from your computer From the Start menu click Programs or All Programs Samsung Printers Fax Transmission History Then the window appears with the list of faxes sent FormoreinformationaboutFaxTransmissionHistory clicktheHelp but...

Страница 154: ...ntly used fax numbers 7 If necessary enter the access code in the Dialing Prefix input area 8 If necessary you can send the fax with a cover page check Use Cover Page Enter the subject and message of the fax job 9 Click Fax 10 The Fax icon appears on your Mac dock Click the icon You can see the status of the fax job You can also delete hold resume and pause the fax job ...

Страница 155: ...page 170 or Setting up an address book from SyncThru Web Service on page 174 Resolution Adjusts the resolution options Darkness Adjusts the degree of darkness of scanned output AddressBook Favorite All ABC Inputs the recipient s address by pressing stored addresses You can save frequently used email addresses using the control panel or SyncThru Web Service see Setting up an address book from the c...

Страница 156: ...ine to send a fax at a later time without your intervention see Delaying a fax transmission on page 158 Build Job After the scanning is finished the Scan More Pages window appears to ask if you want to scan another page If you select Yes then you can scan another page in the current job If you select No then the scanning process is completed and the remainder of the job is performed 6 Image tab Or...

Страница 157: ...ss the ID Name input area The pop up keyboard appears Enter your name or the company name Press OK 4 Press the Fax Number input area Enter your fax number using the numeric keypad on the control panel 5 Press OK to save the information 8 Sending a fax 1 Place the originals face up in the DSDF or place a single original face down on the scanner glass and close the DSDF see Loading originals on page...

Страница 158: ... control panel The machine starts to scan and send a fax to the destinations You can send a fax directly from your computer see Sending a fax from your computer on page 149 When you want to cancel a fax job press Stop on the control panel before the machine starts transmission or press the Job Status button on the control panel and select the job you want to delete then press Delete see Job Status...

Страница 159: ... display screen 3 Adjust the document settings in the Advanced or Image tab see Adjusting the document settings on page 163 4 Press the Basic tab 5 Select Resolution 6 When you press the input line from display screen For a one digit 0 9 speed dial number press and hold the corresponding digit button using the numeric keypad on the control panel For a two or three digit speed dial number press the...

Страница 160: ...ngle original face down on the scanner glass and close the DSDF see Loading originals on page 64 2 Press Fax from the display screen 3 Adjust the document settings in the Advanced or Image tab see Adjusting the document settings on page 163 4 Press the Basic tab 5 Select Resolution 6 Press On Hook on the display screen 7 When you hear the dial tone enter a fax number using the numeric keypad on th...

Страница 161: ...ay screen 2 Press a fax line if your machine has multiple fax lines 3 Set the Redial Term min option using the and buttons 4 Set the Redial Times option using the and buttons 12 Redialing the last number You can choose fax numbers instead of pressing the number key 1 Place the originals face up in the DSDF or place a single original face down on the scanner glass and close the DSDF see Loading ori...

Страница 162: ...e control panel The machine starts to scan and send a fax to destinations 13 Delaying a fax transmission You can set your machine to send a fax at a later time when you will not be present When you use this option Quick Start Fax and Priority Send in the Advanced tab are inactivated When you use this option you cannot send a fax using the On Hook button on the display screen 1 Place the originals ...

Страница 163: ...is feature 9 Press the Job Name input area Then the pop up keyboard appears Enter the job name you want Press Done If you do not enter a job name the machine assigns the job name 10 Set the delay sending time You can set the delay sending time to be greater than 15 minutes later than the current time For example if it is 1 00 then you can set the time starting to be 1 15 If the set time is incorre...

Страница 164: ...swers an incoming fax call and immediately goes into the fax reception mode Answering Machine Fax Is for when an answering machine is attached to your machine Your machine answers an incoming call and the caller can leave a message on the answering machine If the fax machine senses a fax tone on the line the machine automatically switches to Fax mode to receive the fax 15 Receiving manually in Tel...

Страница 165: ...hen the machine receives a fax in this mode Print will be activated If you want to print the secured faxes press Print All secured faxes will be printed out 4 If you want to Passcode setting press Passcode blink then input the Passcode 5 If you want incoming faxes to go into memory always press Whole Day Otherwise go to the next step 6 Set Start Time by pressing the and buttons Press OK 7 Press En...

Страница 166: ...one side of the paper Long Edge Prints on both sides of the paper however the binding will be the long edge Short Edge Prints on both sides of the paper however the binding will be the short edge 3 Press Back to go back to the previous screen 18 Receiving faxes in memory Since your machine is a multi tasking device it can receive faxes while you are making copies or printing If you receive a fax w...

Страница 167: ...ngs To change the menu options 1 Press Fax from the display screen 2 Place the originals face up in the DSDF or place a single original face down on the scanner glass and close the DSDF see Loading originals on page 64 3 If you want to customize the copy settings including reduce enlarge darkness original type and more from the display screen 4 Press the Basic Advanced or Image tab from the displa...

Страница 168: ... fax machine with which you are communicating does not support the Super Fine or Ultra Fine resolution the machine transmits using the highest resolution mode supported by the other fax machine Item Description Original Type Enhances the fax quality based on the type of the original document being scanned Text For originals with text or line art Text Photo For originals with both text and photogra...

Страница 169: ...degrees To use 2 Sided Book and 2 Sided Calendar load the originals on the DSDF If the machine cannot detect the original on the DSDF it automatically changes the option to 1 Sided Delay Send Sets the machine to send a fax at a later time without your intervention see Delaying a fax transmission on page 158 Build Job After the scanning is finished the Scan More Pages window appears to ask if you w...

Страница 170: ...o not support Unknown could be printed instead of the characters fonts in the report 1 Press Machine Setup Application Settings Fax Settings Report from the display screen 2 Press Fax Send Confirmation from the display screen 3 Press the appropriate option Off Disables this feature On Activates this feature On Error Prints a report only when a transmission fails 4 Press Back to go back to the prev...

Страница 171: ... the Advanced or Image tab see Adjusting the document settings on page 163 3 Press the Basic tab 4 Select Resolution 5 Press Programs Save 6 Press Program Name input area The pop up keyboard appears Enter the program name you want Then press OK You can see the values of set Programs by scrolling up or down and check the values using the up down arrows 7 PressSave Whentheconfirmationwindow appears ...

Страница 172: ...ou want to use 6 Press OK 7 Press Yes when the confirmation window appears The machine is now set to fax according to the selected setting 8 Press Start on the control panel The machine starts scanning and sending a fax to destinations When you want to cancel a fax job press Stop on the control panel before the machine starts transmission or press the Job Status button on the control panel and sel...

Страница 173: ...ing up an Address Book This guide gives you guidelines for the address book This chapter includes Setting up an address book from the control panel170 Setting up an address book from SyncThru Web Service 174 ...

Страница 174: ... input area Then enter the name of the recipient Check the favorite icon for addresses you often use You can easily find them from the search results 3 Speed Dial No is automatically filled with the first free number Speed Dial No is the number representing a recipient s information 4 Press the FaxNo input area and enter the fax number using the numeric keypad on the control panel Inserting a paus...

Страница 175: ...Policy option you want using the arrow If the server has a file with the same name already the file will get processed by following the file policy you selected Change Name The sent file is saved as a different file name that is automatically generated Cancel Does not save the sent file Overwrite The sent file overwrites the existing file 11 Select the Folder Creation option you want Use Login Nam...

Страница 176: ...k from the display screen 2 Press the name of the individual you want to edit Press Edit If you want to delete an individual address select the checkbox for the address you want to delete and press Delete 3 Press the input area you want to change Then change the contents using the pop up keyboard or numeric keypad on the control panel If you use the pop up keyboard 4 Press the OK to save the infor...

Страница 177: ...he search icon The machine shows the individual list Select the checkbox you want include an individual address and press the icon 5 If you want to delete anindividual address select the checkbox you want to delete and press Delete The name of the individual will be deleted from the group 6 Press OK to save the information 6 Searching the address book for an entry You can search the addresses that...

Страница 178: ...the ID and password and select a domain you log into the machine 6 Click Address Book Individual 7 Click Add 8 Enter the name to be added and select the speed dial number in General Speed No is the number representing a recipient s information you can use the numeric keypad on the control panel Check Favorite for addresses you often use You can easily find them from the search results 9 Enter the ...

Страница 179: ...creation The machine creates a sub folder according to this option set If the file folder has a sub folder with the same name already the machine does not create a sub folder Day A sub folder is created every day The sub folder name format is YYYY MM DD e g 2015 01 01 Month A sub folder is created every month The sub folder name format is YYYY MM e g 2015 01 Year A sub folder is created every year...

Страница 180: ...uter on and open a web browser 2 Enter your machine s IP address as the URL in a browser Example http 123 123 123 123 3 Press Enter or click Go to access SyncThru Web Service 4 Click Login 5 Enter the ID and password and select a domain to log into the machine 6 Click Address Book Individual 7 Check an address you want to edit and press Edit 8 Change the address information 9 Click Apply Press Und...

Страница 181: ...u can find addresses in a specific category such as Fax Number E mail SMB etc For example if you want to find the fax number click drop down list next to the and select Fax Number 8 Click the Then the search result appears You can find addresses in a specific category such as Fax Number E mail SMB etc For example if you want to see the addresses which are included fax number click drop down list b...

Страница 182: ...dress Book Individual 7 Select Export from the Task drop down list 8 Click Export Then the address book file is stored in your computer Grouping addresses in Groups Address Book 1 Turn your networked computer on and open a web browser 2 Enter your machine s IP address as the URL in a browser Example http 123 123 123 123 3 Press Enter or click Go to access SyncThru Web Service 4 Click Login 5 Enter...

Страница 183: ...entered If you press Cancel the Edit window closes Deleting Group addresses in a Groups Address Book 1 Turn your networked computer on and open a web browser 2 Enter your machine s IP address as the URL in a browser Example http 123 123 123 123 3 Press Enter or click Go to access SyncThru Web Service 4 Click Login 5 Enter the ID and password and select a domain to log into the machine 6 Click Addr...

Страница 184: ... and select a domain to log into the machine 6 Click Address Book Group 7 Press the group address you want to see Press Group Details You can add individual addresses directly Check the addresses you want to add to Group Address Book from Individual Address Book You can delete individual addresses directly Check the addresses you want to delete and press Delete in Group Address Book ...

Страница 185: ...ore using the machine Check that Wi Fi enabled features are on your mobile device and Wi Fi feature is enabled on your printer Using a Network Connected Machine on page 37 This chapter includes Using the NFC feature Optional 182 Supported Mobile Apps 191 Mopria 192 AirPrint 194 Samsung Cloud Print 195 Google Cloud Print 198 ...

Страница 186: ...tal cover sticker can block NFC If NFC devices keep failing to communicate Remove the case or cover from the mobile device then try again Reinstall the battery from the mobile device then try again 1 Requirements NFC and Wi Fi Direct enabled supported mobile apps installed mobile device with Android OS 4 0 or higher Only Android OS 4 1 or higher will automatically enable the Wi Fi Direct feature o...

Страница 187: ... for download the app and try again 3 Type in the ID and Password Use the same login ID Password Domain as when logging in from the machine see Log in on page 220 If you want to create a new user or change the password see Security tab on page 250 4 Tag your mobile device usually located on the back of the mobile device over the NFC tag on your printer Wait few seconds for the mobile device to con...

Страница 188: ...reate a new user or change the password see Security tab on page 250 Passcode is for when the administrator chooses Two Factor Authentication method You need to enter a passcode for authentication Password and passcode should be different You can select Two Factor Authentication from the SyncThru Web Service select Security User Access Control Authentication Authentication Method Options button Lo...

Страница 189: ... that NFC and Wi Fi Direct enabled features are on your mobile device and Wi Fi Direct feature is enabled on your printer 2 Open Samsung Mobile Print Manager from your mobile device If you do not have Samsung Mobile Print Manager installed on your cellphone go to the application store Samsung Apps Play Store on your mobile device and just search for download the app and try again 3 Press Export 4 ...

Страница 190: ...r 2 Open Samsung Mobile Print Manager from your mobile device If you do not have Samsung Mobile Print Manager installed on your cellphone go to the application store Samsung Apps Play Store on your mobile device and just search for download the app and try again 3 Press Import 4 Type in the ID and Password Use the same login ID Password Domain as when logging in from the machine see Log in on page...

Страница 191: ...alled on your cellphone go to the application store Samsung Apps Play Store on your mobile device and just search for download the app and try again 3 Mobile device Samsung Mobile Print Pro screen appears Press Wi Fi Setup 4 Type in the ID and Password Use the same login ID Password Domain as when logging in from the machine see Log in on page 220 If you want to create a new user or change the pas...

Страница 192: ...atures are enabled on your mobile device and Wi Fi Direct feature is enabled on your printer 2 Open Samsung Mobile Print app If you do not have Samsung Mobile Print installed on your cellphone go to the application store Samsung Apps Play Store App Store on your mobile device and just search for download the app and try again 3 Select print mode 4 Select the content you want to print If necessary ...

Страница 193: ...e document face down on the document glass or load the documents face up into the document feeder see Loading originals on page 64 If necessary change the scan option by pressing the 5 Tag your mobile device usually located on the back of the mobile device over the NFC tag on your printer Wait few seconds for the mobile device to send a job to the printer For some mobile devices NFC tag might not ...

Страница 194: ...ur mobile device and just search for download the app and try again 3 Select fax mode 4 Select the content you want to send fax If necessary enter the fax number and change the fax option by pressing the icon 5 Tag your mobile device usually located on the back of the mobile device over the NFC tag on your printer Wait few seconds for the mobile device to send a job to the printer For some mobile ...

Страница 195: ...amsungMobilePrintPro Helps users to get an authentication easily This app provides one way of getting a user authentication using your mobile device see Using the Samsung Mobile Print Pro App on page 183 Samusng Mobile Print Manager Enables users to use cloning and wireless setup features using your mobile device see Using the Samsung Mobile Print Manager App on page 185 7 Downloading Apps To down...

Страница 196: ... you want to create a new user or change the password see Security tab on page 250 5 When the SyncThru Web Service window opens click Settings Network Settings Standard TCP IP LPR IPP IPP Then select Enable 6 Click Settings Network Settings mDNS Then select Enable 7 Click Security System Security Feature Management Mopria Then select Enable 10 Setting up Mopria on your mobile device If you do not ...

Страница 197: ... 2 Under Print Services tap Mopria Print Service 3 Tap the On Off slider to enable the Mopria Print Service 11 Printing via Mopria To print via Mopria on an Android device 1 Open the email photo web page or document that you want to print 2 Tap Print on the menu in the app 3 Select your printer and then configure the print options 4 Touch Print again to print the document To cancel a print job Sel...

Страница 198: ... Type in the ID and Password Use the same login ID Password Domain as when logging in from the machine see Log in on page 220 If you want to create a new user or change the password see Security tab on page 250 5 When the SyncThru Web Service window opens click Settings Network Settings 6 Click AirPrint 13 Printing via AirPrint For example the iPad manual provides these instructions 1 Open your em...

Страница 199: ...s Once paired you can print or scan from anywhere and everywhere 14 Registering your Printer to Samsung Cloud server Registering from Web Browser Make sure the printer machine is turned on and connected to a wired or wireless network that has access to the Internet 1 Open Web browser 2 Enter your printer s IP address in the address field and press the Enter key or click Go 3 Click Login in the upp...

Страница 200: ...your mobile device and just search for download the app and try again 2 Press the button from Samsung Cloud Print app 3 Your mobile device and printer or MFP can be paired NFC tapping QR code or by manually entering its Mac address Printing from an application on mobile device The following steps are anexample of using the SamsungCloudPrint app from Android mobile phone 1 Open Samsung Cloud Print ...

Страница 201: ...ntrol panel 3 Enter recipient country code and recipient phone number 4 Enter sender information 5 Enter a file name to store the scan data You can set the file name from the SyncThru Web Service Open the Web browser from your networked computer and type the IP address of your machine When SyncThru Web Service opens click Settings Machine Settings Samsung Cloud File Name 6 Press the Start button t...

Страница 202: ...cess to the Internet You should create your Google account in the advance 1 Open the Chrome browser 2 Visit www google com 3 Sign in to the Google website with your Gmail address 4 Enter your printer s IP address in the address field and press the Enter key or click Go 5 Click Login in the upper right corner of the SyncThru Web Service website 6 Type in the ID and Password Use the same login ID Pa...

Страница 203: ...ample of using the Google Docs app from Android mobile phone 1 Install the Cloud Print application on your mobile device If you do not have the application download it from the application store such as Android Market or App Store 2 Access the Google Docs application from your mobile device 3 Tap the option button of the document that you want to print 4 Tap the send button 5 Tap the Cloud Print b...

Страница 204: ...bout SmarThru Workflow 201 Understanding the SmarThru Workflow screen 202 Workform Creation Screen 203 Understanding the Shared Folder screen 204 Using the Shared Folder 205 Understanding the Stored Document screen 207 Saving documents in the Stored Document 208 Understanding the USB screen 209 About USB memory device 210 Printing from a USB memory device 211 Scanning to a USB memory device 213 ...

Страница 205: ...constructed tasks called a Workform These Workforms allow repetitive and time consuming tasks to be automated making the users work days less tedious and more productive 1 2 3 5 6 7 8 9 10 11 4 12 13 14 1 LDAP Server Domian Server 8 Fax 2 Microsoft Sharepoint Server 9 WebDAV 3 Network Folder 10 Google Drive 4 Printer 11 E mail Server 5 Database 12 Client Systems 6 User 13 Machine 7 FTP Server 14 S...

Страница 206: ...tra information provided by the Workform creator for Workforms that use Scan input plug ins 2 Public Workform Tab The Public tab shows public Workforms created for user groups by an administrator Refresh Refresh the Workform information Detail Shows the details of a Workform Select Select the Workform for job execution 3 Private Workform Tab The Private tab shows private Workforms created for a pr...

Страница 207: ...rm or Private Workform from the left pane 6 Click Create The Workform Creation page opens 7 Enter the workform s properties 8 Drag and droptheplug insfromtheleftpanetotheappropriatesection in the data pane or click on the green checkmark that appears in the icon s upper right corner Each task in the workform will be performed in the order in which they appear in the workform 9 Click Save The Workf...

Страница 208: ...ed folder through your computer To use the Shared Folder feature press Shared Folder on the display screen The administrator can set the ID and password to restrict the user s access and also set the maximum number of simultaneous users nfsroot Create a new folder under nfsroot directory Rename You can rename data stored in the shared folder Delete You can delete data stored in the shared folder P...

Страница 209: ...als face up in the DSDF or place a single original face down on the scanner glass and close the DSDF see Loading originals on page 64 2 Press Scan to Shared Folder from the display screen 3 Press the name of the scanned data you want to print 4 Press the Basic tab 5 Select a folder for storing the scanned image If you do not select a folder the scanned image is stored in root directory 6 Press the...

Страница 210: ...l face down on the scanner glass and close the DSDF see Loading originals on page 64 2 Press Shared Folder from the display screen 3 Press the name of the scanned data you want to print 4 Press Print 5 If you want to customize the print settings including color mode duplex and more from the display screen 6 Press Start from the control panel to begin printing ...

Страница 211: ...r fax You can set a Stored Document and use Stored Document feature with SyncThru Web Service see Setting up an address book from SyncThru Web Service on page 174 If important data is stored in the Stored Document we recommend you to backup the data regulary Samsung disclaims all responsibility for damage or loss of data caused by misuse or failure of the machine To use the Stored Document feature...

Страница 212: ...cuments or confidential information by using the secure printing feature 1 Press Stored Document on the main screen 2 Press Public or Private tab then you can see the saved files If there is no file you can save files from your PC see Print Mode on page 89 3 You can rename delete or print files 4 Select the document to print 5 Enter the password that you set from the printer driver 6 Print or dele...

Страница 213: ... port on your machine USB Display Displays information of the folder or file Format Formats the USB memory device Rename Changes the name of the selected folder or file Delete Deletes the selected folder or file Print You can directly print files stored on a USB memory device You can print TIFF JPEG PDF and PRN files see Printing from a USB memory device on page 211 ScantoUSB Sendsto ScantoUSB see...

Страница 214: ...32 and sector size of 512 bytes Check your USB memory device s file system from your dealer You must use only an authorized USB memory device with an A plug type connector Use only a USB memory device with metal shielded connector Only use a USB memory device that has obtained compatibility certification otherwise the machine might not recognize it Insert a USB memory device into the USB memory po...

Страница 215: ...USB memory device see Printing to a file PRN on page 103 TIFF TIFF 6 0 Baseline JPEG JPEG Baseline PDF PDF 1 7 and below In case of 8 bit CMYK JPEG files the job could be cancelled To print a document from a USB memory device 1 Insert a USB memory device into the USB memory port on your machine Your machine automatically detects the device and reads data stored on it see About USB memory device on...

Страница 216: ...e password If you do not know the password the print job will be cancelled 4 Press Print 5 Press the appropriate option Copies Selects the number of copies Duplex Selects the machine to print copies on both sides of the paper Auto fit Allows you to scale your print job to the selected paper size in the tray regardless of the document size Select a tray and press On Paper Source Selects a tray that...

Страница 217: ...the DSDF see Loading originals on page 64 3 Press Scan to USB from the display screen 4 Press the Basic tab 5 Select a folder for storing the scanned image If you do not select a folder the scanned image is stored in root directory 6 Press the File Name input area The pop up keyboard appears 7 Enter a file name to store the scan data Press Done 8 Set the File format Resolution and Darkness 9 Set t...

Страница 218: ...ad this chapter carefully to understand the diverse features your machine provides This administrator s guide mainly describes features administrators would often use and settings to set before using the machine For some options you need to contact your local service provider to set the settings Some menus may not appear on the display screen depending on the settings or models If so it is not app...

Страница 219: ...use the various features provided You can access the menus by pressing the display screen on the control panel The following table shows the menus provided by your machine Use the following table to view the menu structure The menu column shows the main menu and the option column shows its submenus Some menus may not appear on the display screen depending on the settings or models If so it is not ...

Страница 220: ...s Advanced Original Size Original Orientation N Up ID Copy Book Copy Booklet Watermark Stamp Build Job Programs Image Original Type Adjust Background Erase Backside Image Erase Edge Programs Copies Reduce Enlarge Duplex N Up Output Original Orientation Darkness Paper Source Basic Input Fax No Total Destination Resolution Darkness Address Book Programs Advanced Original Size Duplex Original Orienta...

Страница 221: ...ze Build Job Programs Image Original Type Color Mode Adjust Background Erase Backside Image Programs Output Quality File Format Programs Computers Basic Destination Darkness Resolution Advanced Duplex Original Orientation Original Size Build Job Image Original Type Color Mode Adjust Background Erase Backside Image Output Quality File Format Basic Total Destination File Name File Format Resolution ...

Страница 222: ...ame File Format Resolution Darkness Programs Advanced Duplex Original Size Original Orientation Build Job Programs Image Original Type Color Mode Adjust Background Erase Backside Image Programs Output Quality File Format Filing Policy Programs Basic Destination File Name File Format Resolution Darkness Advanced Duplex Original Size Original Orientation Build Job Image Original Type Color Mode Adju...

Страница 223: ...tings TCP IP SNMPv1 v2 SNTP UPnP SSDP mDNS SetIP Print SLP Network Filtering HTTP Wi Fia Wi Fi Wi Fi Settings WPS TCP IP Wi Fi Wi Fi Direct Wi Fi Signal Clear Wi Fi Settings NFCa Security Image Overwrite Authentication HTTPS IPSec 802 1x Accounting Others Supplies Life Contact Information Report Application Management Language a This option is available when the optional Wireless NFC kit installed...

Страница 224: ...1 Press Machine Setup from the display screen 2 Select the option you want If the option is available for only the administrator the following screen appears Enter the ID Password and Domain using the pop up keyboard which appears when you press each field Enter the ID and password you first set when you turned on the machine Initial Settings see Initial Settings on page 238 The default ID is admi...

Страница 225: ...achine You can download the latest software from the Samsung website 1 Press Machine Setup Machine Details from the display screen 2 Press the option you want H W Configuration Shows the status of installed hardware including optional parts Software Versions Shows the software versions of the systems installed Capabilities Shows the capabilities of the hardware 3 Press Back for return to the previ...

Страница 226: ... not in use Power Save minutes When you are not using the machine for a while use this option to save power The machine conserves more power in Power Save option than in Low Power Save mode Low Power Save minutes Low Power Save option allows your machine to save power When you are not using the machine for a while some parts of the machine automatically enter Low Power Save option Low Power Save o...

Страница 227: ... height of the machine above sea level Normal 0 1 000 m 3 280 ft High 1 1 000 m 3 280 ft 2 000 m 6 561 ft High 2 2 000 m 6 561 ft 3 000m 9 842 ft High 3 3 000 m 9 842 ft 4 000 m 13 123 ft High 4 4 000 m 13 123 ft 5 000 m 16 404 ft Default Paper Size Allows you to choose the default paper size Feature Description PDF Allows you to select the PDF format If you select PDF A you can create a PDF file ...

Страница 228: ...t per page beyond what one would experience in the normal mode but it reduces print quality Feature Description Sound Allows you to set the volume for button sound notice alarm and sounds occurring during fax job You can test the volume right after you set the level Using the Quiet Loud buttons select the desired volume and press the Test button to test the volume Key Sound Allows you to adjust th...

Страница 229: ... You can select the order of the home window background Feature Description Stamp Allows you to apply the stamp feature prints the time and date IP address or user ID on the copy output Job Progress Window Allows you to show job progress in display Job Rescheduling Job Rescheduling allows the machine to proceed to the next job when the current job pauses due to a paper mismatch or paper empty erro...

Страница 230: ...n settings on page 229 Feature Description Tray Settings Allows you to check the current tray settings and change the settings if necessary see Tray settings on page 236 Eco Settingsa Allows you to set the Eco mode as a default and change settings for Eco mode Using Eco mode can save printing resources see Eco Settings on page 237 Initial Settingsa Allowsyoutosetthebasicsettingsneededtobeset befor...

Страница 231: ...nting problems check the Supplies Life screen If necessary replace the corresponding parts This menu could help you forecast when to replace the toner cartridge or other replaceable supplies Contact information Shows the contact information Report Allows you to print the report related to system fax email sent and font Application management Allows you to enable disable the applications Option Des...

Страница 232: ...ble when Job Accounting is enabled from the SyncThru Web Admin Service Print a report of printout counts for each user Fax Fax Send Confirmation You can set the machine to print a report whether a fax transmission or reception was successfully completed or not Fax Received Print to check the list of faxes received Fax sent Print to check the list of faxes sent Fax Scheduled Jobs Print to check the...

Страница 233: ...s detected the Install button will be enabled 4 Click the Install button 5 A pop up window with list of application appears Select the application file and press OK 6 A verification message appears Read the agreement and check I accept the terms of the License Agreement and press OK Application installation begins From the list select the application you want to view in details and press Detail Fr...

Страница 234: ...ginal s size Original Orientation You can Select the orientation of the originals Upright Images Select this setting for an original document loaded with the top toward the back of the machine Sideways Images Select this setting for an original document loaded into the DSDF with the top of the original documenttowardthe leftsideof the machine or an original document placed on the scanner glass wit...

Страница 235: ...u can select the scanning resolution value Original Size You can set the default original s size to use Duplex You can select the duplex options 1 Sided For originals that are printed on one side only 2 Sided Book For originals that are printed on both sides 2 Sided Calendar For originals that are printed on both sides but the back is rotated 180 degrees Original Orientation You can Select the ori...

Страница 236: ...Once this number is set it will automatically appear on the screen when entering a phone fax number Option Description ECM Mode You can set the machine to correct the error It helps with poor line quality and ensures any faxes you send are properly transmitted to any other error correction mode equipped fax machines Sending a fax using error correction mode may take more time Receive Mode You can ...

Страница 237: ...e machine is unattended If you have installed the fax multi line kit you need to select a line first Off Select to not use secure receive On Select to use secure receive Print Select to print faxes in the memory You need to log in as an administrator to to print out received faxes in memory Received Fax Printing You can set options for printing received faxes Report You can select the options for ...

Страница 238: ...ution You can select the scanning resolution value Darkness You can select the degree of darkness of scan outputs Duplex You can select the duplex options 1 Sided Select the binding of the original 2 Sided Book Select the binding of the original 2 Sided Calendar Select the binding of the original Original Size You can set the default original s size to use Original Orientation You can Select the o...

Страница 239: ...be small File Format You can select the file format of the scan outputs JPEG Scans originals in JPEG format PDF Scans originals in PDF format TIFF Scans originals in TIFF Tagged Image File Format XPS Scans originals in XPS format Scans originals in TIFF Tagged Image File Format If you want several originals to be scanned as one file press On in the Multi Page option This is not available for JPEG ...

Страница 240: ...tup Tray Settings from the display screen 2 Check the current tray settings If you do not need to change the setting go to step 5 3 Press Settings to change the current settings 4 Press the option you want to change If some options are grayed out it means that the grayed out option is not supported for your machine or optional parts needed to use the option are not installed Option Description All...

Страница 241: ...tor set the password users need to enter the password in order to turn this mode off Once this feature is on you can see the symbol next to the options set with eco mode On Set the Eco mode on Off Set the Eco mode off Option Description Tray x a Mp Tray a tray type indicates the tray number You can set the paper size and type to use in the each tray Also you can activate a tray confirmation messag...

Страница 242: ... password to use and then press Next Re enter the password to confirm it then press Done Next 4 Set the time on the machine Then press Next 5 Remove the existing device name and enter the device name you want to use and then press OK Then press Next If necessary enter the location of the machine in the Location field If necessary enter the information in the Administrator field for the person to c...

Страница 243: ... the information you must have the relevant information concerning the type of network protocols and computer system you use If you are not sure which settings to use contact your network administrator for such information 1 Press Machine Setup Network Settings from the display screen 2 Set the appropriate options Option Description Layout Provides paper layout related options Orientation Select t...

Страница 244: ...iate option Print You can set the ports needed for network printing SNMPv1 v2 You can set SNMP Simple Network Management Protocol Administrator s can use SNMP to monitor and manage machines on the network mDNS You can set the mDNS settings SNTP You can set the SNTP settings SetIP You can set the SetIP settings SLP You can set the SLP settings Network Filtering You can set the network filtering set...

Страница 245: ...d Image Overwritea Overwrite Method You can select the method for overwriting the secure non volatile memory hard disk German VSITR Select to overwrite the memory 7 times When overwriting for the 6 times alternate 0x00 and 0xff are used to overwrite the disk and in the 7th time the disk is written with 0xAA DoD 5220 28 M Select to overwrite the memory 3 times When overwriting three times patterns ...

Страница 246: ... application without logging in Application Mode Activate application authentication An administrator can choose the application s to require user to login to use Users cannot use the selected application s without logging in Press Application mode to enable authentication Basic Mode Activate basic authentication Users are asked to login when they select options that are only available to administ...

Страница 247: ...gout Seconds You can set the auto logout time Login Identification You can select the login Identification type Login Restriction You can set the Login Restriction time attemp or lock out time Logout Policy You can set the logout policy Option Description HTTPS Select Off to disable HTTPS IPSec Select Off to disable IPSec 802 1x You can enable 802 1x authentication which is a port based authentica...

Страница 248: ...unting Select to use the installed job accounting method SyncThruAaProvier Select to use the job accounting method provided by the SyncThru Web Admin Service For detailed information refer to the SyncThru Web Admin Service guide a This feature may not be available depending on models or option kits installed Option Description ...

Страница 249: ...er includes Accessing management tools 246 SyncThru Web Service 247 Easy Capture Manager 253 Samsung AnyWeb Print 254 Easy Eco Driver 255 Using Samsung Easy Document Creator 256 Using Samsung Printer Center 257 Using Samsung Easy Printer Manager 260 Using Samsung Printer Status 262 Using Samsung Printer Experience 264 ...

Страница 250: ...s 8 from the Charms select Search Apps 3 Find Samsung Printers 4 Under Samsung Printers you can see installed management tools 5 Click the management tool you want to use After installing the driver for some management tools you can access them directly from the Start menu Programs or All Programs For Windows 8 after installing the driver for some management tools you can access them directly from...

Страница 251: ... its current status Change TCP IP parameters and set up other network parameters Change the printer preference Set the email notifications advising of the machine s status Get support for using the machine Upgrade machine software 2 Required web browser You need one of the following web browsers to use SyncThru Web Service Internet Explorer 6 0 or higher Chrome 4 0 or higher FireFox 3 0 or higher ...

Страница 252: ...s must be enclosed in brackets 4 Your machine s SyncThru Web Service website opens 4 Logging into SyncThru Web Service Before configuring options in SyncThru Web Service you need to log in as an administrator You can still use SyncThru Web Service without logging in but you will not have access to or view the Settings tab and the Security tab 1 Click Login on the upper right of the SyncThru Web Se...

Страница 253: ...needed for using the network Security Information Shows the current security settings of the machine and network Print Information You can print all the reports provided by your machine You can use these reports to help you maintain your machine This feature is also available in the machine see Other settings on page 226 6 Address book tab You can manage the address book This feature is also avail...

Страница 254: ...re Outgoing emails will be sent through SMTP server you set here HTTP You can allow or block users from accessing the SyncThru Web Service Proxy You can set proxy settings and enable authentication 8 Security tab The security tab has System Security Network Security User Access Control and System Log You cannot access this tab if you do not log in as an administrator see Logging into SyncThru Web ...

Страница 255: ...g the machine or application You can also give specific permission for user to only use certain feature of the machine For example you can allow user A to only use print feature In this case user A will not be able to scan copy or fax with the machine Authentication Activating access control You can choose the authentication method for user authentication Select a mode and click on the Options but...

Страница 256: ...ing contact information for sending emails You can also connect to the Samsung website or download manuals and drivers by selecting the Link menu Firmware Version You can check the firmware version used in the machine Check the version and update it if necessary Application Management You can add or delete applications license If you add an application you need to activate the license of the insta...

Страница 257: ...only This feature may not be available depending on model or optional goods see Software on page 8 Capture your screen and launch Easy Capture Manager by simply pressing the Print Screen key on the keyboard Now you can easily print your captured screen as captured or edited ...

Страница 258: ...del or optional goods see Features by model on page 8 This tool helps you screen capture preview scrap and print Windows Internet Explorer pages more easily than when you use an ordinary program Download the software from the Samsung website then unpack and install it http www samsung com find your product Support or Downloads ...

Страница 259: ...int 2 Open printing preference window see Opening printing preferences on page 84 3 From the Favorites tab select Eco Printing Preview 4 Click OK Print in the window A preview window appears 5 Select the options you want to apply to the document You can see the preview of the applied features 6 Click Print If you want to run Easy Eco Driver every time you print check Start Easy Eco Driver before p...

Страница 260: ...e a student needing to organize research from the library or a stay at home mom sharing scanned pictures from last year s birthday party Samsung Easy Document Creator will provide you with the necessary tools The Samsung Easy Document Creator provides features mentioned below Scan Use for scanning pictures or documents Text Converting Scan Windows only Use for scanning documents that need to be sa...

Страница 261: ...move printer drivers check the status of printers update printer software and configure printer driver settings 10 Understanding Samsung Printer Center To open the program For Windows Select Start Programs or All Programs Samsung Printers Samsung Printer Center Printers tab The screenshot may differ depending on operating system model or options 1 Printer list Displays the printer drivers installe...

Страница 262: ...modify the Printer Status and Stylish User Interface settings Changedevice Allows you to change the device into another device Properties Allows you to configure the printer driver properties such as the name of the printer driver and its location or add comments about the printer driver Actions Allowsyoutousethescanfeature thisoptionisenabled only if the selected device supports the scan feature ...

Страница 263: ... fax transmission history Faxpreferences faxonly Allows you to configure the default fax settings Change device Allows you to change the devices into another device Properties Allows you to configure the properties of a device such as location and add comments about the device Actions Allows you to use the scan feature Management Allows you to manage the devices registered in the program Remove fa...

Страница 264: ...eatures provide a gateway to conveniently use your Samsung machine 11 Understanding Samsung Easy Printer Manager To open the program For Windows Select Start Programs or All Programs Samsung Printers Samsung Easy Printer Manager For Mac Open the Applications folder Samsung folder Samsung Easy Printer Manager The Samsung Easy Printer Manager interface is comprised of various basic sections as descr...

Страница 265: ...t Provides settings related to when alerts will be received EmailAlert Providesoptionsrelatingtoreceivingalerts via email Alert History Provides a history of device and toner related alerts 3 Application information Includes links for changing to the refresh preference setting help and about 4 Printer information This area gives you general information about your machine You can check information ...

Страница 266: ...eck the error from the Samsung Printer Status Samsung Printer Status is installed automatically when you install the machine software You can also launch Samsung Printer Status manually Go to the Printing Preferences click the Basic tab Printer Status button These icons appear on the Windows task bar The screenshot may differ depending on operating system model or option Icon Mean Description Norm...

Страница 267: ... shown in the above window may differ depending on the machine in use Some machines do not have this feature 4 Option You can set printing job alert related settings 5 Order Supplies You can order replacement toner cartridge s from online 6 Cancel Print or Close Cancel Print If print job is waiting in the print queue or printer cancel all user s print jobs in the print queue or the printer Close D...

Страница 268: ...he machine is connected to a computer with an Internet connection Available for Windows 8 users only 13 Understanding the Samsung Printer Experience To open the application From the Start screen select the Samsung Printer Experience tile TheSamsungPrinterExperienceinterfacecomprisesvarioususefulfeaturesas described in the following table The screenshot may differ depending on operating system mode...

Страница 269: ...or occurs You can directly open the troubleshooting section in the user s guide 3 Order Supplies Click on this button to order replacement toner cartridges online You need to be connected to the Internet to use this feature 4 Visit Samsung Links to Samsung printer website You need to be connected to the Internet to use this feature 5 Printer Settings You can configure various machine settings such...

Страница 270: ...an see that the selected printer is removed from the screen 15 Printing from Windows 8 This section explains common printing tasks from the Start screen The screenshot may differ depending on operating system model or option Basic printing 1 Open the document to print 2 From the Charms select Devices 3 Select your printer from the list 4 Select the printer settings such as the number of copies and...

Страница 271: ...ing Stop button on the control panel Opening more settings The screen may appear somewhat different depending on the model or options You can set up more printing parameters 1 Open the document you want to print 2 From the Charms select Devices 3 Select your printer from the list 4 Click More settings Basic tab Basic This option allows you to choose the basic printing settings such as copies orien...

Страница 272: ... various ways to layout your documents Security tab Some features may not be available depending on the model or options If this tab is not shown or disabled it means that this features are not supported Job Accounting This option allows you to print with the given permission Confidential Printing This option is used for printing confidential documents You need to enter a password to print using i...

Страница 273: ... functional printers Scanning with your machine lets you turn pictures and text into digital files that can be stored on your computer Scanning from Samsung Printer Experience The most frequently used printing menus are displayed for quick scanning 1 Place a single document face down on the document glass or load the documents face up into the document feeder 2 Click the Samsung Printer Experience...

Страница 274: ...r includes Ordering supplies and accessories 271 Available consumables 272 Available accessories 273 Available maintenance parts 274 Storing the toner cartridge 275 Redistributing toner 277 Replacing the toner cartridge 279 Installing accessories 282 Monitoring the supplies life 286 Cleaning the machine 287 Tips for moving storing the machine 293 ...

Страница 275: ...s to obtain the list of available supplies and maintenance parts To order Samsung authorized supplies accessories and maintenance parts contact your local Samsung dealer or the retailer where you purchased your machine You can also visit www samsung com supplies and then select your country region to obtain the contact information for service ...

Страница 276: ...r supplies according to the specific country conditions Samsung does not recommend using non genuine Samsung toner cartridge such as refilled or remanufactured toner Samsung cannot guarantee non genuine Samsung toner cartridge s quality Service or repair required as a result of using non genuine Samsung toner cartridges will not be covered under the machine s warranty Type Average yielda a Declare...

Страница 277: ...l trays Tray2 Tray3 Tray4 If you are experiencing frequent paper supply problems you can attach an additional 550a sheet trays a Plain paper 75 g m2 20 lb bond SL SCF4000 Stand You can easily move the machine using the stand with its wheels When using the optional Stand you must install the foot as shown in the Optional Stand Install Guide provided with the optional Stand Otherwise the machine cou...

Страница 278: ...e model Replacing maintenance parts can be performed only by an authorized service provider dealer or the retailer where you bought the machine To purchase maintenance parts contact the retailer where you bought the machine The replacement period for the maintenance parts is informed by the Samsung Printer Status program Or on the UI User Interface if your machine supports a display screen The rep...

Страница 279: ...e bag from the original package Store lying flat not standing on end with the same side facing up as if it were installed in the machine Do not store consumables in any of the following conditions Temperature greater than 40 C 104 F Humidity range less than 20 or greater than 80 An environment with extreme changes in humidity or temperature Direct sunlight or room light Dusty places A car for a lo...

Страница 280: ...mount of toner that print jobs require The actual print yield may vary depending on the print density of the pages you print on operating environment percentage of image area printing interval media type and or media size For example if you print a lot of graphics the consumption of the toner is higher and you may need to change the cartridge more often ...

Страница 281: ...ge In some cases white streaks or light printing will still occur even after you have redistributed the toner Illustrations on this user s guide may differ from your machine depending on its options or models Check your machine type see Front view on page 19 To prevent damage to the toner cartridge do not expose it to light for more than a few minutes Cover it with a piece of paper if necessary Do...

Страница 282: ...Redistributing toner 278 14 Maintenance ...

Страница 283: ...thoroughly it will increase the initial print quality Illustrations on this user s guide may differ from your machine depending on its options or models Check your machine type see Front view on page 19 To prevent damage to the toner cartridge do not expose it to light for more than a few minutes Cover it with a piece of paper if necessary Do not touch the green area of the toner cartridge Use the...

Страница 284: ...Replacing the toner cartridge 280 14 Maintenance 2 1 ...

Страница 285: ...Replacing the toner cartridge 281 14 Maintenance ...

Страница 286: ...n if battery is replaced by an incorrect type Your service provider should remove the old battery from your device and dispose of it in accordance with the relevant regulations in your country 5 Setting Device Options When you install the optional devices such as optional tray memory etc this machine automatically detects and sets the optional devices If you cannot use the optional devices you ins...

Страница 287: ...stalled If this feature is checked you can select the Print Mode Printer Configuration Select the printer language for the print job AdministratorSettings You can select the Printer Status and EMF Spooling Admin Job Accounting Allows you to associate user and account identification information with each document you print User permission If you check this option only users with user permission can...

Страница 288: ...ine Samsung DIMM s You may void your warranty if it is determined that your machine problem is being caused by third party DIMM s The order information is provided for optional accessories see Available accessories on page 273 After installing the optional memory you can use the advanced printing features such as proofing a job and specifying of printing a secure print job in the printer propertie...

Страница 289: ...Installing accessories 285 14 Maintenance 1 2 ...

Страница 290: ...n page 226 7 From the machine 1 Press Machine Setup Others Supplies Life from the display screen 2 Check the usage account We recommend you prepare new supplies or those that you have used over 90 of their average yield see Redistributing toner on page 277 3 Press Back for return to the previous screen 8 From the SyncThru Web Service 1 From the SyncThru Web Service select the Information tab Suppl...

Страница 291: ... containing large amounts of alcohol solvents or other strong substances can discolor or distort the cabinet If your machine or the surrounding area is contaminated with toner we recommend you use a cloth or tissue dampened with water to clean it If you use a vacuum cleaner toner blows in the air and might be harmful to you 9 Cleaning the outside Clean the machine cabinet with a soft lint free clo...

Страница 292: ...artridge Use the handle on the cartridge to avoid touching this area Use a dry lint free cloth when cleaning the inside of the machine be careful not to damage the transfer roller or any other inside parts Do not use solvents such as benzene or thinner Printing quality problems can occur and cause damage to the machine Use a dry lint free cloth to clean the machine Turn the machine off and unplug ...

Страница 293: ...Cleaning the machine 289 14 Maintenance 1 1 2 2 ...

Страница 294: ...plug the power cord Wait for the machine to cool down If your machine has a power switch turn the power switch off before cleaning the machine Illustrations on this user s guide may differ from your machine depending on its options or models Check your machine type see Front view on page 19 1 2 1 2 ...

Страница 295: ...eded Turn the machine off and unplug the power cord Wait for the machine to cool down If your machine has a power switch turn the power switch off before cleaning the machine Illustrations on this user s guide may differ from your machine depending on its options or models Check your machine type see Front view on page 19 1 Slightly dampen a soft lint free cloth or paper towel with water 2 Lift an...

Страница 296: ...Cleaning the machine 292 14 Maintenance 3 Wipe the surface of the scanner until it is clean and dry 1 Scanner lid 2 Scanner glass 3 Document feeder glass 4 White bar 4 Close the scanner lid 1 2 4 3 ...

Страница 297: ...e intentional or unintentional actions of the user When moving the machine do not tilt or turn it upside down Otherwise the inside of the machine may be contaminated by toner which can cause damage to the machine or reduce print quality When moving the machine make sure at least two people are holding the machine securely ...

Страница 298: ...roblem persists call for service This chapter includes Tips for avoiding paper jams 295 Clearing paper jams 296 Understanding display messages 315 Paper feeding problems 321 Power and cable connecting problems 322 Printing problems 323 Printing quality problems 326 Copying problems 334 Scanning problems 335 Faxing problems 337 Operating system problems 339 ...

Страница 299: ...ines Ensure that the adjustable guides are positioned correctly see Tray overview on page 68 Do not remove paper from the tray while your machine is printing Flex fan and straighten paper before loading Do not use creased damp or highly curled paper Do not mix paper type and size in a tray Use only recommended print media see Print media specifications on page 346 ...

Страница 300: ...r jams To avoid tearing the paper pull the jammed paper out slowly and gently 1 In tray1 Illustrations on this user s guide may differ from your machine depending on its options or models Check your machine type see Front view on page 19 ...

Страница 301: ...Clearing paper jams 297 15 Troubleshooting If you do not see the paper in this area stop and go to next step 1 2 2 1 ...

Страница 302: ...Clearing paper jams 298 15 Troubleshooting 2 In optional trays The procedure is same for all optional trays ...

Страница 303: ...Clearing paper jams 299 15 Troubleshooting If you do not see the paper in this area stop and go to next step ...

Страница 304: ...Clearing paper jams 300 15 Troubleshooting If you do not see the paper in this area stop and go to next step ...

Страница 305: ...Clearing paper jams 301 15 Troubleshooting 3 In the multi purpose tray ...

Страница 306: ...ine off and let the machine cool before removing paper from the Fuser Unit area Failure to take care when removing paper from this area may cause injury Illustrations on this user s guide may differ from your machine depending on its options or models Check your machine type see Front view on page 19 ...

Страница 307: ...Clearing paper jams 303 15 Troubleshooting 2 1 1 2 ...

Страница 308: ...Clearing paper jams 304 15 Troubleshooting If you do not see the paper in this area stop and go to next step ...

Страница 309: ...Clearing paper jams 305 15 Troubleshooting 5 In the exit area The fuser area is hot Take care when removing paper from the machine ...

Страница 310: ...Clearing paper jams 306 15 Troubleshooting If you do not see the paper in this area stop and go to next step ...

Страница 311: ...Clearing paper jams 307 15 Troubleshooting If you do not see the paper in this area stop and go to next step 2 90 90 1 1 90 90 2 1 1 ...

Страница 312: ...Clearing paper jams 308 15 Troubleshooting 6 In the duplex unit area 1 2 1 2 1 2 ...

Страница 313: ...Clearing paper jams 309 15 Troubleshooting If you do not see the paper in this area stop and go to next step 2 90 90 1 1 90 90 2 1 1 ...

Страница 314: ...310 15 Troubleshooting 7 Clearing original document jams To prevent document jams use the scanner glass for thick thin or mixed paper originals To avoid tearing the document remove the jammed document slowly and carefully ...

Страница 315: ...scanner Illustrations in this user s guide may differ from your machine depending on the model and options installed Check your machine type see Front view on page 19 This troubleshooting may not be available depending on model or optional goods see Variety feature on page 9 ...

Страница 316: ...canner Illustrations in this user s guide may differ from your machine depending on the model and options installed Check your machine type see Front view on page 19 This troubleshooting may not be available depending on model or optional goods see Variety feature on page 9 ...

Страница 317: ...Clearing paper jams 313 15 Troubleshooting If you do not see the paper in this area stop and go to next step ...

Страница 318: ... of scanner Illustrations in this user s guide may differ from your machine depending on the model and options installed Check your machine type see Front view on page 19 This troubleshooting may not be available depending on model or optional goods see Front view on page 19 ...

Страница 319: ...mber 8 Paper Jam related messages Message Meaning Suggested solutions Paper jam inside of duplex path Please remove the paper Paperjamatthetopof duplex path Please remove the paper Paper jam at the bottom of duplex path Please remove the paper Paper has jammed during duplex printing This is applicable only to machines with this feature Clear the jam see In the duplex unit area on page 308 Paper ja...

Страница 320: ...er cartridge A toner cartridge is not installed Reinstall the toner cartridge A toner cartridge is not being detected Reinstall the toner cartridge two or three times to confirm it is seated properly If the problem persists please call for service Not removed protective film from toner Remove the protective film from the toner cartridge Refer to Quick Installation Guide provided with your machine ...

Страница 321: ...ppears Using a cartridge beyond this stage can result in printing quality issues see Replacing the toner cartridge on page 279 If the machine stops printing replace the toner cartridge see Replacing the toner cartridge on page 279 End of life Replace with new toner cartridge The indicated toner cartridge has reached its estimated cartridge lifea Replace the toner cartridge with a Samsung genuine t...

Страница 322: ...rrect paper in the tray If you select Continue printing job will continue Tray type cassette is pulled out Insert it properly The tray is not securely latched Close the tray until it locks into place Message Meaning Suggested solutions Tray Failure error number Pull tray type out and insert it Call for service if the problem persists Tray Failure error number Check tray type connection and turn of...

Страница 323: ...ists Message Meaning Suggested solutions System Fan Failure error number Turn off then on Call for service if the problem persists SMPS Fan Failure error number Turn off then on Call for service if the problem persists Fuser Fan Failure error number Turn off then on Call for service if the problem persists There is a problem in the fan system Reboot the power If the problem persists please call fo...

Страница 324: ...of the fuser unit has expired Replace the fuser unit with a new one If the problem persists please call for service Message Meaning Suggested solutions Temperature Sensor Failure error number Turn off then on Call for service if the problem persists There is a problem in the sensor Reboot the power If the problem persists please call for service Scanner is locked Please try to release scanner lock...

Страница 325: ... feed into the machine Remove any obstructions from inside the machine Paper has not been loaded correctly Remove paper from the tray and reload it correctly There is too much paper in the tray Remove excess paper from the tray The paper is too thick Use only paper that meets the specifications required by the machine The paper keeps jamming There is too much paper in the tray Remove excess paper ...

Страница 326: ...ted solutions The machine is not receiving power or the connection cable between the computer and the machine is not connected properly 1 Connect the machine to the electricity supply first 2 Check the USB cable or network cable in the machine s rear 3 Disconnect the USB cable or network cable in the machine s rear and then reconnect it 1 2 ...

Страница 327: ...isconnect the machine cable and reconnect it see Rear view on page 20 Theconnection cablebetweenthecomputerand the machine is defective If possible attach the cable to another computer that is working properly and print a job You can also try using a different machine cable The port setting is incorrect Check the Windows printer settings to make sure that the print job is sent to the correct port ...

Страница 328: ... in the software application settings you use see Opening printing preferences on page 84 The machine prints but the text is wrong garbled or incomplete The machine cable is loose or defective Disconnect the machine cable and reconnect Try a print job that you have already printed successfully If possible attach the cable and the machine to another computer that you know works and try a print job ...

Страница 329: ...ion will be reduced Before printing the machineemitsvapornear the output tray Using damp wet paper can cause vapor white smoke during printing This is not a problem just keep printing If you are bothered by the smoke vapor then replace the paper with fresh paper from an unopened ream The machine does not print special sized paper such as billing paper Paper size and paper size setting do not match...

Страница 330: ...oner save mode is on Adjust the print resolution and turn the toner save mode off See the help screen of the printer driver A combination of faded or smeared defects may indicate that the toner cartridge needs cleaning Clean the inside of your machine see Cleaning the machine on page 287 The surface of the LSU part inside the machine may be dirty Clean the inside of your machine see Cleaning the m...

Страница 331: ... some areas to reject toner Try a different kind or brand of paper Change the printer option and try again Go to Printing Preferences click the Paper tab and set type to Thick see Opening printing preferences on page 84 If these steps do not correct the problem contact a service representative White Spots If white spots appear on the page The paper is too rough and a lot of dirt from paper falls t...

Страница 332: ...blem contact a service representative Black or color background If the amount of background shading becomes unacceptable Change to a lighter weight paper Check the environmental conditions very dry conditions or a high level of humidity higher than 80 RH can increase the amount of background shading Remove the old toner cartridge and install a new one see Replacing the toner cartridge on page 279 ...

Страница 333: ...apping seams on the reverse side Printing on seams can cause problems Or select Thick from the Printing Preferences window see Opening printing preferences on page 84 If background scatter covers the entire surface area of a printed page adjust the print resolution through your software application or in Printing Preferences see Opening printing preferences on page 84 Ensure the correct paper type...

Страница 334: ... properly Check the paper type and quality Ensure that the guides are not too tight or too loose against the paper stack Curl or wave Ensure that the paper is loaded properly Check the paper type and quality Both high temperature and humidity can cause paper curl Turn the stack of paper over in the tray Also try rotating the paper 180 in the tray Condition Suggested solutions A a B b C A a B b C A...

Страница 335: ...are dirty Check for leaking toner Clean the inside of the machine see Cleaning the machine on page 287 Solid color or black pages The toner cartridge may not be installed properly Remove the cartridge and reinsert it The toner cartridge may be defective Remove the toner cartridge and install a new one see Replacing the toner cartridge on page 279 The machine may require repairing Contact a service...

Страница 336: ...reas within parts of characters that should be solid black You may be printing on the wrong surface of the paper Remove the paper and turn it around The paper may not meet paper specifications Horizontal stripes If horizontally aligned black streaks or smears appear The toner cartridge may be installed improperly Remove the cartridge and reinsert it The toner cartridge may be defective Remove the ...

Страница 337: ...g Preferences click the Paper tab and set type to Thin see Opening printing preferences on page 84 An unknown image repetitively appears on a few sheets Loose toner Light print or contamination occurs Your machine is probably being used at an altitude of 1 000 m 3 281 ft or above The high altitude may affect the print quality such as loose toner or light imaging Change the altitude setting for you...

Страница 338: ...f these steps do not correct the problem contact a service representative Image rubs off the copy easily Replace the paper in the tray with paper from a new package In high humidity areas do not leave paper in the machine for extended periods of time Frequent copy paper jams occur Fan the paper then turn it over in the tray Replace the paper in the tray with a fresh supply Check adjust the paper g...

Страница 339: ...nter cable with a known good cable If necessary replace the printer cable Check that the scanner is configured correctly Check scan setting in the application you want to use to make certain that the scanner job is being sent to the correct port for example USB001 The unit scans very slowly Check if the machine is printing received data If so scan the document after the received data has been prin...

Страница 340: ... a copying or printing job in progress Try your job again when that job is finished The selected port is currently being used Restart your computer and try again The machine printer cable may be improperly connected or the power may be off The scanner driver is not installed or the operating environment is not set up properly Ensure that the machine is properly connected and the power is on then r...

Страница 341: ... or thin Make sure that the document feeder is firmly closed The document feeder rubber pad may need to be replaced Contact a service representative see Available maintenance parts on page 274 Faxes are not received automatically The receiving mode should be set to fax see Changing the receive modes on page 160 Make sure that there is paper in the tray see Print media specifications on page 346 Ch...

Страница 342: ... paper or cannot answer incoming calls Speak with the other machine operator and ask them to solve the problem on their side Faxes do not store in memory There may not be enough memory space to store the fax If the display indicating the memory status shows delete any faxes you no longer need from the memory and then try to store the fax again Call for service Blank areas appear at the bottom of e...

Страница 343: ...o Print A printer timeout error occurred message appear These messages may appear during printing Just keep waiting until the machine finishes printing If the message appears in ready mode or after printing has completed check the connection and or whether an error has occurred Samsung Printer Experience is not shown when you click more settings Samsung Printer Experience is not installed Download...

Страница 344: ...e may enable the file to print Turn on Print As Image from the Acrobat printing options It will take longer to print when you print a PDF file as an image Some letters are not displayed normally during cover page printing Mac OS cannot create the font while printing the cover page The English alphabet and numbers are displayed normally on the cover page When printing a document in Mac with Acrobat...

Страница 345: ...hecking the collate option in the Print Dialog does not work For some distributions GNOME Print Dialog has an issue handling the collate option As workaround set the default value of collate option to False using the system s printing utility execute system config printer in the Terminal program Printing always works with duplex This duplex issue was in Ubuntu 9 10 CUPS package Update CUPS version...

Страница 346: ...int job was too complex You might need to reduce the complexity of the page or install more memory A PostScript error page prints The print job may not be PostScript Make sure that the print job is a PostScript job Check to see whether the software application expected a setup or PostScript header file to be sent to the machine The optional tray is not selected in the driver The printer driver has...

Страница 347: ...16 Appendix This chapter provides product specifications and information concerning applicable regulations This chapter includes Specifications 344 Regulatory information 352 Copyright 365 ...

Страница 348: ...n Dimensiona Width x Depth x Height 530 x 481 4 x 576 mm 20 87 x 18 95 x 22 68 inches Weighta Machine with consumables 25 Kg 55 11 lbs Noise Levelb c Ready mode Less than 30 dB A Print mode Less than 53 dB A Copy mode Less than 56 dB A Temperature Operation 10 to 30 C 50 to 86 F Storage packed 20 to 40 C 4 to 104 F Humidity Operation 20 to 80 RH Storage packed 10 to 90 RH Power ratingd 110 volt mo...

Страница 349: ... machine installation A4 paper simplex printing c China only If the equipment s noise is louder than 63 dB A the equipment should be placed in region of relatively independent advice d See the rating label on the machine for the correct voltage V frequency hertz and of current A for your machine e The power consumption may be affected by the machine s status setting conditions operating environmen...

Страница 350: ... A4 210 x 297 mm 8 27 x 11 69 inches Oficio 216 x 343 mm 8 5 x 13 5 inches JIS B5 182 x 257 mm 7 17 x 10 12 inches ISO B5 176 x 250 mm 6 93 x 9 84 inches Executive 184 x 267 mm 7 25 x 10 5 inches Statement 140 x 216 mm 5 5 x 8 5 inches A5 148 x 210 mm 5 83 x 8 27 inches A6 105 x 148 mm 4 13 x 5 83 inches 70 to 90 g m2 19 to 24 lbs bond 150 sheets of 80 g m2 21 lbs bond Not available in optional tr...

Страница 351: ...e Plain paper section 91 to 105 g m2 24 to 28 lbs bond 50 sheets of 105 g m2 28 lbs bond 91 to 105 g m2 24 to 28 lbs bond 10 sheets Thicker paperc d Refer to the Plain paper section Refer to the Plain paper section Not available in tray1 and optional trays 164 to 220 g m2 43 to 59 lbs bond 10 sheets Thin paper Refer to the Plain paper section Refer to the Plain paper section 60 to 69 g m2 16 to 18...

Страница 352: ...5 to 120 g m2 28 to 32 lbs bond 50 sheets 105 to 120 g m2 28 to 32 lbs bond 10 sheets Archive Refer to the Plain paper section Refer to the Plain paper section 550 sheets 100 sheets Minimum size custom 76 2 x 127 mm 3 x 5 inches 60 to 163 g m2 16 to 43 lbs bond 60 to 220 g m2 16 to 59 lbs bond Maximum size custom 216 x 356 mm 8 5 x 14 inches a Maximum capacity may differ depending on media weight ...

Страница 353: ... GB Windows Server 2008 Intel Pentium IV 1 GHz Pentium IV 2 GHz 512 MB 2 GB 10 GB Windows Vista Intel Pentium IV 3 GHz 512 MB 1 GB 15 GB Windows 7 Intel Pentium IV 1 GHz 32 bit or 64 bit processor or higher 1 GB 2 GB 16 GB Support for DirectX 9 graphics with 128 MB memory to enable the Aero theme DVD R W Drive Windows Server 2008 R2 Intel Pentium IV 1 4 GHz x64 processors 2 GHz or faster 512 MB 2 ...

Страница 354: ...l processors 2 GB 4 GB Items Requirements Operating system Red Hat Enterprise Linux 5 6 7 Fedora 13 14 15 16 17 18 19 20 21 OpenSUSE 11 3 11 4 12 1 12 2 12 3 13 1 13 2 Ubuntu 10 04 10 10 11 04 11 10 12 04 12 10 13 04 13 10 14 04 14 10 SUSE Linux Enterprise Desktop 11 12 Debian 6 7 Mint 13 14 15 16 17 CPU Pentium IV 2 4 GHz Intel Core 2 RAM 512 MB 1 GB Free HDD space 1 GB 2 GB ...

Страница 355: ...ations 351 16 Appendix Unix Items Requirements Operating system Sun Solaris 9 10 11 x86 SPARC HP UX 11 0 11i v1 11i v2 11i v3 PA RISC Itanium IBM AIX 5 1 5 2 5 3 5 4 6 1 7 1 PowerPC Free HDD space Up to 100 MB ...

Страница 356: ...ements of IEC 60825 1 2007 Class I laser products are not considered to be hazardous The laser system and printer are designed so there is never any human access to laser radiation above a Class I level during normal operation user maintenance or prescribed service condition Warning Never operate or service the printer with the protective cover removed from laser scanner assembly The reflected bea...

Страница 357: ... the product in a place with good ventilation This printer contains advanced energy conservation technology that reduces power consumption when it is not in active use When the printer does not receive data for an extended period of time power consumption is automatically lowered ENERGY STAR and the ENERGY STAR mark are registered U S marks For more information on the ENERGY STAR program see http ...

Страница 358: ...ory information 354 16 Appendix 9 China only Website http www samsung com cn support location supportServiceLocation do page SERVICE LOCATION 襦 襦愤縑趀爮闭 賉 賉帞 縑趀绌裎 術賉縑聱 ポkW hマ ProXpress M4080FX 2 2 15 蜷筨愤竖爮襔 ᆇ 䋼 ...

Страница 359: ...charger headset USB cable should not be disposed of with other household waste at the end of their working life To prevent possible harm to the environment or human health from uncontrolled waste disposal please separate these itemsfromother s ofwaste and recyclethemresponsiblyto promotethe sustainable reuse of material resources Household users should contact either the retailer where they purcha...

Страница 360: ...ence to radio or television reception which can be determined by turning the equipment off and on the user is encouraged to try to correct the interference by one or more of the following measures Reorient or relocate the receiving antenna Increase the separation between the equipment and receiver Connect the equipment into an outlet on a circuit different from that to which the receiver is connec...

Страница 361: ...ower output of the wireless device or devices which may be embedded in your printer is well below the RF exposure limits as set by the FCC This transmitter must not be collocated or operation in conjunction with any other antenna or transmitter Operation of this device is subject to the following two conditions 1 This device may not cause harmful interference and 2 this device must accept any inte...

Страница 362: ...maximum number of devices allowed to be connected to a telephone interface The termination of an interface may consist of any combination of devices subject only to the requirement that the sum of the RENs of all the devices not exceed five L indice d equivalence de la sonnerie IES sert a indiquer le nombre maximal de terminaux qui peuvent etre raccordes a une interface telephonique La terminaison...

Страница 363: ...ate notice in writing to allow the customer an opportunity to maintain uninterrupted service 21 Ringer Equivalence Number The Ringer Equivalence Number and FCC Registration Number for this machine may be found on the label located on the bottom or rear of the machine In some instances you may need to provide these numbers to the telephone company The Ringer Equivalence Number REN is a measure of t...

Страница 364: ... incidence of lightning or power surges we recommend that you install surge protectors for both the power and the telephone lines Surge protectors can be purchased from your dealer or telephone and electronic specialty stores When programming emergency numbers and or making test calls to emergency numbers use a non emergency number to advise the emergency service dispatcher of your intentions The ...

Страница 365: ...ry 1 1995 Council Directive 2006 95 EC Approximation of the laws of the member states related to low voltage equipment January 1 1996 Council Directive 2004 108 EC approximation of the laws of the Member States related to electromagnetic compatibility March 9 1999 Council Directive 1999 5 EC on radio equipment and telecommunications terminal equipment and the mutual recognition of their conformity...

Страница 366: ...gned against and is fully compliant with all of the relevant advisory notes contained in this document European radio approval information for products fitted with EU approved radio devices Low power Radio LAN type devices radio frequency RF wireless communication devices operating in the 2 4 GHz 5 GHz band may be present embedded inyourprintersystem which is intended for home or office use This s...

Страница 367: ...care should be taken to minimize human contact during normal operation As a general guideline a separation of 20 cm 8 inches between the wireless device and the body for use of a wireless device near the body this does not include extremities is typical This device should be used more than 20 cm 8 inches from the body when wireless devices are on and transmitting This transmitter must not be collo...

Страница 368: ...on country If your system came equipped with an internal embedded wireless device do not operate the wireless device unless all covers and shields are in place and the system is fully assembled Wireless devices are not user serviceable Do not modify them in any way Modification to a wireless device will void the authorization to use it Contact manufacturer for service Only use drivers approved for...

Страница 369: ...and Gmail are either registered trademarks or trademarks of Google Inc iPad iPhone iPod touch Mac and Mac OS are trademarks of Apple Inc registered in the U S and other countries AirPrint and the AirPrint logo are trademarks of Apple Inc All other brand or product names are trademarks of their respective companies or organizations REV 1 01 QR code The software included in this product contains ope...

Страница 370: ...w samsung com support BAHRAIN 8000 GSAM 8000 4726 www samsung com ae support English www samsung com ae_ar support Arabic BELARUS 810 800 500 55 500 www samsung com support BANGLADESH 09612300300 www samsung com in support BELGIUM 02 201 24 18 www samsung com be support Dutch www samsung com be_fr support French BOLIVIA 800 10 7260 HHP 4828210 www samsung com cl support BOSNIA 055 233 999 www sams...

Страница 371: ... latin_en support English CROATIA 072 726 786 www samsung com hr support Cote D Ivoire 8000 0077 www samsung com africa_fr support Country Region Customer Care Center WebSite CYPRUS 80094000onlyfromlandline toll free www samsung com gr support CZECH 800 SAMSUNG 800 726786 www samsung com cz support DENMARK 70 70 19 70 www samsung com dk support DOMINICAN REPUBLIC 1 800 751 2676 www samsung com lat...

Страница 372: ... 0 60 Anruf www samsung com de support GEORGIA 0 800 555 555 www samsung com support Country Region Customer Care Center WebSite GHANA 0800 10077 0302 200077 www samsung com africa_en support GREECE 80111 SAMSUNG 80111 726 7864 only from land line 30 210 6897691 from mobile and land line www samsung com gr support GUATEMALA 1 800 299 0013 1 800 299 0033 www samsung com latin support Spanish www sa...

Страница 373: ...pport JORDAN 0800 22273 06 5777444 www samsung com levant support English KAZAKHSTAN 8 10 800 500 55 500 GSM 7799 VIP care 7700 www samsung com support Country Region Customer Care Center WebSite KENYA 0800 545 545 www samsung com support KUWAIT 183 CALL 183 2255 www samsung com ae support English www samsung com ae_ar support Arabic KYRGYZSTAN 00 800 500 55 500 www samsung com kz_ru support LATVI...

Страница 374: ...00 726 7864 www samsung com africa_en support NETHERLANDS 0900 SAMSUNG 0900 7267864 0 10 Min www samsung com nl support NEW ZEALAND 0800 726 786 www samsung com nz support Country Region Customer Care Center WebSite NICARAGUA 001 800 5077267 www samsung com latin support Spanish www samsung com latin_en support English NORWAY 815 56480 www samsung com no support OMAN 800 SAMSUNG 800 726 7864 www s...

Страница 375: ...pl support PORTUGAL 808 20 7267 www samsung com pt support Country Region Customer Care Center WebSite PUERTO RICO 1 800 682 3180 www samsung com latin support Spanish www samsung com latin_en support English QATAR 800 CALL 800 2255 www samsung com ae support English www samsung com ae_ar support Arabic REUNION 262508869 www samsung com support RWANDA 9999 www samsung com support ROMANIA 08008 726...

Страница 376: ...rt SUDAN 1969 www samsung com support SWEDEN 0771 726 7864 0771 SAMSUNG www samsung com se support Country Region Customer Care Center WebSite SWITZERLAND 0800 726 78 64 0800 SAMSUNG www samsung com ch support German www samsung com ch_fr support French SYRIA 18252273 www samsung com levant support English TADJIKISTAN 8 10 800 500 55 500 www samsung com support TAIWAN 0800 329999 www samsung com t...

Страница 377: ...88 987 HELP 4357 www samsung com us support UGANDA 0800 300 300 www samsung com support UKRAINE 0 800 502 000 www samsung com ua support Ukrainian www samsung com ua_ru support Russian Country Region Customer Care Center WebSite URUGUAY 000 405 437 33 www samsung com latin support Spanish www samsung com latin_en support English UZBEKISTAN 8 10 800 500 55 500 GSM 7799 www samsung com support VENEZ...

Страница 378: ...s WLAN and acts as a central transmitter and receiver of WLAN radio signals ADF An Automatic Document Feeder ADF is a scanning unit that will automatically feedanoriginalsheetofpapersothatthemachinecanscansomeamountofthe paper at once AppleTalk AppleTalk is a proprietary suite of protocols developed by Apple Inc for computer networking It was included in the original Macintosh 1984 and is now depr...

Страница 379: ... flat typically vertical area where control or monitoring instruments are displayed They are typically found in front of the machine Coverage It is the printing term used for a toner usage measurement on printing For example 5 coveragemeansthatanA4sidedpaperhasabout 5 imageortext on it So if the paper or original has complicated images or lots of text on it the coverage will be higher and at the s...

Страница 380: ...runs back and forth on the page and prints by impact striking an ink soaked cloth ribbon against the paper much like a typewriter DPI Dots Per Inch DPI is a measurement of resolution that is used for scanning and printing Generally higher DPI results in a higher resolution more visible detail in the image and a larger file size DRPD Distinctive Ring Pattern Detection Distinctive Ring is a telephon...

Страница 381: ...ntrol MAC data link layer of the OSI model Ethernet is mostlystandardizedasIEEE 802 3 It has become the most widespread LAN technology in use during the 1990s to the present EtherTalk A suite of protocols developed by Apple Computer for computer networking It was included in the original Macintosh 1984 and is now deprecated by Apple in favor of TCP IP networking FDI Foreign Device Interface FDI is...

Страница 382: ...dly rotating platters with magnetic surfaces IEEE The Institute of Electrical and Electronics Engineers IEEE is an international non profit professional organization for the advancement of technology related to electricity IEEE 1284 The 1284 parallel port standard was developed by the Institute of Electrical and Electronics Engineers IEEE The term 1284 B refers to a specific connector type on the ...

Страница 383: ...nce exceeds that of TCP IP on a LAN ISO The International Organization for Standardization ISO is an international standard setting body composed of representatives from national standards bodies It produces world wide industrial and commercial standards ITU T The International Telecommunication Union is an international organization established to standardize and regulate international radio and ...

Страница 384: ...ing functionality in one physical body so as to have a printer a copier a fax a scanner and etc MH Modified Huffman MH is a compression method for decreasing the amount of data that needs to be transmitted between the fax machines to transfer the image recommended by ITU T T 4 MH is a codebook based run length encoding scheme optimized to efficiently compress white space As most faxes consist most...

Страница 385: ...s but which is not itself copied or derived from something else OSI Open Systems Interconnection OSI is a model developed by the International Organization for Standardization ISO for communications OSI offers a standard modular approach to network design that divides the required set of complexfunctionsintomanageable self contained functionallayers Thelayers are from top to bottom Application Pre...

Страница 386: ...to interact with the device driver using standard input output system calls which simplifies many tasks Protocol A convention or standard that controls or enables the connection communication and data transfer between two computing endpoints PS See PostScript PSTN The Public Switched Telephone Network PSTN is the network of the world s public circuit switched telephone networks which on industrial...

Страница 387: ...ddress and which part is the host address TCP IP The Transmission Control Protocol TCP and the Internet Protocol IP the set of communications protocols that implement the protocol stack on which the Internet and most commercial networks run TCR Transmission Confirmation Report TCR provides details of each transmission such as job status transmission result and number of pages sent This report can ...

Страница 388: ...port USB is designed to concurrently connect a single computer USB port to multiple peripherals Watermark A watermark is a recognizable image or pattern in paper that appears lighter when viewed by transmitted light Watermarks were first introduced in Bologna Italy in 1282 they have been used by papermakers to identify their product and also on postage stamps currency and other government document...

Страница 389: ...vanced security WPS The Wi Fi Protected Setup WPS is a standard for establishing a wireless home network If your wireless access point supports WPS you can configure the wireless network connection easily without a computer XPS XML Paper Specification XPS is a specification for a Page Description Language PDL and a new document format which has benefits for portable document and electronic documen...

Страница 390: ...ing inside 288 outside 287 pickup roller 290 scan unit 291 cleaning a machine 287 control panel 21 convention 11 copy darkness 230 231 duplex 230 231 234 original type 230 231 setting 229 249 copying basic copying 112 ID card copy 115 programs setting 122 understanding the copy screen 110 D default paper selection printing 239 default settings setting a fax header 153 tray setting 78 device option...

Страница 391: ...57 resending automatically 157 sending a fax 153 fax email individual address 170 faxing changing receiving mode 160 delaying a fax transmission 158 preparing to fax 148 printing sent fax report 166 programs setting 167 receiving 160 receiving a fax in memory 162 receiving in Tel mode 160 redialing the last number 157 sending 153 sending for both sided originals 162 setting the fax header 153 unde...

Страница 392: ...e tray 71 special media 73 loading originals 64 log 252 login 220 248 LPR LPD settings 250 M Mac common Mac problems 340 driver installation for network connected 50 driver reinstallation for USB cable connected 36 printing 104 system requirements 350 using SetIP 43 machine detail 221 machine setup 220 Macintosh scanning 145 maintenance parts 274 managing address book 235 249 application 252 copy ...

Страница 393: ... 86 preprinted paper 77 setting the paper size 78 setting the paper type 78 special media 73 printer preferences Linux 106 printer properties opening printer preferences 84 printer status general information 262 printing changing the default print settings 101 changing the print percentage 94 duplex 239 249 fitting your document to a selected paper size 94 Linux 106 Mac 104 margin 239 249 multiple...

Страница 394: ... cloud printing 195 samsung printer experience 264 Samsung Printer Status 262 scan color 234 235 darkness 234 email server 250 format 235 original type 234 quality 235 to email 234 to server 234 to shared folder 234 to usb 234 Scan Assitant 144 scan to email 126 scan to server 130 Scanning Scanning with Samsung Scan Assitant 144 scanning changing settings 138 for network connection to email 126 to...

Страница 395: ...ife 276 monitoring the supplies life 286 ordering 272 replacing toner cartridge 279 SyncThruTM Web Service 247 accounting 251 address book tab 249 application management 252 configuring 250 connecting to 247 copy 249 external authentication server 251 fax 249 information tab 249 log 252 maintenance tab 252 network 250 printer 249 requirements 247 scan 250 security tab 250 settings 249 settings tab...

Страница 396: ...ing the usb screen 209 USB cable driver installation 32 driver reinstallation 36 USB memory device how to scan 136 printing 211 user managing 251 profile 251 user access control 251 using help 90 105 W watermark create 95 delete 96 edit 96 print 95 Windows common Windows problems 339 driver installation for network connected 47 driver installation for USB cable connected 32 driver reinstallation f...

Отзывы: