CONTENTS > 6
Cannot print. . . . . . . . . . . . . . . . . . . . . . . . . . . . . . . . . . 187
Application error or general protection fault is
displayed. . . . . . . . . . . . . . . . . . . . . . . . . . . . . . . . . . . 188
Insufficient memory. . . . . . . . . . . . . . . . . . . . . . . . . . . . 188
Printing is slow.. . . . . . . . . . . . . . . . . . . . . . . . . . . . . . . 188
Printer requests paper size change to
continue printing. . . . . . . . . . . . . . . . . . . . . . . . . . . . . 189
Unclear printing . . . . . . . . . . . . . . . . . . . . . . . . . . . . . . 189
Miscellaneous. . . . . . . . . . . . . . . . . . . . . . . . . . . . . . . . . . . 191
The power is on, but the printer does not
go online. . . . . . . . . . . . . . . . . . . . . . . . . . . . . . . . . . . 191
Print processing does not start.. . . . . . . . . . . . . . . . . . 191
Print processing cancels. . . . . . . . . . . . . . . . . . . . . . . . 191
Printer makes a strange noise. . . . . . . . . . . . . . . . . . . 191
Printer takes a long time to start printing. . . . . . . . . . 192
Toner rubs off when you rub the printed surface. . . . . 192
Accessories . . . . . . . . . . . . . . . . . . . . . . . . . . . . . . . . . . . . . . . .193
Network interface card . . . . . . . . . . . . . . . . . . . . . . . . . . . . 193
Additional memory . . . . . . . . . . . . . . . . . . . . . . . . . . . . . . . 194
Internal hard disk . . . . . . . . . . . . . . . . . . . . . . . . . . . . . . . . 197
Duplex unit . . . . . . . . . . . . . . . . . . . . . . . . . . . . . . . . . . . . . 199
Additional paper trays . . . . . . . . . . . . . . . . . . . . . . . . . . . . 200
C7000 CCS . . . . . . . . . . . . . . . . . . . . . . . . . . . . . . . . . . . . . 203
Specifications . . . . . . . . . . . . . . . . . . . . . . . . . . . . . . . . . . . . . .204
External dimensions. . . . . . . . . . . . . . . . . . . . . . . . . . . . . . 206
Consumables . . . . . . . . . . . . . . . . . . . . . . . . . . . . . . . . . . . . . . .207
Factory Default Settings . . . . . . . . . . . . . . . . . . . . . . . . . . . . . .208
Print menu. . . . . . . . . . . . . . . . . . . . . . . . . . . . . . . . . . . . . . 208
Media menu . . . . . . . . . . . . . . . . . . . . . . . . . . . . . . . . . . . . 208
Colour menu . . . . . . . . . . . . . . . . . . . . . . . . . . . . . . . . . . . . 209
System Config menu . . . . . . . . . . . . . . . . . . . . . . . . . . . . . 209
PCL Emulation menu. . . . . . . . . . . . . . . . . . . . . . . . . . . . . . 209
PPR Emulation menu . . . . . . . . . . . . . . . . . . . . . . . . . . . . . 210
FX Emulation menu . . . . . . . . . . . . . . . . . . . . . . . . . . . . . . . 210
Parallel menu . . . . . . . . . . . . . . . . . . . . . . . . . . . . . . . . . . . 211
USB menu . . . . . . . . . . . . . . . . . . . . . . . . . . . . . . . . . . . . . . 211
Network menu. . . . . . . . . . . . . . . . . . . . . . . . . . . . . . . . . . . 211
Memory menu . . . . . . . . . . . . . . . . . . . . . . . . . . . . . . . . . . . 212
Содержание C7300
Страница 1: ...C7100 C7300 C7500 USER S GUIDE WINDOWS 2000 l ...
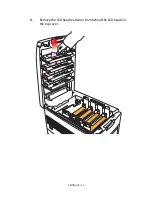
Страница 20: ...SETTING UP 20 3 Remove the LED head restrainer from behind the LED heads in the top cover ...
Страница 22: ...SETTING UP 22 5 Remove the protective sheets from each of the four image drums ...
Страница 27: ...SETTING UP 27 LOADING PAPER 1 Remove the paper tray from the printer ...
Страница 82: ...PRINTER DRIVERS 82 6 Click on Paper Size and set the required paper size 7 Click on OK three times ...
Страница 98: ...OPERATION 98 1 Click on the Colour Management tab 2 Select Automatic or Manual setting for colour matching ...
Страница 116: ...OPERATION 116 2 Select Booklet from Pages per Sheet 3 Click on OK twice and close the printer dialogue box ...
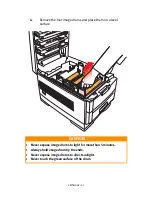
Страница 158: ...MAINTENANCE 158 5 Remove the protective sheet from the new image drum ...
Страница 159: ...MAINTENANCE 159 6 Install the new image drum into its correct colour location in the printer 1 ...
Страница 168: ...MAINTENANCE 168 2 Gently wipe the LED head surface with LED lens cleaner or soft tissue 3 Close the top cover ...
Страница 175: ...TROUBLESHOOTING 175 BEHIND THE FRONT COVER Open the front cover and remove any jammed paper then close the front cover ...
Страница 177: ...TROUBLESHOOTING 177 BEHIND THE REAR COVER Open the rear cover and remove any jammed paper then close the rear cover ...
Страница 206: ...SPECIFICATIONS 206 EXTERNAL DIMENSIONS ...


