SETTING UP > 51
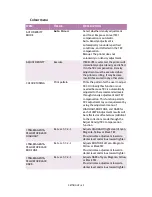
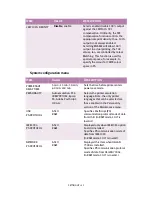
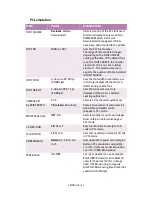
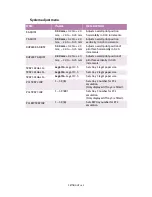
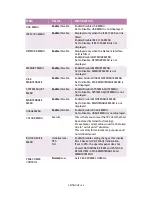
System configuration menu
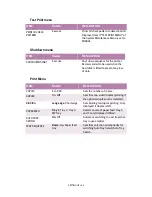
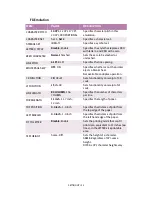
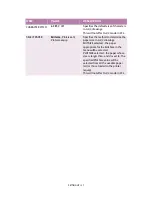
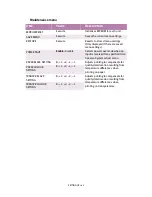
CMY 100% DENSITY
Disable
; enable
Selects enable/disable 100% output
against the CMY100% TRC
compensation. Ordinarily, the TRC
compensation function controls the
appropriate print density; thus, 100%
output is not always enabled.
Selecting ENABLE will allow 100%
output. In actual printing, the TCR
values, too, are controlled by Colour
Matching. This function is used for
special purposes; for example, to
specify the colour for CMYK colour
space in PS.
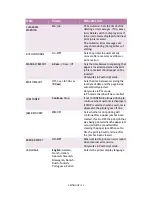
Item
Value
Description
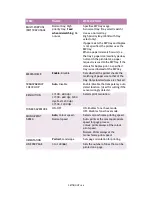
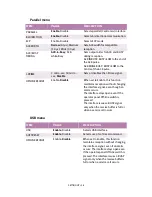
POWER SAVE
DELAY TIME
5 min; 15 min; 30 min;
60 min; 240 min.
Sets the time before printer enters
power save mode.
PERSONALITY
Auto emulation; PCL;
IBM PPR III XL; Epson
FX; Adobe PostScript;
HP-GL2
Selects the printer emulation
language. Note: the only printer
languages that can be selected are
those enabled in the Personality
section of the Maintenance menu.
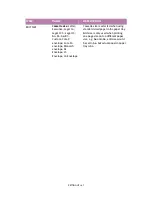
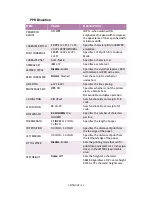
USB
PS-PROTOCOL
ASCII
RAW
Specifies PostScript (PS)
communication protocol mode of data
from USB. (In RAW mode, Ctrl-T is
invalid.)
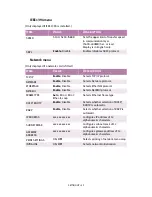
IEEE 1394
PS PROTOCOL
ASCII
RAW
Displayed only when IEEE1394 option
board is installed.
Specifies PS communication mode of
data from IEEE1394.
(In RAW mode, Ctrl-T is invalid).
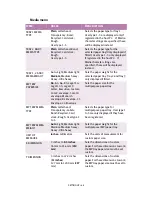
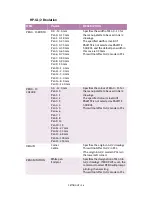
NETWORK
PS PROTOCOL
ASCII
RAW
Displayed this Item when OkiLAN
7300e is installed.
Specifies PS communication protocol
mode of data from OkiLAN 7300e .
(In RAW mode, Ctrl-T is invalid.)
Item
Value
Description
Содержание C7300
Страница 1: ...C7100 C7300 C7500 USER S GUIDE WINDOWS 2000 l ...
Страница 20: ...SETTING UP 20 3 Remove the LED head restrainer from behind the LED heads in the top cover ...
Страница 22: ...SETTING UP 22 5 Remove the protective sheets from each of the four image drums ...
Страница 27: ...SETTING UP 27 LOADING PAPER 1 Remove the paper tray from the printer ...
Страница 82: ...PRINTER DRIVERS 82 6 Click on Paper Size and set the required paper size 7 Click on OK three times ...
Страница 98: ...OPERATION 98 1 Click on the Colour Management tab 2 Select Automatic or Manual setting for colour matching ...
Страница 116: ...OPERATION 116 2 Select Booklet from Pages per Sheet 3 Click on OK twice and close the printer dialogue box ...
Страница 158: ...MAINTENANCE 158 5 Remove the protective sheet from the new image drum ...
Страница 159: ...MAINTENANCE 159 6 Install the new image drum into its correct colour location in the printer 1 ...
Страница 168: ...MAINTENANCE 168 2 Gently wipe the LED head surface with LED lens cleaner or soft tissue 3 Close the top cover ...
Страница 175: ...TROUBLESHOOTING 175 BEHIND THE FRONT COVER Open the front cover and remove any jammed paper then close the front cover ...
Страница 177: ...TROUBLESHOOTING 177 BEHIND THE REAR COVER Open the rear cover and remove any jammed paper then close the rear cover ...
Страница 206: ...SPECIFICATIONS 206 EXTERNAL DIMENSIONS ...

