SETTING UP > 59
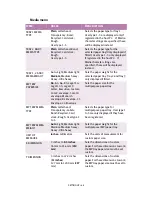
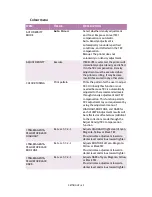
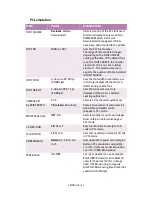
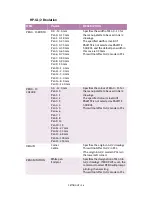
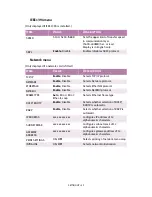
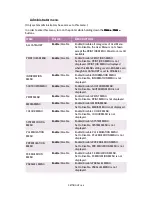
IEEE1394 menu
(Only displayed if IEEE 1394 is installed.)
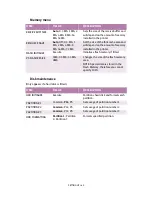
Network menu
(Only displayed if a network card is fitted.)
Item
Value
Description
SPEED
S100; S200;
S400
Sets the upper limit of transfer speed
in communication layer.
(S400: 400MB/Sec. or less).
Display is in English only.
SBP2
Enable
; Disable
Enables/disables SBP2 protocol.
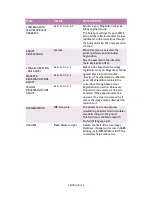
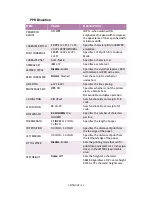
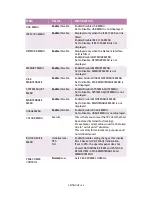
Item
Value
Description
TCP/IP
Enable
; Disable
Selects TCP/IP protocol.
NETWARE
Enable
; Disable
Selects Netware protocol.
ETHERTALK
Enable
; Disable
Selects EtherTalk protocol.
NETBEUI
Enable
; Disable
Selects NetBEUI protocol.
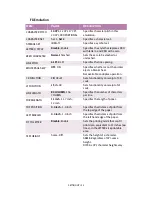
FRAME TYPE
Auto
; 802.2; 802.3
Ether-II; snap
Selects Ethernet frame type.
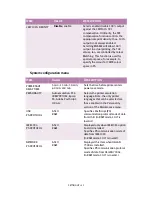
DHCP/BOOTP
Enable
; Disable
Selects whether selection of DHCP/
BOOTP is automatic.
RARP
Enable
; Disable
Selects whether selection of RARP is
automatic.
IP ADDRESS
xxx.xxx.xxx.xxx
Configures IP address of 12
alphanumeric characters.
SUBNET MASK
xxx.xxx.xxx.xxx
Configures subnet mask of 12
alphanumeric characters.
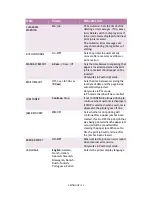
GATEWAY
ADDRESS
xxx.xxx.xxx.xxx
Configures gateway address of 12
alphanumeric characters.
PRINT SETTINGS
ON;
OFF
Selects printing of network menu map.
INITIALISE
ON;
OFF
Selects network initialisation.
Содержание C7300
Страница 1: ...C7100 C7300 C7500 USER S GUIDE WINDOWS 2000 l ...
Страница 20: ...SETTING UP 20 3 Remove the LED head restrainer from behind the LED heads in the top cover ...
Страница 22: ...SETTING UP 22 5 Remove the protective sheets from each of the four image drums ...
Страница 27: ...SETTING UP 27 LOADING PAPER 1 Remove the paper tray from the printer ...
Страница 82: ...PRINTER DRIVERS 82 6 Click on Paper Size and set the required paper size 7 Click on OK three times ...
Страница 98: ...OPERATION 98 1 Click on the Colour Management tab 2 Select Automatic or Manual setting for colour matching ...
Страница 116: ...OPERATION 116 2 Select Booklet from Pages per Sheet 3 Click on OK twice and close the printer dialogue box ...
Страница 158: ...MAINTENANCE 158 5 Remove the protective sheet from the new image drum ...
Страница 159: ...MAINTENANCE 159 6 Install the new image drum into its correct colour location in the printer 1 ...
Страница 168: ...MAINTENANCE 168 2 Gently wipe the LED head surface with LED lens cleaner or soft tissue 3 Close the top cover ...
Страница 175: ...TROUBLESHOOTING 175 BEHIND THE FRONT COVER Open the front cover and remove any jammed paper then close the front cover ...
Страница 177: ...TROUBLESHOOTING 177 BEHIND THE REAR COVER Open the rear cover and remove any jammed paper then close the rear cover ...
Страница 206: ...SPECIFICATIONS 206 EXTERNAL DIMENSIONS ...

