SETTING UP > 61
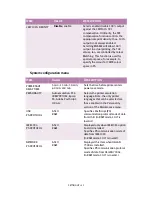
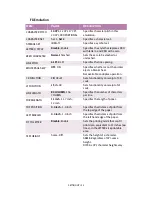
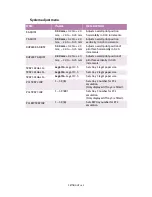
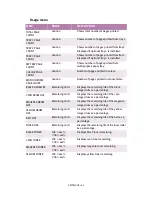
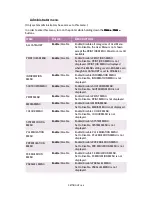
System adjust menu
Item
Value
Description
X ADJUST
0.00 mm
; +0.25 to +2.0
mm; – 2.0 to –0.25 mm
Adjusts overall print position
horizontally in 0.20 increments.
Y ADJUST
0.00 mm
; +0.25 to +2.0
mm; – 2.0 to –0.25 mm
Adjusts overall print position
vertically in 0.20 increments.
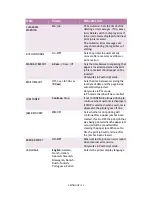
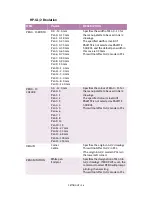
DUPLEX X ADJUST
0.00 mm
; +0.25 to +2.0
mm; – 2.0 to –0.25 mm
Adjusts overall print position of
print face horizontally in 0.20
increments.
DUPLEX Y ADJUST
0.00 mm
; +0.25 to +2.0
mm; – 2.0 to –0.25 mm
Adjusts overall print position of
print face vertically in 0.20
increments.
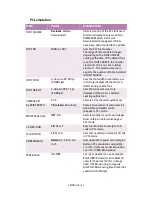
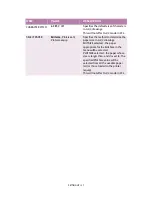
TRAY 1 LEGAL 14
Legal 14
; Legal 13.5
Sets tray 1 legal paper size.
TRAY 2 LEGAL 14
Legal 14
; Legal 13.5
Sets tray 2 legal paper size.
TRAY 3 LEGAL 14
Legal 14
; Legal 13.5
Sets tray 3 legal paper size.
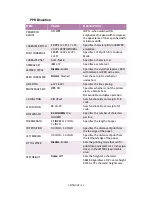
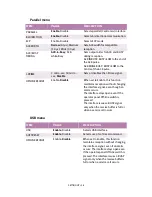
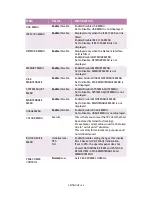
PCL TRAY 2 ID#
1 – 59 (
5
)
Sets tray 2 number for PCL
emulation.
(Only displayed if Tray 2 is fitted).
PCL TRAY 3 ID#
1 – 59 (
20
)
Sets tray 3 number for PCL
emulation.
(Only displayed if Tray 3 is fitted).
PCL MP TRAY ID#
1 – 59 (
4
)
Sets MP tray number for PCL
emulation.
Содержание C7300
Страница 1: ...C7100 C7300 C7500 USER S GUIDE WINDOWS 2000 l ...
Страница 20: ...SETTING UP 20 3 Remove the LED head restrainer from behind the LED heads in the top cover ...
Страница 22: ...SETTING UP 22 5 Remove the protective sheets from each of the four image drums ...
Страница 27: ...SETTING UP 27 LOADING PAPER 1 Remove the paper tray from the printer ...
Страница 82: ...PRINTER DRIVERS 82 6 Click on Paper Size and set the required paper size 7 Click on OK three times ...
Страница 98: ...OPERATION 98 1 Click on the Colour Management tab 2 Select Automatic or Manual setting for colour matching ...
Страница 116: ...OPERATION 116 2 Select Booklet from Pages per Sheet 3 Click on OK twice and close the printer dialogue box ...
Страница 158: ...MAINTENANCE 158 5 Remove the protective sheet from the new image drum ...
Страница 159: ...MAINTENANCE 159 6 Install the new image drum into its correct colour location in the printer 1 ...
Страница 168: ...MAINTENANCE 168 2 Gently wipe the LED head surface with LED lens cleaner or soft tissue 3 Close the top cover ...
Страница 175: ...TROUBLESHOOTING 175 BEHIND THE FRONT COVER Open the front cover and remove any jammed paper then close the front cover ...
Страница 177: ...TROUBLESHOOTING 177 BEHIND THE REAR COVER Open the rear cover and remove any jammed paper then close the rear cover ...
Страница 206: ...SPECIFICATIONS 206 EXTERNAL DIMENSIONS ...

