CONTENTS > 3
CONTENTS
Introduction . . . . . . . . . . . . . . . . . . . . . . . . . . . . . . . . . . . . . . . . . . 9
Features. . . . . . . . . . . . . . . . . . . . . . . . . . . . . . . . . . . . . . . . . . 9
Using this Manual. . . . . . . . . . . . . . . . . . . . . . . . . . . . . . . . . 11
Online usage . . . . . . . . . . . . . . . . . . . . . . . . . . . . . . . . . . 11
Printing Pages . . . . . . . . . . . . . . . . . . . . . . . . . . . . . . . . . 12
Getting Started . . . . . . . . . . . . . . . . . . . . . . . . . . . . . . . . . . . . . .13
Unpacking . . . . . . . . . . . . . . . . . . . . . . . . . . . . . . . . . . . . . . . 13
CD-ROM disk contents . . . . . . . . . . . . . . . . . . . . . . . . . . . . . 14
CD1 - Drivers . . . . . . . . . . . . . . . . . . . . . . . . . . . . . . . . . . 14
CD2 - Manuals . . . . . . . . . . . . . . . . . . . . . . . . . . . . . . . . . 14
CD3 - Network . . . . . . . . . . . . . . . . . . . . . . . . . . . . . . . . . 14
CD4 - Print Control software . . . . . . . . . . . . . . . . . . . . . . 15
Printer location . . . . . . . . . . . . . . . . . . . . . . . . . . . . . . . . . . . 15
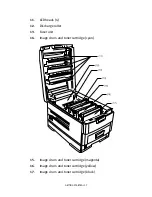
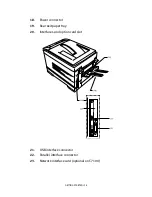
Printer components . . . . . . . . . . . . . . . . . . . . . . . . . . . . . . . 16
Setting up . . . . . . . . . . . . . . . . . . . . . . . . . . . . . . . . . . . . . . . . . .19
Packaging and protective sheet removal . . . . . . . . . . . . . . 19
Toner cartridge installation . . . . . . . . . . . . . . . . . . . . . . . . . 24
Loading paper . . . . . . . . . . . . . . . . . . . . . . . . . . . . . . . . . . . . 27
Manual feed . . . . . . . . . . . . . . . . . . . . . . . . . . . . . . . . . . . . . 31
Power connection . . . . . . . . . . . . . . . . . . . . . . . . . . . . . . . . . 33
Control panel . . . . . . . . . . . . . . . . . . . . . . . . . . . . . . . . . . . . 34
Menu settings . . . . . . . . . . . . . . . . . . . . . . . . . . . . . . . . . . . . 35
Changing the display language . . . . . . . . . . . . . . . . . . . 35
Confirmation printout . . . . . . . . . . . . . . . . . . . . . . . . . . . 36
Paper feed, size and media . . . . . . . . . . . . . . . . . . . . . . 36
Paper, envelope types, transparencies
and adhesive labels . . . . . . . . . . . . . . . . . . . . . . . . . . . . . . 40
Paper feed and exit. . . . . . . . . . . . . . . . . . . . . . . . . . . . . . . . 41
Paper Sizes . . . . . . . . . . . . . . . . . . . . . . . . . . . . . . . . . . . 41
Paper weights and media settings. . . . . . . . . . . . . . . . . 42
Printer settings . . . . . . . . . . . . . . . . . . . . . . . . . . . . . . . . . . . 43
Confirming current settings . . . . . . . . . . . . . . . . . . . . . . 43
Changing the settings. . . . . . . . . . . . . . . . . . . . . . . . . . . 43
List of menu settings . . . . . . . . . . . . . . . . . . . . . . . . . . . . . . 44
Switching off . . . . . . . . . . . . . . . . . . . . . . . . . . . . . . . . . . . . . 66
Interfaces . . . . . . . . . . . . . . . . . . . . . . . . . . . . . . . . . . . . . . . 67
Содержание C7300
Страница 1: ...C7100 C7300 C7500 USER S GUIDE WINDOWS 2000 l ...
Страница 20: ...SETTING UP 20 3 Remove the LED head restrainer from behind the LED heads in the top cover ...
Страница 22: ...SETTING UP 22 5 Remove the protective sheets from each of the four image drums ...
Страница 27: ...SETTING UP 27 LOADING PAPER 1 Remove the paper tray from the printer ...
Страница 82: ...PRINTER DRIVERS 82 6 Click on Paper Size and set the required paper size 7 Click on OK three times ...
Страница 98: ...OPERATION 98 1 Click on the Colour Management tab 2 Select Automatic or Manual setting for colour matching ...
Страница 116: ...OPERATION 116 2 Select Booklet from Pages per Sheet 3 Click on OK twice and close the printer dialogue box ...
Страница 158: ...MAINTENANCE 158 5 Remove the protective sheet from the new image drum ...
Страница 159: ...MAINTENANCE 159 6 Install the new image drum into its correct colour location in the printer 1 ...
Страница 168: ...MAINTENANCE 168 2 Gently wipe the LED head surface with LED lens cleaner or soft tissue 3 Close the top cover ...
Страница 175: ...TROUBLESHOOTING 175 BEHIND THE FRONT COVER Open the front cover and remove any jammed paper then close the front cover ...
Страница 177: ...TROUBLESHOOTING 177 BEHIND THE REAR COVER Open the rear cover and remove any jammed paper then close the rear cover ...
Страница 206: ...SPECIFICATIONS 206 EXTERNAL DIMENSIONS ...


