23. FA TRANSPARENT FUNCTION
23.5 GOT Side Settings
23 - 45
17
ROBOT
CONT
ROLLER
CONN
E
C
TION
18
C
NC CONNECTION
19
ENER
GY M
EAS
URIN
G
UNIT/EL
EC
TRIC M
U
LT
I-
ME
ASUR
ING IN
STRU
MEN
T
CO
NNE
CTION
20
GOT
MUL
T
I-DROP
CONNECTION
21
MUL
TI
PL
E-GT1
4, G
T12,
GT
11
, GT
10
CO
NNECTIO
N FUNCTION
22
MUL
T
I-CHA
N
N
E
L
FUNCT
ION
23
F
A
TRANS
P
ARENT
FUNCTION
23.5 GOT Side Settings
23.5.1 Setting communication
interface
Controller setting
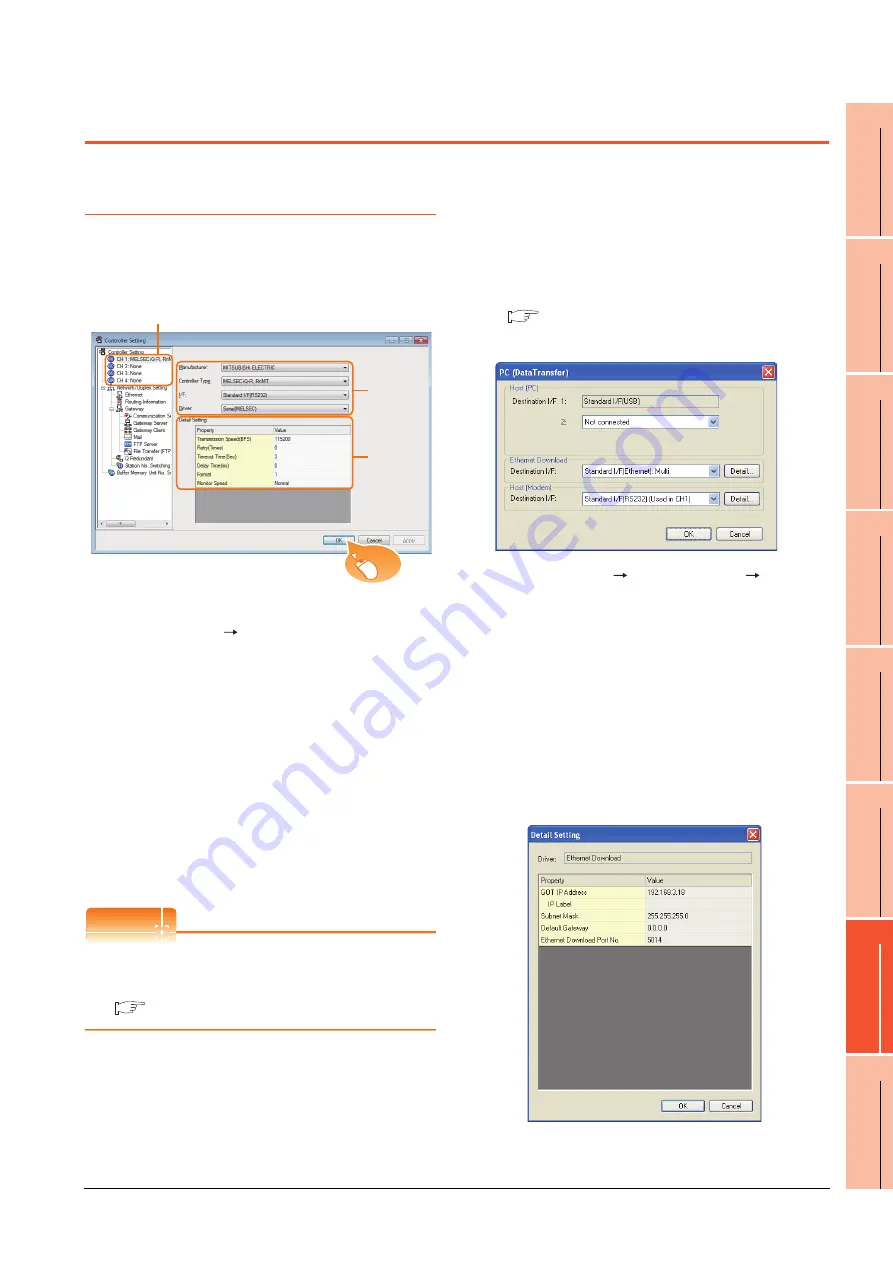
Set the channel of the connected equipment.
1.
Select [Common]
[Controller Setting] from the
menu.
2.
The Controller Setting window is displayed. Select the
channel to be used from the list menu.
3.
Set Manufacturer, Controller Type, I/F, and Driver
according to the connected equipment to be used.
4.
The detailed setting is displayed after Manufacturer,
Controller Type, I/F, and Driver are set.
Make the settings according to the usage
environment.
Click the [OK] button when settings are completed.
POINT
POINT
POINT
The settings of connecting equipment can be
confirmed in [I/F Communication Setting].
For details, refer to the following.
1.1.2 I/F communication setting
Communication setting with personal
computer
Set the communication setting between the GOT and the
personal computer.
For details of the setting contents, refer to the following
manual.
Screen Design Manual (Fundamentals)
7.1.2 Interface setting of the GOT
Example: For GT16
1.
Select [Common]
[Peripheral Setting]
[PC(Data
Transfer) ]from the menu.
2.
The [PC (Data Transfer)] is displayed. Set the
interface of the GOT to be used in the communication
with the personal computer.
(a) Host (PC) setting
When communicating the GOT and the personal
computer in the direct connection, set the interface
of the GOT to be used in the communication with
the personal computer.
(b) Ethernet download setting
When communicating the GOT via Ethernet, set
the interface of the GOT to be used in the
communication with the personal computer.
2.
3.
4.
Click!
Содержание GT15
Страница 2: ......
Страница 34: ...A 32 ...
Страница 92: ......
Страница 110: ...2 18 2 DEVICE RANGE THAT CAN BE SET 2 9 MELSEC WS ...
Страница 134: ...3 24 3 ACCESS RANGE FOR MONITORING 3 7 Connection to the Head Module of CC Link IE Field Network System ...
Страница 186: ...5 10 5 BUS CONNECTION 5 2 System Configuration ...
Страница 218: ...5 42 5 BUS CONNECTION 5 4 Precautions ...
Страница 254: ...6 36 6 DIRECT CONNECTION TO CPU 6 6 Precautions ...
Страница 286: ...7 32 7 COMPUTER LINK CONNECTION 7 6 Precautions ...
Страница 350: ...8 64 8 ETHERNET CONNECTION 8 5 Precautions ...
Страница 368: ...9 18 9 MELSECNET H CONNECTION PLC TO PLC NETWORK 9 5 Precautions ...
Страница 420: ...11 26 11 CC Link IE CONTROLLER NETWORK CONNECTION 11 5 Precautions ...
Страница 440: ...12 20 12 CC Link IE FIELD NETWORK CONNECTION 12 5 Precautions ...
Страница 490: ...13 50 13 CC Link CONNECTION INTELLIGENT DEVICE STATION 13 5 Precautions ...
Страница 510: ......
Страница 564: ...15 54 15 INVERTER CONNECTION 15 7 Precautions ...
Страница 668: ......
Страница 712: ...21 12 21 MULTIPLE GT14 GT12 GT11 GT10 CONNECTION FUNCTION 21 5 Precautions ...
Страница 713: ...MULTI CHANNEL FUNCTION 22 MULTI CHANNEL FUNCTION 22 1 ...
Страница 714: ......
Страница 760: ...22 46 22 MULTI CHANNEL FUNCTION 22 5 Multi channel Function Check Sheet ...
Страница 761: ...FA TRANSPARENT FUNCTION 23 FA TRANSPARENT FUNCTION 23 1 ...
Страница 762: ......
Страница 860: ...REVISIONS 4 ...
Страница 863: ......


