6 Image Acquisition
Operator’s Manual
6 - 19
–
The images are captured from the same plane.
–
There are no large black areas in the image.
6.9.4 Cine Review
Tap [Review Cine] on the touch screen in panoramic image viewing status to enter cine reviewing
mode. In cine reviewing mode, a green frame marker indicates the sequence of the currently
reviewed images in the panoramic image on the left-hand side of screen.
In cine review status:
•
Use the trackball/trackpad to review the captured images frame by frame.
•
Tap [Auto Play] to start or end auto play.
•
In auto play mode, tap [Auto Play] on the touch screen, or press/rotate the corresponding knob
to change the play speed. When the speed is off, the system exits auto play mode.
•
Review to a certain image. Tap [Set Begin] to set the start point. Review to another image. Tap
[Set End] to set the end point. In auto play mode, the review region is confined to the set start
point and end point.
•
Tap [iScape View] > [Overview] on the touch screen to exit cine review mode. The panoramic
image displays.
•
In cine review mode, press <Freeze> on the control panel to return to the acquisition
preparation status.
6.10 R-VQS
R-VQS (RF-data based quantification on arterial stiffness) tracks movements of the upper and
lower vessel walls and measures vessel diameter, displacement, coefficient of hardness and PWV
(dimensionless pulse wave velocity).
Hardness coefficient: Arterial stiffness is changed with the blood pressure changing. The bigger the
value the higher the stiffness.
PWV (dimensionless pulse wave velocity) represents the transmit speed of pulse wave. The bigger
the
stiffness parameter
the higher the PWV.
NOTE:
•
Vascular Package should be configured.
•
R-VQS is an option.
•
Only linear probe under Carotid exam mode supports this feature.
Perform the following procedure:
1.
Select a probe and carotid exam mode. Perform B real-time imaging and search for carotid
vessel. Try to place the vessel on the image horizontally.
2.
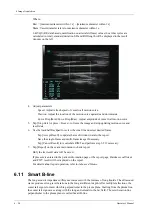
Tap [R-VQS] and use the trackball/trackpad to locate the ROI box on the target area.
Dotted line of the ROI lies in the middle of the vessel and divides the vessel upper wall and
lower wall. Use <Set> key and trackball/trackpad to change ROI size and position.
Note that ROI should include the upper and lower wall of the vessel.
3.
Tap [Start Calc] to start tracking. Upper wall and lower wall are marked by green line in the
ROI box.
Motion curve of vessel walls display under the image in real time. 6 cardiac cycles are
calculated in total with each results display in the result window on the left synchronously.
Содержание Ana
Страница 2: ......
Страница 50: ...This page intentionally left blank...
Страница 60: ...This page intentionally left blank...
Страница 110: ...This page intentionally left blank...
Страница 116: ...This page intentionally left blank...
Страница 166: ...This page intentionally left blank...
Страница 176: ...This page intentionally left blank...
Страница 194: ...This page intentionally left blank...
Страница 220: ...This page intentionally left blank...
Страница 288: ...This page intentionally left blank...
Страница 304: ...This page intentionally left blank...
Страница 308: ...This page intentionally left blank...
Страница 316: ...This page intentionally left blank...
Страница 337: ......
Страница 338: ...P N 046 018835 00 2 0...


