


9-28
User Authentication and Accounting (User Login, Job Accounting) > Setting User Login Administration
Simple Login Key
Register users to use simple login. You can add up to 20 users.
1
Display the screen.
1
[
System Menu/Counter
] key > [
Job Accounting/Authentication
]
2
Select "User Login Setting" [
Simple Login Key
].
2
Enter the user information.
1
Select the key to which you want to register a user.
2
Enter the user name to be displayed.
3
Select [
Select user
].
4
To specify the user from local users, select [
Local User
]. To specify from network users,
select [
Network User
].
The procedure differs depending on the transmission method selected.
Specifying the user from local users
Select the user to be set for simple login.
NOTE
If the login user name entry screen appears during operations, enter a login user name
and password, and select [
Login
]. For this, you need to login as an administrator or as a
user with privileges to carry out this setting.
The factory default login user name and login password are set as shown below.
NOTE
For details on entering characters, refer to the following:
Character Entry Method (page 11-9)
NOTE
• Search by login user name or name. Select either [
Search (Login)
] or [
Search (Name)
] to
switch between [
Search (Login)
] and [
Search (Name)
].
• Select [
User Name
] or [
Login User Name
] to sort the user list.
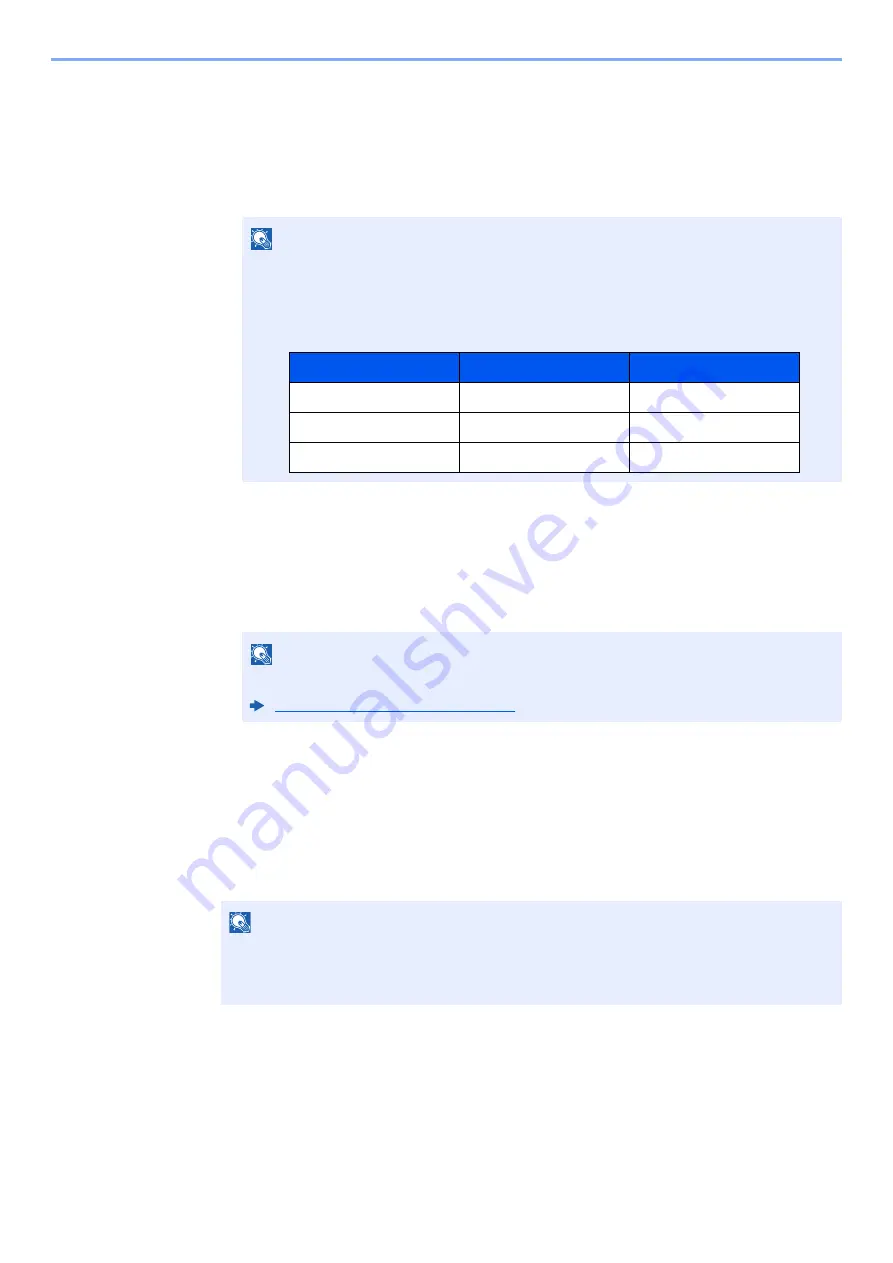
Model Name
Login User Name
Login Password
358ci
3500
3500
408ci
4000
4000
508ci
5000
5000
Содержание 358ci
Страница 1: ...kyoceradocumentsolutions com Operation Guide 508ci 408ci 358ci...
Страница 83: ...2 13 Installing and Setting up the Machine Touch Panel Example System Menu Screen Move the screen up and down...
Страница 233: ...5 23 Operation on the Machine Sending Document via E mail 6 Press the Start key Sending starts...
Страница 539: ...10 20 Troubleshooting Regular Maintenance 3 Empty the Punch Waste Box 4 Install the Punch Waste Box 5 Close the cover...
Страница 541: ...10 22 Troubleshooting Regular Maintenance 4 Install the Punch Waste Box 5 Close the cover...
Страница 586: ...10 67 Troubleshooting Clearing Paper Jams 4 Remove any jammed paper 5 Push Right Cover 2 and Cassette 3 back in...
Страница 592: ...10 73 Troubleshooting Clearing Paper Jams 8 Remove any jammed paper 9 Push Right Cover 1...
Страница 611: ...10 92 Troubleshooting Clearing a Staple Jam 4 Install the Staple Cartridge Holder 5 Close the front cover...
Страница 613: ...10 94 Troubleshooting Clearing a Staple Jam 4 Install the Staple Cartridge Holder 5 Close the front cover...
Страница 657: ...Index 10 X XPS Fit to Page 6 85 Default 8 34 Z Zoom 6 42 Default 8 32...
Страница 658: ......
Страница 661: ...is a trademark of KYOCERA Corporation 2019 KYOCERA Document Solutions Inc 2019 7 2WHKDEN200...


