


2-68
Installing and Setting up the Machine > Command Center RX
2
In the address or location bar, enter the machine's IP address or the host name.
Click in the following order to check the machine's IP address and the host name.
[
Device Information
] in the home screen > [
Identification/Wired Network
]
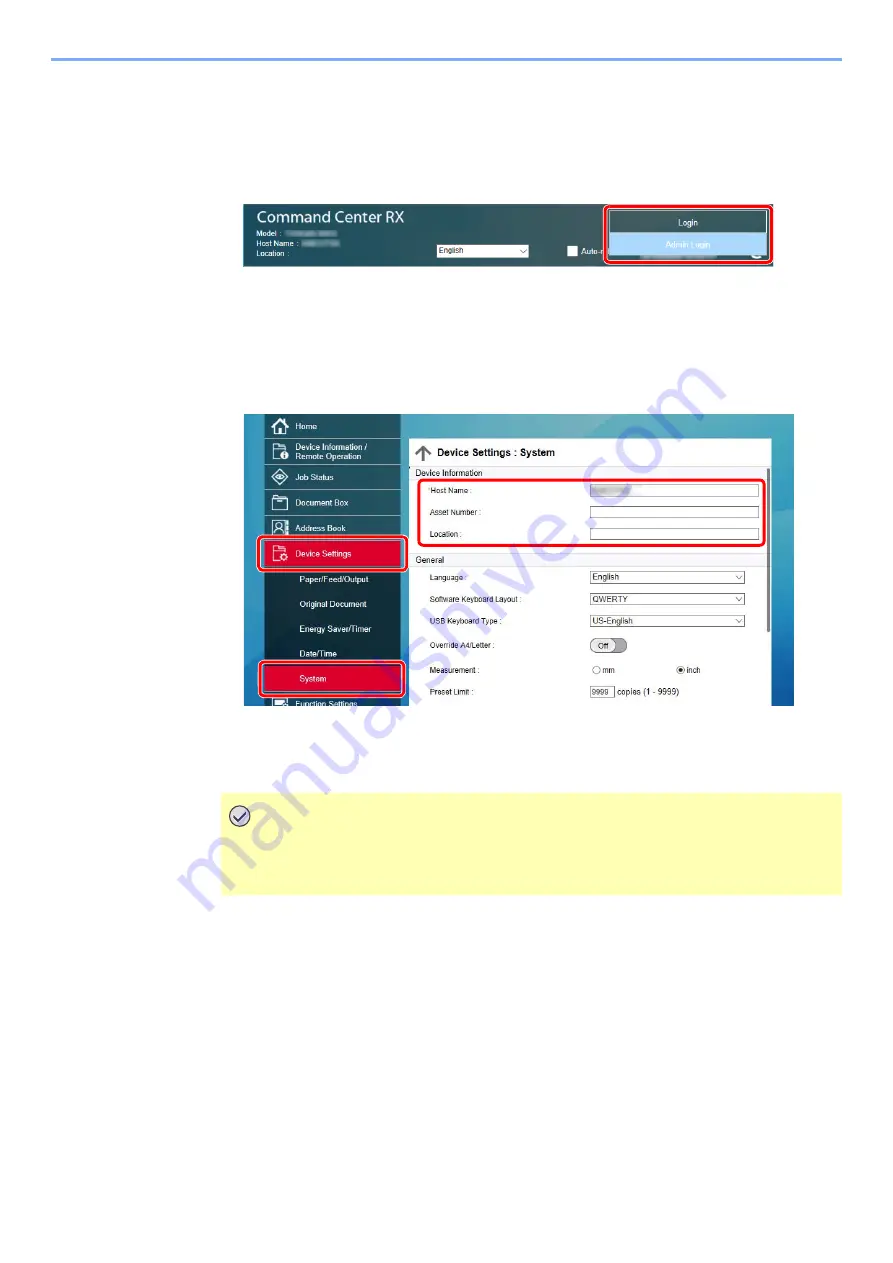
3
Log in with administrator privileges.
The factory default setting for the default user with administrator privileges is shown below.
(Upper case and lower case letters are distinguished (case sensitive).)
Login User Name: Admin
Login Password:
Admin
4
From the [
Device Settings
] menu, click [
System
].
2
Specify the host name.
Enter the device information, and then click [
Submit
].
E-mail Settings
By configuring the SMTP settings, it is possible to send the images scanned by the machine as E-mail attachments and
to send E-mail notices when jobs have been completed.
To use this function, this machine must be connected to a mail server using the SMTP protocol.
In addition, configure the following.
• SMTP settings
Item: "SMTP Protocol" and "SMTP Server Name" in "SMTP"
• The sender address when the machine sends E-mails
Item: "Sender Address" in "E-mail Send Settings"
• The setting to limit the size of E-mails
Item: "E-mail Size Limit" in "E-mail Send Settings"
IMPORTANT
After changing the setting, restart the network or turn the machine OFF and then ON.
To restart the network interface card, click [Reset] in the [Management Settings]
menu, and then click [Restart Network] in "Restart".
2
3
1
Содержание 358ci
Страница 1: ...kyoceradocumentsolutions com Operation Guide 508ci 408ci 358ci...
Страница 83: ...2 13 Installing and Setting up the Machine Touch Panel Example System Menu Screen Move the screen up and down...
Страница 233: ...5 23 Operation on the Machine Sending Document via E mail 6 Press the Start key Sending starts...
Страница 539: ...10 20 Troubleshooting Regular Maintenance 3 Empty the Punch Waste Box 4 Install the Punch Waste Box 5 Close the cover...
Страница 541: ...10 22 Troubleshooting Regular Maintenance 4 Install the Punch Waste Box 5 Close the cover...
Страница 586: ...10 67 Troubleshooting Clearing Paper Jams 4 Remove any jammed paper 5 Push Right Cover 2 and Cassette 3 back in...
Страница 592: ...10 73 Troubleshooting Clearing Paper Jams 8 Remove any jammed paper 9 Push Right Cover 1...
Страница 611: ...10 92 Troubleshooting Clearing a Staple Jam 4 Install the Staple Cartridge Holder 5 Close the front cover...
Страница 613: ...10 94 Troubleshooting Clearing a Staple Jam 4 Install the Staple Cartridge Holder 5 Close the front cover...
Страница 657: ...Index 10 X XPS Fit to Page 6 85 Default 8 34 Z Zoom 6 42 Default 8 32...
Страница 658: ......
Страница 661: ...is a trademark of KYOCERA Corporation 2019 KYOCERA Document Solutions Inc 2019 7 2WHKDEN200...


