


6-44
Using Various Functions > Functions
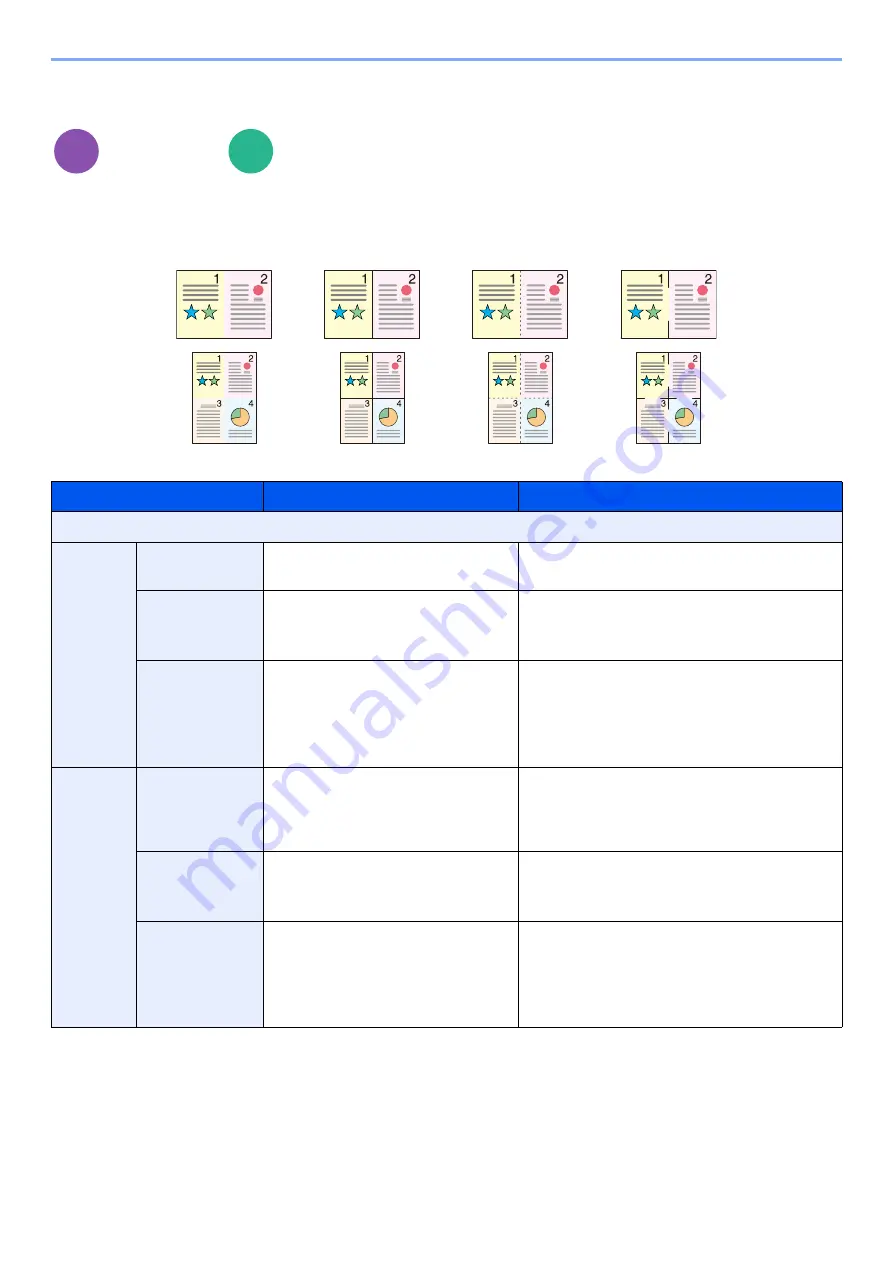
Combine
Combines 2 or 4 original sheets into 1 printed page.
You can select the page layout and the type of boundary lines around the pages.
The following types of the boundary lines are available.
Layout/Edit
Functions
Item
Value
Description
Off
2 in 1
Layout
2 in 1 (Left to Right/Top to Bottom),
2 in 1 (Right to Left/Bottom to Top)
Select the page layout of scanned originals.
Border Line
None, Solid Line, Dotted Line,
Positioning Mark
Select the boundary line type.
Select [
Border Line
] to select the page
boundary line.
Original
Orientation
Top Edge on Top, Top Edge on Left,
Auto
*1
*1 This function can only be used when the optional OCR Scan Activation Kit is installed.
Select the orientation of the original document
top edge to scan correct direction.
Select [
Original Orientation
] to choose
orientation of the originals, either [
Top Edge
on Top
] or [
Top Edge on Left
].
4 in 1
Layout
4 in 1 (Right then Down),
4 in 1 (Left then Down),
4 in 1 (Down then Right),
4 in 1 (Down then Left)
Select the page layout of scanned originals.
Border Line
None, Solid Line, Dotted Line,
Positioning Mark
Select the boundary line type.
Select [
Border Line
] to select the page
boundary line.
Original
Orientation
Top Edge on Top, Top Edge on Left,
Auto
Select the orientation of the original document
top edge to scan correct direction.
Select [
Original Orientation
] to choose
orientation of the originals, either [
Top Edge
on Top
] or [
Top Edge on Left
].
Copy
Custom
Box
None
Dotted Line
Solid Line
Positioning Mark
Содержание 358ci
Страница 1: ...kyoceradocumentsolutions com Operation Guide 508ci 408ci 358ci...
Страница 83: ...2 13 Installing and Setting up the Machine Touch Panel Example System Menu Screen Move the screen up and down...
Страница 233: ...5 23 Operation on the Machine Sending Document via E mail 6 Press the Start key Sending starts...
Страница 539: ...10 20 Troubleshooting Regular Maintenance 3 Empty the Punch Waste Box 4 Install the Punch Waste Box 5 Close the cover...
Страница 541: ...10 22 Troubleshooting Regular Maintenance 4 Install the Punch Waste Box 5 Close the cover...
Страница 586: ...10 67 Troubleshooting Clearing Paper Jams 4 Remove any jammed paper 5 Push Right Cover 2 and Cassette 3 back in...
Страница 592: ...10 73 Troubleshooting Clearing Paper Jams 8 Remove any jammed paper 9 Push Right Cover 1...
Страница 611: ...10 92 Troubleshooting Clearing a Staple Jam 4 Install the Staple Cartridge Holder 5 Close the front cover...
Страница 613: ...10 94 Troubleshooting Clearing a Staple Jam 4 Install the Staple Cartridge Holder 5 Close the front cover...
Страница 657: ...Index 10 X XPS Fit to Page 6 85 Default 8 34 Z Zoom 6 42 Default 8 32...
Страница 658: ......
Страница 661: ...is a trademark of KYOCERA Corporation 2019 KYOCERA Document Solutions Inc 2019 7 2WHKDEN200...


