5.
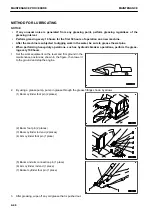
If the oil level is above line (H) of dipstick (G), loosen drain
valve (P) to drain the excessive oil.
Set a container to receive the oil under drain valve (P) be-
fore draining the oil.
6.
After checking oil level or adding oil, insert the cap of dip-
stick (G) into the hole.
METHOD FOR CHECKING OIL LEVEL IN FINAL DRIVE CASE, ADDING OIL
k
k
WARNING
• Immediately after the engine is stopped, its parts and oil are still very hot and may cause burn in-
jury. Accordingly, wait until they have cooled down before starting the work.
• If there is remaining pressure inside the case, the oil or plug may jump out. Loosen the plug slowly
to release the pressure.
• Do not stand in front of the plug when you loosen the plug.
Items to be prepared
Sliding T-handle (with 1/2" square drive).
1.
Set the TOP mark at the top with the line running on TOP
mark and plug (P) perpendicular to the ground surface.
2.
Remove plug (F) by using the handle.
When the oil level reaches a point 10 mm below the bot-
tom of the plug hole, the oil level is appropriate.
If the oil level is low, check it again according to the follow-
ing procedure.
1) Install plug (F).
2) Operate the travel lever to move the machine forward
or reverse and rotate the sprocket by 1 turn.
3) Then repeat Step 2 to check again.
3.
If the oil is insufficient, add oil through plug (F) hole.
Add oil until oil overflows from the hole of plug (F).
4.
After the inspection, install plug (F).
Tightening torque of plugs (P) and (F): 68.6 ± 9.8 Nm {7
± 1 kgm}
REMARK
Plug (F) is installed at 2 places. Add oil through the one
with which it is easier to add oil and through which no in-
ternal gears are seen.
EVERY 1000 HOURS MAINTENANCE
Maintenance for every 100, 250 and 500 hours should be performed at the same time.
CHECK STRUCTURES FOR CRACKS
Before checking, be sure to remove any excessive dirt (e.g. from undercarriage) and excessive grease (e.g.
around area of articulating joint/pins) from areas of the machine to be checked.
Check structures for cracks. If any cracks are found contact your Komatsu distributor.
MAINTENANCE PROCEDURE
MAINTENANCE
4-56
Содержание PC210-11
Страница 2: ......
Страница 24: ......
Страница 74: ......
Страница 75: ...OPERATION Please read and make sure that you understand the SAFETY section before reading this section 3 1 ...
Страница 352: ......
Страница 353: ...MAINTENANCE Please read and make sure that you understand the SAFETY section before reading this section 4 1 ...
Страница 431: ...SPECIFICATIONS 5 1 ...
Страница 435: ...PC210LC 11 PC210NLC 11 SPECIFICATIONS SPECIFICATIONS 5 5 ...
Страница 436: ...PC230NHD 11 SPECIFICATIONS SPECIFICATIONS 5 6 ...
Страница 458: ...PC210 11 2 Piece Boom PC210LC 11 2 Piece Boom PC210NLC 11 2 Piece Boom 2 PIECE BOOM ATTACHMENTS AND OPTIONS 6 22 ...
Страница 459: ...PC230NHD 11 2 Piece Boom ATTACHMENTS AND OPTIONS 2 PIECE BOOM 6 23 ...
Страница 470: ... Not including tail swing SUPER LONG FRONT BOOM AND ARM ATTACHMENTS AND OPTIONS 6 34 ...
Страница 505: ...REPLACEMENT PARTS 7 1 ...
Страница 521: ......


