| Set up Users and Groups |
38
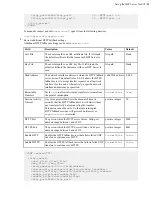
or for Linux systems that use
init.d
:
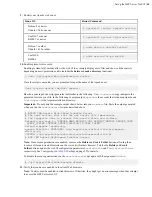
# service asperacentral restart
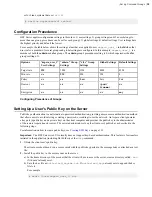
Configuration Precedence
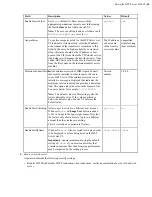
HST Server applies configuration settings in this order: 1) user settings, 2) group settings (and if a user belongs to
more than one group, precedence can be set for each group), 3) global settings, 4) default settings. User settings have
the highest priority and default the lowest.
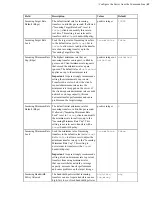
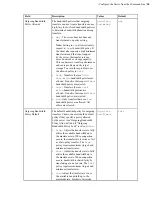
For example, the table below shows the setting values that are applied to user
aspera_user_1
in
bold
when that
user is also a member of several groups and global settings are configured. In this example,
aspera_user_1
is a
member of both the
admin
and
xfer
groups. The
admin
group's precedence setting is 0, which supersedes the
xfer
group's setting of 1:
Options
"aspera_user_1"
User Settings
"admin" Group
Settings
"xfer" Group
Settings
Global Settings Default Settings
Target rate
5M
10M
15M
40M
45M
Min rate
n/a
2M
8M
3M
0
Policy
n/a
n/a
Low
Fair
Fair
Docroot
n/a
n/a
n/a
/pod/
$(name)
n/a
Encryption
n/a
n/a
n/a
n/a
any
Configuring Precedence of Groups
Setting Up a User's Public Key on the Server
Public key authentication is an alternative to password authentication, providing a more secure authentication method
that allows users to avoid entering or storing a password, or sending it over the network. An Aspera client generates
a key pair (a public key and a private key) on the client computer and provides the public key to the administrator
of the remote Aspera transfer server. The server administrator sets up the client user's public key as described in the
following steps.
For information on how to create public keys, see
on page 133.
Important:
The HST Server web UI currently does not support key-based authentication. This feature is for transfers
initiated in the application (including Hot Folders) or the
ascp
command.
1.
Obtain the client user's public key.
The client user should send you a secure email with the public key pasted in the message body or attached as a text
file.
2.
Install the public key in the user account on the server.
a) In the home directory of the account that the client will use to access the server, create a directory called
.ssh
if it doesn't already exist.
b) Save the key file as
authorized_keys
in
.ssh
. If
authorized_keys
already exists, append the key
file to it.
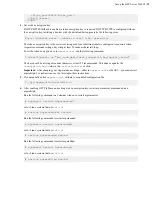
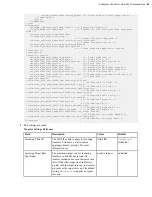
For example,
# mkdir /home/aspera_user_1/.ssh

