| Chargers |
232
Item #
Quantity
Description
15
4
Spring, Metric, 6.00x0.60x9.50 long
(681006)
16
4
Screw, M3x0.5x16 Phillips pan head
(680128)
17
1
Collar placement tool
You will need:
• Screw driver, #2 Phillips
1.
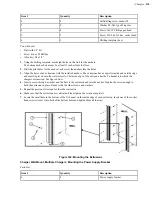
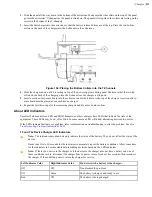
Locate the collar placement tool on the back of the charger so that it is against the charger’s end cap.
2.
Position one of the collars against the collar placement tool. Place the collar directly over one of the charger’s
threaded channels.
Figure 164: Fastening the Collars
3.
Insert a spring into the collar, then secure with a screw. The screw should bottom out in the channel.
4.
Repeat these steps for the rest of the collars.
Charger Wall Mount, Multiple Chargers: Completing the Assembly
At this point, you are ready to put the power supply mounting panel, the chargers, and the dry-erase board sections
into the extrusions. Insert the different pieces into the top of the extrusions and then slide them down the extrusions.
1.
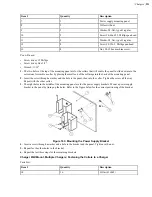
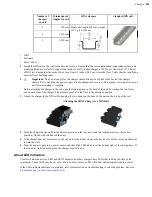
Place the bottom of the mounting panel (the end without the collars) into the slots in the outer edges of the
extrusions.
Figure 165: Placing the Bottom of the Mounting Panel into the Slots
Содержание Vocollect
Страница 1: ...Honeywell Vocollect Hardware Reference ...
Страница 2: ......
Страница 4: ......
Страница 12: ......
Страница 20: ......
Страница 36: ......
Страница 80: ......
Страница 106: ......
Страница 128: ......
Страница 148: ......
Страница 150: ......
Страница 154: ... Honeywell Wired Headsets 154 ...
Страница 166: ......
Страница 287: ... Honeywell Regulatory Compliance 287 Japanese Compliance Brazilian Compliance ...
Страница 308: ......
Страница 316: ... Index 316 ...

