


• Removal of the powered secondary PGM from its IOTA.
• Removal of PROFIBUS network cable from the secondary PGM.
Tip
When the single FTE link to the primary and/or secondary PGM is disconnected, this does not result in loss of
synchronization.
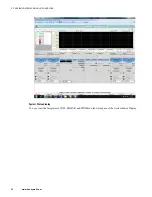
PGM Redundancy tab in Monitoring view
After the PGM configured as redundant is loaded, the Redundancy tab must provide the following statistics.
• Auto Synchronization State (RDNAUTOSYNC)
• Redundancy Compatibility (RDNCMPT)
• Inhibit Sync Reason (RDNINHIBITSYNC)
• Initial Sync Progress (RDNSYNCPROG)
• Last Synchronization Time (SYNCTIMEBEG)
• Last Loss of Sync Time (SYNCTIMEEND)
• Redundancy Controllability (RDNCTLABILITY)
• Device Index (RDNDEVICEIDX)
• Redundancy Traffic bytes/sec (RDNXFERAVG)
• Max Redun. Traffic bytes/sec (RDNXFERMAX)
• Redundancy Delay (RDNDELAYAVG)
• Maximum Redundancy Delay (RDNDELAYMAX)
• Max Initial Sync Time (RDNISTIMEMAX)
• Max Switchover Time (RDNSOTIMEMAX)
Related topics
“Enabling Synchronization ” on page 43
“Disabling Synchronization ” on page 44
“Configuring the network for switchover” on page 44
“Enabling a secondary PGM to become a primary PGM in the absence of a partner module” on page 46
“Performing a manual switchover” on page 46
“PGM redundancy notifications” on page 47
5.6.1 Enabling Synchronization
Use the following procedure to initiate a synchronization command manually to a redundant PGM pair.
Tip
You can view the active PGM pair in the Monitoring view in the Control Builder.
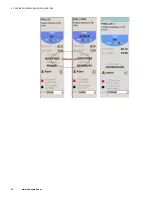
Perform the following steps to enable synchronization
1
In the Monitoring view, double-click the primary PGM icon.
The PGM block configuration form appears.
2
Click the
Redundancy
tab.
3
Click
Enable Synchronization
.
4
Click
Yes
to confirm the action and issue the synchronize command.
Confirm that the
Auto Synchronization State
becomes
ENABLED
.
5
Click
OK
.
5 PROFIBUS GATEWAY MODULE (PGM) BLOCK
43
Содержание Experion PKS
Страница 1: ...Experion PKS PROFIBUS Gateway Module User s Guide EPDOC XX88 en 431E June 2018 Release 431 ...
Страница 8: ...CONTENTS 8 www honeywell com ...
Страница 10: ...1 ABOUT THIS GUIDE 10 www honeywell com ...
Страница 32: ...4 PROFIBUS GATEWAY MODULE PGM INSTALLATION 32 www honeywell com ...
Страница 58: ...5 PROFIBUS GATEWAY MODULE PGM BLOCK 58 www honeywell com ...
Страница 69: ...6 PROTOCOL BLOCK 69 ...
Страница 103: ...5 Click OK 6 PROTOCOL BLOCK 103 ...
Страница 109: ...You can modify the following value from the Protocol Main tab detail display Alarming Enabled 6 PROTOCOL BLOCK 109 ...
Страница 110: ...6 PROTOCOL BLOCK 110 www honeywell com ...
Страница 181: ...7 20 3 Detail display tab Main tab Figure 4 Detail Display of Main tab 7 DEVICE SUPPORT BLOCK DSB 181 ...
Страница 182: ...Slave Status tab Figure 5 Detail Display of Slave Status tab 7 DEVICE SUPPORT BLOCK DSB 182 www honeywell com ...
Страница 183: ...PDC Details tab Figure 6 Detail Display of PDC Details tab 7 DEVICE SUPPORT BLOCK DSB 183 ...
Страница 184: ...DPV1 Details tab Figure 7 Detail Display of DPV1 Details tab 7 DEVICE SUPPORT BLOCK DSB 184 www honeywell com ...
Страница 185: ...Config Details tab Figure 8 Detail Display of Config Details tab 7 DEVICE SUPPORT BLOCK DSB 185 ...
Страница 186: ...7 DEVICE SUPPORT BLOCK DSB 186 www honeywell com ...
Страница 229: ...For a digital channel the detail display appears as follows 9 PROFIBUS I O MODULE PIOMB FUNCTION BLOCK 229 ...
Страница 231: ...9 PROFIBUS I O MODULE PIOMB FUNCTION BLOCK 231 ...
Страница 232: ...9 PROFIBUS I O MODULE PIOMB FUNCTION BLOCK 232 www honeywell com ...
Страница 236: ...10 PROFIBUS GATEWAY MODULE PGM CONFIGURATION EXAMPLE 236 www honeywell com ...
Страница 264: ...13 PROFIBUS GATEWAY MODULE PGM TROUBLESHOOTING 264 www honeywell com ...


