


Attention
•
When you click
Append
, the last module you selected is placed at the end of the Configured Modules list.
•
When you click
Insert
, you can place the new module between existing modules. You can use
Insert
to select
the slots of your choice for the I/O modules.
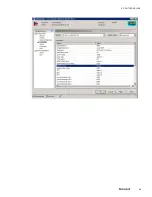
6
Select the
Parameters
menu from the
Navigation Area
.
7
Click
Common
from the
Module
list.
Attention
All the common parameters of the selected device appears in the
Module
list and you can configure the common
settings, as required. The parameters that appear in this list may vary based on the DSB selected.
8
Select the I/O module from the
Module
list.
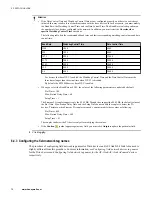
9
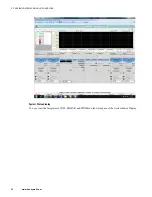
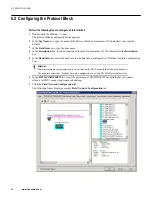
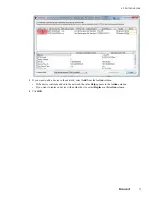
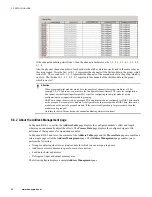
Configure the channel type and the channel's high and low ranges. Refer to the following figure for an
example of configuring the analog module parameters.
Attention
•
You must perform this step if you have selected the analog I/O modules.
10
Similarly, select the other I/O modules from the
Module
list and configure the channel type and the
channel's high and low ranges.
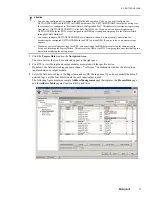
11
Select the
DPV1
menu from the
Navigation Area
.
Attention
You can enable DP-V1 from the
DPV1
menu in the
Navigation Area
. Note that PGM does not support DP-V1 in
R400. However, for the ET200M devices, DP-V1 is enabled by default.
12
Click
Apply
.
6 PROTOCOL BLOCK
65
Содержание Experion PKS
Страница 1: ...Experion PKS PROFIBUS Gateway Module User s Guide EPDOC XX88 en 431E June 2018 Release 431 ...
Страница 8: ...CONTENTS 8 www honeywell com ...
Страница 10: ...1 ABOUT THIS GUIDE 10 www honeywell com ...
Страница 32: ...4 PROFIBUS GATEWAY MODULE PGM INSTALLATION 32 www honeywell com ...
Страница 58: ...5 PROFIBUS GATEWAY MODULE PGM BLOCK 58 www honeywell com ...
Страница 69: ...6 PROTOCOL BLOCK 69 ...
Страница 103: ...5 Click OK 6 PROTOCOL BLOCK 103 ...
Страница 109: ...You can modify the following value from the Protocol Main tab detail display Alarming Enabled 6 PROTOCOL BLOCK 109 ...
Страница 110: ...6 PROTOCOL BLOCK 110 www honeywell com ...
Страница 181: ...7 20 3 Detail display tab Main tab Figure 4 Detail Display of Main tab 7 DEVICE SUPPORT BLOCK DSB 181 ...
Страница 182: ...Slave Status tab Figure 5 Detail Display of Slave Status tab 7 DEVICE SUPPORT BLOCK DSB 182 www honeywell com ...
Страница 183: ...PDC Details tab Figure 6 Detail Display of PDC Details tab 7 DEVICE SUPPORT BLOCK DSB 183 ...
Страница 184: ...DPV1 Details tab Figure 7 Detail Display of DPV1 Details tab 7 DEVICE SUPPORT BLOCK DSB 184 www honeywell com ...
Страница 185: ...Config Details tab Figure 8 Detail Display of Config Details tab 7 DEVICE SUPPORT BLOCK DSB 185 ...
Страница 186: ...7 DEVICE SUPPORT BLOCK DSB 186 www honeywell com ...
Страница 229: ...For a digital channel the detail display appears as follows 9 PROFIBUS I O MODULE PIOMB FUNCTION BLOCK 229 ...
Страница 231: ...9 PROFIBUS I O MODULE PIOMB FUNCTION BLOCK 231 ...
Страница 232: ...9 PROFIBUS I O MODULE PIOMB FUNCTION BLOCK 232 www honeywell com ...
Страница 236: ...10 PROFIBUS GATEWAY MODULE PGM CONFIGURATION EXAMPLE 236 www honeywell com ...
Страница 264: ...13 PROFIBUS GATEWAY MODULE PGM TROUBLESHOOTING 264 www honeywell com ...


