background image

344

7 Maintenance

9.

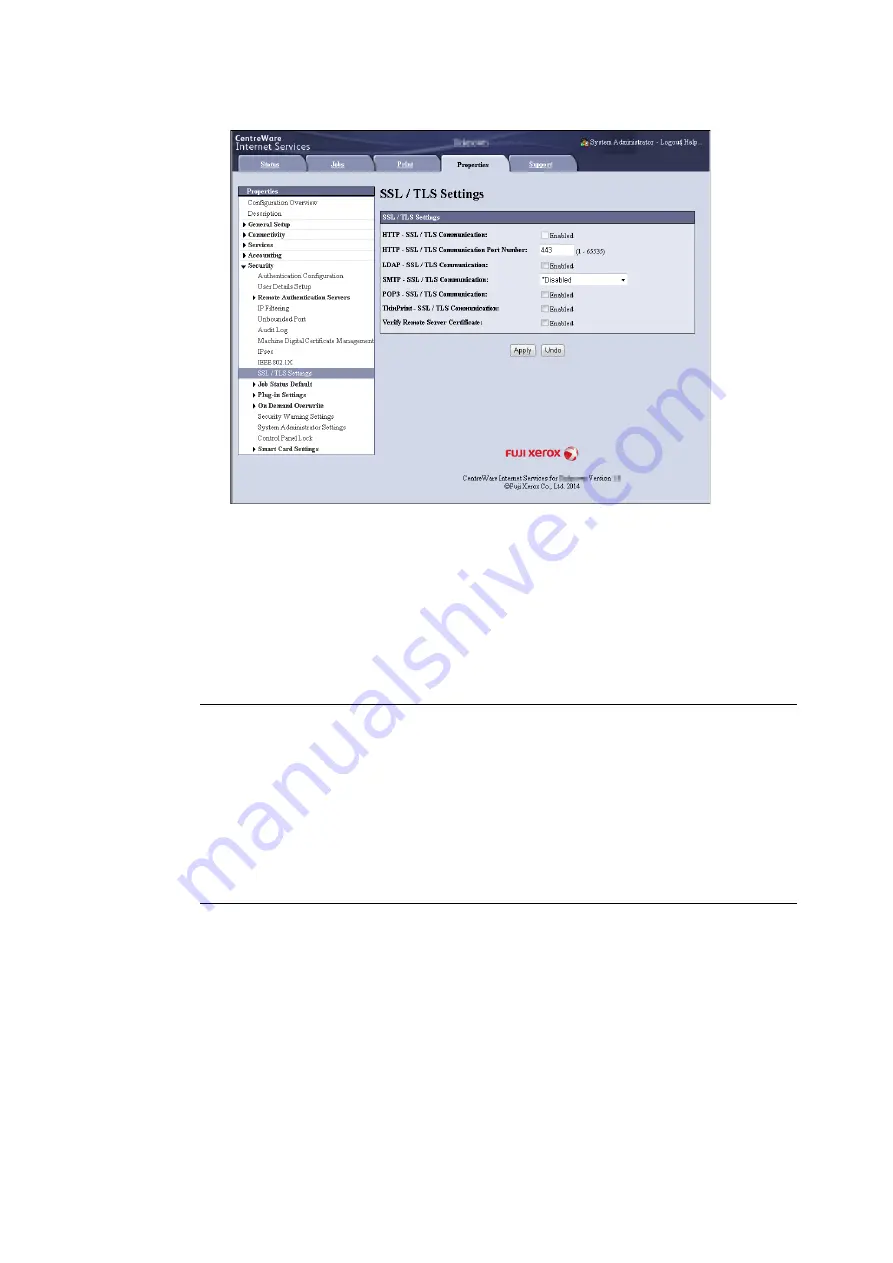
Select the [Enabled] check box for [HTTP-SSL/TLS Communication], and then click [Apply]. 

10. A window that prompts you to reboot the printer appears. On the window, click [Reboot 

Machine]. 
The printer reboots and the settings you configured are reflected. 

Note

• If you reboot CentreWare Internet Services, [Certificate Management] will appear for [Security] on the 

[Properties] tab. [Certificate Management] can be used to view and select certificate data, and to export and 
delete certificates. 

Accessing CentreWare Internet Services when Data Encryption is Enabled

When HTTP communication is encrypted, enter 

https

 instead of 

http

 before the address when 

accessing CentreWare Internet Services. 

• Example of IP address: https://192.0.2.1/

(Replace the above “192.0.2.1” with IP address of your printer.)

• Example of Internet address: https://xxx.yyyy.zz.vvv/

Configuring Settings to Encrypt Communication Data for Printing with the 
IPP Port

Encrypting HTTP communication makes it possible to encrypt communication data when 
printing with the IPP port. 

If the printer's IPP port is disabled (the default is [Disabled]), enable the report using the 
procedure under "1.5 Enabling Ports" (P. 41).

Next, install a print driver on your computer and specify IPP as the output port. 

The following describes how to install a print driver on your computer. The procedure uses 
Windows 7 as an example. 

Note

• To install a print driver on Windows Vista onward, you should import the printer's certificates to the [Trusted Root 

Certification Authorities] store for a local computer. Otherwise, your computer cannot find the printer.

• For information on how to install a print driver on your computer, refer to the 

Manual (HTML)

 on the Media 

(Software/Product Manual). 

Содержание DocuPrint 5105 d

Страница 1: ...DocuPrint 5105 d User Guide...

Страница 2: ...r nature regardless of whether they will be used The data saved in the hard disk of the machine may be lost if there is any problem in the hard disk Fuji Xerox is not responsible for any direct and in...

Страница 3: ...the printer with the Two Tray Module installed These illustrations are current as of September 2014 however the machine and its specifications may be changed without notice Fuji Xerox shares the glob...

Страница 4: ...ected document in the printer which is output following authentication by password entry on the control panel or by smart card This feature is ideal for printing confidential documents Prevent data le...

Страница 5: ...Help 45 1 7 Installing a Print Driver 46 2 Basic Operation 47 2 1 Main Components and Functions 47 Main Unit 47 Control Panel 53 Control Panel Display 55 2 2 Switching On Off the Power 56 Switching th...

Страница 6: ...Print 95 Configuring Charge Print Settings 95 Printing with Charge Print 95 3 10 Direct Printing of PDF Files 98 Supported PDF Files 98 Printing PDF Files Directly 98 3 11 Direct Printing of DocuWork...

Страница 7: ...d 223 Paper Jams in Tray 4 When Tandem Tray Module is Installed 224 Paper Jams in Tray 5 Bypass Tray 224 Paper Jams in Tray 6 HCF B1 Optional 225 Paper Jams in C3 Finisher C3 Finisher with Booklet Mak...

Страница 8: ...Watermark Feature 330 Force Annotation Feature 335 Using the Audit Log 337 Stored Information in the Audit Log 339 7 10 Configuring Encryption Settings 340 Types of Certificate 340 About Encryption 3...

Страница 9: ...ng the Korean Additional Fonts Kit 386 Installation Procedure 386 A 9 Notes and Restrictions 389 Notes and Restrictions on Using the Printer 389 TCP IP lpd Note and Limitations 392 Notes and Restricti...

Страница 10: ...ing tips and maintenance information This guide is on the Media Software Product Manual under Model specific Manual PDF Document Manual HTML Describes how to set up the printer s operating environment...

Страница 11: ...per types and how to load paper in the printer 5 Control Panel Settings Describes control panel menus and how to configure them 6 Troubleshooting Contains procedures that help to resolve problems such...

Страница 12: ...ur computer screen or the printer s control panel display These brackets also are used for the names of reports and lists output from the printer Indicates key cap text for keys on your computer keybo...

Страница 13: ...if not followed strictly can lead death or severe or fatal injuries and the possibility to do it is comparatively high Used for items that if not followed strictly can lead to severe or fatal injuries...

Страница 14: ...It may generate heat and eventually cause a fire accident To avoid the risk of electric shock and a fire accident only use the power cord supplied with this product or the ones designated by Fuji Xer...

Страница 15: ...ght of 244 Kg Otherwise if tilted the product may fall over and cause injuries Locate this product in a well ventilated area Do not obstruct ventilation openings of the product Keep the minimum cleara...

Страница 16: ...such as flower vases or coffee cups Metal parts such as staples or clips Heavy objects If liquid is spilled over or metal parts are slipped into the product it may cause electric shock or a fire acci...

Страница 17: ...it means that the ground fault interrupter circuit is working properly If not the circuit is not working properly 6 Press the RESET button back to the depressed position Do not attempt to remove a pap...

Страница 18: ...drum cartridges and toner cartridges be careful not to spill the toner In case of any toner spills avoid contact with clothes skin eyes and mouth as well as inhalation If toner spills onto your skin o...

Страница 19: ...and Caution Labels Always follow all warning instructions marked on or supplied with this product To avoid the risk of burn injuries and electric shock never touch the area with the High Temperature o...

Страница 20: ...interference in a residential installation This product generates uses and can radiate radio frequency energy and if not installed and used in accordance with the instructions may cause harmful interf...

Страница 21: ...t values affects the behavior of cooperative software or utilities Check the influence before changing these settings Set System Settings Authentication Login Type to Local Accounts or Remote Accounts...

Страница 22: ...ved from this software without specific prior written permission THIS SOFTWARE IS PROVIDED BY THE INSTITUTE AND CONTRIBUTORS AS IS AND ANY EXPRESS OR IMPLIED WARRANTIES INCLUDING BUT NOT LIMITED TO TH...

Страница 23: ...the following conditions are met Redistributions of source code must retain the above copyright notice this list of conditions and the following disclaimer Redistributions in binary form must reproduc...

Страница 24: ...blic sources Additional information about OpenLDAP can be obtained at http www openldap org Portions Copyright 1998 2006 Kurt D Zeilenga Portions Copyright 1998 2006 Net Boolean Incorporated Portions...

Страница 25: ...nse revision or under the terms of any subsequent revision of the license THIS SOFTWARE IS PROVIDED BY THE OPENLDAP FOUNDATION AND ITS CONTRIBUTORS AS IS AND ANY EXPRESSED OR IMPLIED WARRANTIES INCLUD...

Страница 26: ...Copyright c 1988 1997 Sam Leffler Copyright c 1991 1997 Silicon Graphics Inc ICC Profile Little cms Little cms Copyright C 1998 2004 Marti Maria XPS XML Paper Specification This product may incorporat...

Страница 27: ...les of items that may be illegal to copy or print in your country Currency Banknotes and checks Bank and government bonds and securities Passports and identification cards Copyright material or tradem...

Страница 28: ...ollowing methods USB connection Connecting the printer and a computer using a USB cable default Enabled Parallel connection Connecting the printer and a computer using a parallel cable To use this fea...

Страница 29: ...nt PostScript data refer to the manual on the PostScript Driver Library CD ROM Connectivity Local Network Port Name Parallel 1 USB 2 LPD IPP Port 9100 Bonjour WSD 3 Protocol TCP IP TCP IP TCP IP TCP I...

Страница 30: ...Product Manual Refer to the Manual HTML on the Media Software Product Manual PostScript Print Driver Installing the print driver is available from the PostScript Driver Library CD ROM Refer to the man...

Страница 31: ...B Connection The following explains how to connect the printer to your computer using the USB cable 1 Plug the USB cable into the USB interface connector on the printer 2 Plug the other end of the USB...

Страница 32: ...each equipment needs to support IEEE802 3az Important It is necessary to use the category CAT5 or enhanced category 5 CAT5e cable for connecting with 1000BASE T We recommend to use enhanced category 5...

Страница 33: ...available together with the standard one Secondary Ethernet can be used as 1000BASE T 5 Plug the other end of the network cable into a network device such as a hub 6 Press the side of the printer s ma...

Страница 34: ...the push button power switch to turn off the power 2 Open the front cover 3 Press the side of the printer s main power switch to turn off the main power Note The Main Power lamp goes out on the contro...

Страница 35: ...dy to print IP Address failed may be displayed on the control panel To erase this message set to STATIC in Network Port TCP IP Settings IPv4 Settings Get IP Address to specify IP address Example 192 0...

Страница 36: ...ons are unnecessary if you are using an English operating system 1 Press the Settings button to display the menu screen 2 Press the button until Language is displayed Note If you went past the desired...

Страница 37: ...and configure the address Note For information on how to print the Configuration Report refer to 7 2 Printing Reports Lists P 310 The printer can also obtain its IP address by using a BOOTP or RARP s...

Страница 38: ...is displayed 7 Press the or OK button to select Get IP Address is displayed 8 Press the or OK button to select The current set value is displayed 9 Press the button until STATIC is displayed 10 Press...

Страница 39: ...Mask is displayed 18 Press the or OK button to select The current subnet mask is displayed 19 Enter the subnet mask in the same way you entered the IP address Example 255 255 255 000 and press the OK...

Страница 40: ...setting the fixed IPv6 address on the printer use CentreWare Internet Services to manually configure the settings Then print the Configuration Report to verify the automatically set address Use this a...

Страница 41: ...o select TCP IP Settings is displayed Note Parallel appears only when the Parallel Port Kit optional is installed 5 Press the button until the desired protocol is displayed Example IPP 6 Press the or...

Страница 42: ...rowser such as Internet Explorer or Safari to use CentreWare Internet Services Setting Up a Web Browser When using CentreWare Internet Services we recommend you specify the address of the printer with...

Страница 43: ...ut tray Consumables Displays the amount and status of the consumables estimate Actual replacement of consumables must be done by checking the messages displayed on the control panel Refer to 6 7 Error...

Страница 44: ...s Memory Settings Internet Services Settings 1 Print On Demand Service Settings Cloning 1 Alert Notification 1 Connectivity You can check and change Network related settings like ports and protocols S...

Страница 45: ...right when CentreWare Internet Services is started up After you logged in with the ID and password for administrator or the user registered in the printer to configure and confirm settings make sure...

Страница 46: ...Editions Microsoft Windows 7 x64 and Microsoft Windows Server 2008 R2 Read Important Information on the download page of our web site before using these drivers Uninstalling a Print Driver and Other S...

Страница 47: ...center tray into two levels 3 Center tray Prints are delivered here facing down 4 Push button power switch Switches the printer on off Refer to 2 2 Switching On Off the Power P 56 5 Front cover Opene...

Страница 48: ...r here to print on paper that cannot be loaded in Trays 1 to 4 and 6 Used for loading not only plain paper but also non standard paper such as envelope This tray can be extended in 2 levels if necessa...

Страница 49: ...foot Prevents the printer from toppling over Move the printer to its installation site and then rotate this adjuster in clockwise direction until it touches a floor 7 RESET button Automatically switch...

Страница 50: ...by the system administrator Important Always switch the power off before switching the main power off Refer to 2 2 Switching On Off the Power P 56 3 Drum cartridge Contains a photoconductor Important...

Страница 51: ...ge Staples are stored in this cartridge Pull out this cartridge to replace staples or clear staple jams 6 Booklet tray Bound booklets are delivered here 7 Finisher front door Open this door to clear p...

Страница 52: ...tional In some sections of this guide they are referred to as finisher 12 Finisher transport center tray Top cover of the finisher transport Prints are delivered here when they are unable to be delive...

Страница 53: ...the printer power is switched on Print job is available when the display message changes to Ready to print It displays authenticated user ID for about 2 seconds when card authentication is used Nothi...

Страница 54: ...cles through available settings at high speed To display a setting s default value press and at the same time 11 OK button Pressed to confirm the menu option selected on the menu screen This button is...

Страница 55: ...ssing the Information button while the mark is on the display shows detailed information Print Screen Shows the status of the printer The following screens are used to indicate when the printer is in...

Страница 56: ...the memory or cause a machine malfunction 1 Open the front cover 2 Press the side of the printer s main power switch to turn on the main power Note The Main Power lamp lights up on the control panel 3...

Страница 57: ...e printer for a while after the power is switched off Power Saver button blinks Make sure the Power Saver button is completely turned off before switching on the printer again 1 Make sure that the pri...

Страница 58: ...58 2 Basic Operation 3 Press the side of the printer s main power switch to turn off the main power Note The Main Power lamp goes out on the control panel 4 Close the front cover...

Страница 59: ...fire from occurring Check that the circuit breaker works properly at least once a month Be sure to establish a ground for the machine Without a proper ground the circuit breaker may be disabled causin...

Страница 60: ...re entering to the Power Saver Modes the power distribution time gets longer as well It may cause an early replacement of the fusing unit of the printer For more information contact our Customer Suppo...

Страница 61: ...Internet Services Refer to CentreWare Internet Services help for details Canceling a Print Job being Printed Received on the Printer Press the Cancel Job button on the control panel Note that the pag...

Страница 62: ...Ware Internet Services Checking the Job Status on Windows 1 Double click the printer icon on the task bar at the lower right corner of your monitor 2 On the displayed window check Status Checking the...

Страница 63: ...not available when the printer is directly connected to the computer via parallel cable or USB cable In this case configure settings of the applicable print driver items manually Refer to Set Printer...

Страница 64: ...is imported to the print driver Search Printer appears Proceed to step 5 5 Select Specify Address 6 Click Next 7 Enter printer name or IP address in Printer Name or IP Address 8 Click Finish 9 Click O...

Страница 65: ...rint driver screen is displayed during print job 1 On the Start menu select Devices and Printers Select Printer or Printers and Faxes depending on the OS and display the properties of the printer bein...

Страница 66: ...vices and Printers Select Printer or Printers and Faxes depending on the OS and display the properties of the printer being used 2 Click the Configuration tab 3 Click Bi Directional Setup 4 Select Off...

Страница 67: ...2 6 Importing Printer Information to a Print Driver 67 6 Click Installable Options 7 Set items necessary in Items 8 Click OK to close the dialog box 9 Click OK 6 7 8...

Страница 68: ...On the File menu of your application select Print 2 Use the Select Printer box to select the printer and then display the Properties dialog box In Windows 7 WordPad click Preferences to display the di...

Страница 69: ...igured with multiple settings simply by selecting an item from the list Settings can be edited and pre registered as required Secure Print Allows temporary storage of a document in the printer for man...

Страница 70: ...have any exposed adhesive when the flaps are closed have deckle edges or creased corners are wrinkled rough or are glued have adhesive flaps open Envelopes can be printed using the bypass tray only N...

Страница 71: ...varies depending on the application being used Refer to the documentation for the application 1 On the File menu select Print 2 Select the printer from the Select Printer list box and then click Prefe...

Страница 72: ...ginal Document Size 6 If the output paper size is different from the file size choose Automatically Scale for Scale Options and then select output paper size for Output Paper Size 7 Click OK to close...

Страница 73: ...C5 click v beside the Paper to display the options and then select Mixed Sizes to display the Mixed Sizes dialog box Select Portrait and Landscape for envelopes for Image Rotation 180 Degrees and the...

Страница 74: ...print driver or on the control panel Setting the wrong paper size can cause malfunction of the printer Note Only users with administrator level access authority can change settings Users without admi...

Страница 75: ...3 3 Printing on Custom Size Paper 75 2 Click the Device Settings tab 3 Click Custom Paper Size...

Страница 76: ...s to specify the lengths Even if the Width setting is within the allowable range you cannot specify a value that is greater than the Length setting Conversely even if the Length setting is within the...

Страница 77: ...varies depending on the application being used Refer to the documentation of the application 1 On the File menu select Print 2 Select the printer from the Select Printer list box and then click Prefe...

Страница 78: ...78 3 Printing 6 Click Print on the Print dialog box to start printing...

Страница 79: ...For information on how to load the settings into the print driver refer to 2 6 Importing Printer Information to a Print Driver P 63 The following procedures use Windows 7 WordPad as an example Automa...

Страница 80: ...6 Set the Original Document Size 7 If the output paper size is different from the file size choose Automatically Scale for Scale Options and then select output paper size for Output Paper Size 8 Clic...

Страница 81: ...Whether or not to delete a Secure Print job after printing it can be specified when you print it from the control panel For more information refer to Control Panel Operations P 83 Secure Print output...

Страница 82: ...ic characters 7 For Job Name select Enter Job Name or Use Existing Name If you selected Enter Job Name name the document by entering up to 12 single byte characters into New Job Name If you selected U...

Страница 83: ...password appears 5 Enter your password using the and buttons Use the button to move the cursor Note Enter the password you specified for Secure Print Passcode on the Secure Print dialog box of the pri...

Страница 84: ...printer after printing press the button display Print Save and proceed to Step 9 of this procedure 9 Press the or OK button to select A screen to enter the number of copies appears 10 Enter the number...

Страница 85: ...delete Sample Set jobs that have accumulated on the printer without printing them refer to Control Panel Operations P 87 Printing Using Sample Set The following explains how to use Sample Set to print...

Страница 86: ...Name If you selected Enter Job Name name the document by entering up to 12 single byte characters into New Job Name If you selected Use Existing Name the document name will be the name of the document...

Страница 87: ...ton until the desired document name appears Note The document name is the name of up to 12 bytes specified for Job Name on the Sample Set dialog box of the print driver When more than one document is...

Страница 88: ...print start confirmation screen appears Note The initial number of copies is one less than the number preset in the print driver because one copy has already been printed 10 Press the OK button to pri...

Страница 89: ...of jobs which can be executed held at the same time is 100 jobs or less Important Do not turn off the printer power while a Delayed Print job is pending If the printer power is turned off before the s...

Страница 90: ...time that the document will be printed is used for the name 7 Click OK 8 On the Paper Output tab click OK 9 Click Print on the Print dialog box to start printing Printing will start when the specifie...

Страница 91: ...diately or to delete the job without printing appears Note If you want to delete the job without printing press the button to display Delete press the button and then press the OK button 6 To print th...

Страница 92: ...hentication feature If IC Card Reader is connected print job data for Secure Print and Sample Set already stored in the printer may not be available to use In this case print or delete print job data...

Страница 93: ...the user is successful Deleting Print Job The following explains how to delete print job stored in the printer in Private Charge Print 1 On the control panel press the Print Menu button 2 Press button...

Страница 94: ...94 3 Printing 8 Press the Print Menu button to return to the Ready to print screen...

Страница 95: ...saved The IC Card Reader may not be supplied with the printer in some regions Contact your dealers for details The Authentication feature includes login to local accounts which uses user IDs and other...

Страница 96: ...lect No User ID for user ID if printing documents with no Billing ID set 5 Select with or OK button The screen shown to the right appears if passcode is set Proceed to Step 6 The screen to select docu...

Страница 97: ...ocument in the printer after printing press the button display Print Save and proceed to Step 10 10 Select with or OK button A screen to enter the number of copies appears 11 Enter the number of copie...

Страница 98: ...ported PDF output may take longer time due to its complexity of the rendering process It does not support the settings for embedding OpenType font in Adobe Acrobat 7 PDF1 6 Although it supports featur...

Страница 99: ...F Files Using Lpr Command PDF files can be sent directly to the printer using commands such as lpr When printing with commands the following items are printed according to PDF settings on the control...

Страница 100: ...to send files from a computer directly to the printer for printing The ContentsBridge Utility is on the Media Software Product Manual To use ContentsBridge Utility refer to the manual on the Media Sof...

Страница 101: ...cases the Quantity setting on the control panel becomes invalid If you do not specify the number of copies using the lpr command the printer assumes 1 set The following is an example of printing DocuW...

Страница 102: ...we recommend you to back up the hard disk data on your computer Note The following documents are available as an attachment TIFF PDF JPEG JFIF XML Paper Specification XPS XDW DocuWorks documents and X...

Страница 103: ...ernet Services Default value Selected Check box is selected Cleared No Check box is selected Item Setting Description Available Settings ReceivingProtocol SMTP POP3 Description Administrator s E mail...

Страница 104: ...address IPv4 xxx xxx xxx xxx IPv6 IPv6 addr format Dynamic DNS Registration IPv4 IPv6 Select the Enabled check box to update the IPv4 IPv6 DNS automatically and the Overwrite check box to overwrite E...

Страница 105: ...rt Specify the IP address of the POP3 server for receiving e mail the IPv6 addr format or FQDN Fully Qualified Domain Name Specify the port number used by the POP3 server Alphanumeric characters plus...

Страница 106: ...ecify the port number used by the SMTP server for sending e mail 1 65535 Port Number for receiving E mail Specify the port number used by the SMTP server for receiving e mail 1 65535 SMTP SSL TLS Comm...

Страница 107: ...be able to print the attached file properly if its extension is other than tif tiff pdf jpeg jpg jpe jfif xps xdw or xbd If the extension of the attached file is txt text plain is specified for Conte...

Страница 108: ...Printing E mail Manually Though e mail is printed automatically when it is received by the printer it also can be printed manually from the control panel Only when POP reception Note This feature is...

Страница 109: ...cautions When Connecting the Printer with an Internet Provider If your Internet provider does not bill you at a flat rate or if you do not have full time access to the Internet you will be charged eve...

Страница 110: ...Cloud Print help For the clients operating system web browser and application supported by this feature refer to the Google Cloud Print help Environment Settings This section explains how to set the e...

Страница 111: ...d Note During connection operation a pop up screen for user ID passcode entry may appear In this case enter a system administrator s user ID passcode and click OK 3 Click the Properties tab Connectivi...

Страница 112: ...Internet Services is established Note During connection operation pop up screen for user ID passcode entry may appear In this case enter a system administrator s user ID passcode and click OK 3 Click...

Страница 113: ...box of the browser and press the Enter key 5 Enter the Google account and passcode of the user using this feature and log in 6 Click Finish printer registration 7 Registering to Google Cloud Print is...

Страница 114: ...le Cloud Print management page will appear Click Printers 3 Select the machine to share and click Share 4 On the displayed screen enter the Google account e mail address for the user who will be shari...

Страница 115: ...ne you can print e mails and attached files PDF JPEG from Gmail webmail service or documents from Google Docs program This section describes how to print from an Android platform taking e mail from Gm...

Страница 116: ...r to Configuration on the Machine and CentreWare Internet Services P 110 Cause The proxy server in the network environment uses authentication Remedy This feature cannot be used with proxy authenticat...

Страница 117: ...le Cloud Print is not printed out Cause The machine is set to Charge Print or Private Charge Print Remedy This feature cannot be used with Charge Print or Private Charge Print Change the machine setti...

Страница 118: ...rays when sending print requests from your print driver Loading paper that is not supported or configuring wrong settings can cause paper jams Moisture such as water rain and humidity can cause print...

Страница 119: ...e Basis Weight gsm Paper Type Notes Countermeasure P A4 64 Plain P A3 64 Plain Paper Name Size Basic Weight gsm Paper Type Notes Countermeasure Professional A4 80 Plain Professional A3 80 Plain Perfor...

Страница 120: ...Premier Letter 80 Plain PaperOne Premium Copier 70 Plain PaperOne All Purpose 80 Plain Colotech A4 200 Heavyweight Colotech A3 200 Heavyweight DocuPaper Black A4 70 Plain DocuPaper Blue A4 80 Plain P...

Страница 121: ...STRO EXTRA A3 80 Plain Xpress A4 70 Plain Xpress A3 70 Plain Double A A4 80 Plain Double A A3 80 Plain Colotech A4 90 Plain Colotech A3 90 Plain Astro Extra A4 80 Plain ECO Enviroguard Paper 80 Plain...

Страница 122: ...ain Performer A3 80 Plain Professional A4 80 Plain Recycled Pur recycle paper A4 80 Plain Colour Impression A4 90 Plain Colour Impression A3 90 Plain Colotech Plus A4 90 Plain Colotech Plus A3 90 Plai...

Страница 123: ...Double A A3 80 Plain Roxy Paper A4 80 Plain Roxy Paper B5 80 Plain Roxy Paper Letter 80 Plain Star Package Orange A4 70 Plain Star Package Orange A3 70 Plain Star Package Orange B4 70 Plain Horizon A...

Страница 124: ...essional A4 70 Plain Professional A3 70 Plain PERFORMER A4 75 Plain PERFORMER A3 75 Plain PERFORMER A4 80 Plain PERFORMER A3 80 Plain PREMIER FSC A4 75 Plain PREMIER FSC A3 75 Plain PREMIER FSC A4 80...

Страница 125: ...h A4 90 Plain Colotech A3 90 Plain Colotech A4 100 Plain Colotech A3 100 Plain Colotech A4 120 Heavyweight Colotech A3 120 Heavyweight Quality A4 70 Plain Quality A3 70 Plain Quality B4 70 Plain Quali...

Страница 126: ...cover the entire backing sheet Envelopes with sticky adhesive Multi color printed postcard Inkjet postcard Curled postcard Storing and Handling Paper Paper stored in poor conditions may deteriorate r...

Страница 127: ...s other than paper on the bypass tray Do not push down the tray or apply an excessive force to the tray 1 Lower the bypass tray Extend the tray as required The extension tray can extend two levels 2 L...

Страница 128: ...rientations as follows Note Register the paper size with the length of the flap included in Custom Paper Size when printing envelopes with keeping the flap open Configure the register paper size in Or...

Страница 129: ...ide facing up and its leading edge aligned with the left side of the drawer Important Do not load paper of different types into the tray Doing so can cause paper jams Do not load paper above the maxim...

Страница 130: ...not load paper of different types into the tray Doing so can cause paper jams Do not load paper above the maximum fill line the position MAX It may cause paper jams Loading paper into Tray 4 1 Pull ou...

Страница 131: ...aper type setting Configuration of Image Quality settings on the control panel also is required when using some types of thick paper such as business card paper Refer to Image Quality P 206 for inform...

Страница 132: ...Tray 6 1 Pull out Tray 6 until it stops 2 Remove any paper loaded in the tray 3 Open the end guide 1 and unscrew the screw 2 And then remove the guide from the tray 4 Insert the small protrusions at t...

Страница 133: ...ion corresponding to the paper size 2 And then press the lever down 3 Important Adjust the end guide correctly to the size of the paper If the end guide is not adjusted correctly the machine cannot fe...

Страница 134: ...on the control panel also is required when using some types of thick paper such as business card paper Refer to Image Quality P 195 for information about image quality and Configuring Image Quality Se...

Страница 135: ...OK button to select The current set value is displayed 12 Use the and buttons to enter the Portrait Y size and then press the OK button to apply it Example 297 mm 13 After setting the Portrait Y Size...

Страница 136: ...the paper type settings of trays Important If a paper type setting results in toner not fusing properly on the paper and poor print quality try changing to a different paper type setting and printing...

Страница 137: ...ss the Settings button to return to the Ready to print screen Configuring Image Quality Settings for Each Paper Type The printer performs image quality processing in accordance with the current paper...

Страница 138: ...g The current set value is displayed 9 Press the button until the desired paper quality is displayed Example S 10 Press the OK button to apply the setting 11 To configure settings for other types of p...

Страница 139: ...our printer not to display this message and have the printer print the job on paper that is nearly the same size or larger than the document size Substitute Tray feature If a tray runs out of paper du...

Страница 140: ...10 Press the button and then press the OK button Now priority for Tray 5 Bypass is set Note Only the lowest priority can be set for Tray 5 Bypass For information on how to set the highest priority fo...

Страница 141: ...he or OK button to select The current set value is displayed 16 Press the button until the desired paper size is displayed Example A5 17 Press the OK button to apply the setting 18 To exit the setting...

Страница 142: ...ttings Meter Reading Settings Admin Menu Settings Language LanguageEmulation ESCP LanguageEmulation PCL LanguageEmulation KS LanguageEmulation KSSM ESCP extension menu items LanguageEmulation HPGL HPG...

Страница 143: ...e Allocate Memory P 204 Image Quality Adjusts the printer when the print quality is not as expected Image Quality P 206 Adjust Finisher Adjusts the position of the punch holes when the finisher is ins...

Страница 144: ...menu screen is exited Resetting a Value to Its Default For items to change numeric values with the or button press the and buttons simultaneously to reset a value to its default The value changes to i...

Страница 145: ...ton To start over from the beginning press the Settings button 4 Press the button until System Settings is displayed 5 Press the or OK button to select Move on to the next lower level 6 Press the butt...

Страница 146: ...146 5 Control Panel Settings 10 The setting is now complete Press the Settings button to return to the Ready to print screen Ready to print Toner Left...

Страница 147: ...he options installed on your printer For details refer to Printing Reports Lists P 310 Meter Reading Displays the number of printed pages on the control panel Meter information can be checked as a tot...

Страница 148: ...set the IP address when this screen is displayed IPv4 Settings IP Address Subnet Mask Gateway Address Allows you to verify the automatically acquired IP address or manually enter the IP address Enter...

Страница 149: ...on Auto default After receiving data from a computer the printer automatically detects its language emulation and processes the data accordingly See 1 on P 215 PS ESCP HP GL 2 PCL TIFF KS KSSM KS5895...

Страница 150: ...driver Adobe Protocol is enabled only when printing in PostScript Auto Eject Time Sets the time that data still remaining on your printer is automatically printed and ejected when data has continuous...

Страница 151: ...o enable or disable PJL commands that are sent from the computer PJL commands control print jobs and are required to print jobs using the print driver Use of PJL commands allows you to specify the lan...

Страница 152: ...s language emulation and processes the data accordingly See 1 on P 215 PS ESCP HP GL 2 PCL TIFF KS KSSM KS5895 After receiving data from a computer the printer processes the data with the selected pri...

Страница 153: ...ed if data is not received Specify the value from 0 to 65535 seconds in 1 second increments 60 Seconds default TBCP Filter Sets whether to enable or disable the TBCP filter during processing of PostSc...

Страница 154: ...nter processes the data with the selected print language HexDump Allows you to view data received from a computer by printing it in ASCII code hexadecimal format See 3 on P 215 PJL Sets whether to ena...

Страница 155: ...ccording to the data format specified on your print driver Adobe Protocol is enabled only when printing in PostScript Normally use this setting at its default Normal PS Wait Timeout Sets the print wai...

Страница 156: ...me Out Sets the time after which data reception is canceled if data is not received Specify the value from 2 to 65535 seconds in 1 second increments See 2 on P 215 60 Seconds default Port Number Sets...

Страница 157: ...e however that InternetServices IPP SOAP UPnP WSD ports and Internet services that use HTTP protocol can share the same port number Network Port SOAP SOAP Port Status SOAP Port Number Setting Descript...

Страница 158: ...nter start up Enabled Disabled default Port Number Sets the port number from 1 to 65535 See 2 on P 215 4000 default Note Set only unique port numbers SSL TLS Sets whether to enable or disable SSL encr...

Страница 159: ...ayed Get IP from DHCP Specifies whether or not to automatically acquire the DNS server IP address from the DHCP server Enabled Disabled default Note Consult your network administrator for the IP addre...

Страница 160: ...wser on your computer Enabled default Disabled Important If the printer runs out of memory when the port is enabled the port is sometimes automatically disabled If this happens either disable unused p...

Страница 161: ...Server HTTP Port Number EP Proxy Server HTTP Authenticate EP Proxy Server HTTP Login Name EP Proxy Server HTTP Password EP Proxy Server Proxy File URL Setting Description Server Setup Sets EP proxy se...

Страница 162: ...le Up to 255 characters are allowed See 4 on P 215 Network Port Ethernet Ethernet Ethernet Settings Setting Description Ethernet Settings Sets the communication speed and connector type for the Ethern...

Страница 163: ...egisters IP addresses allowed through the filter for printing Up to ten IP addresses can be registered Set the filter address for registered IP addresses Enter the IP address and filter address in the...

Страница 164: ...can be any number between 0 and 255 See 2 on P 215 000 000 000 000 default Network Port HTTP SSL TLS HTTP SSL TLS Enablement HTTP SSL TLS Port Number Setting Description Enablement Sets whether or no...

Страница 165: ...ttings 802 1x Settings 802 1x 802 1x Settings Authenticate by 802 1x Settings Verify SrvrCert Setting Description 802 1x Sets whether or not to use Enable IEEE 802 1x Disabled default Enabled Authenti...

Страница 166: ...ailable printer with your mobile device and make the Ready Tone sound to identify the machine For information on how to print via AirPrint refer to the User Guide For AirPrint System Settings Panel Se...

Страница 167: ...efault Login Attempts Sets the number of authentication errors until access is denied within 1 to 10 tries 5 Time s default Note When Max LoginAttempts is set to Unlimited Unlimited is displayed Syste...

Страница 168: ...enters the Low Power mode Specify the value from 1 to 240 minutes in 1 minute increments See 2 on P 215 1 Minutes Later default System Settings Sleep Mode Setting Description Sleep Mode Consumes less...

Страница 169: ...ff Time Sets hours minutes in the format set in Machine Clock Time Format Hours can be set from 1 to 12 or from 00 to 23 by 1 hour increments Minutes can be set from 00 to 59 by 1 minute increments Re...

Страница 170: ...Jobs Configures settings for the display of completed job information Viewing Options Sets view options for completed jobs No Job Viewing Require Login Always Allow View default Access To Sets whether...

Страница 171: ...t Sets whether or not to insert banner sheets Off default Does not output banner sheets Start Sheet Outputs a banner sheet at the beginning of a document End Sheet Outputs a banner sheet at the end of...

Страница 172: ...from the control panel Enabled default Permits users to print Secure Print jobs from the control panel Disabled Does not permit users to print Secure Print jobs from the control panel System Settings...

Страница 173: ...Off Daylight Savings Set by Date Daylight Savings Set by Month Week Setting Description Set Date Sets year month day to match with the format set in Date Format Set Time Sets hours minutes to match w...

Страница 174: ...week Note Invalid value appears for inputting incorrect values while Start date and end date are incorrect appears for configuring the same setting for Start date and End date Do not set the same mont...

Страница 175: ...when the drum cartridge has reached its replacement cycle Select whether or not to cancel printing when a drum cartridge has reached its replacement cycle Cancel Printing default After the drum cartri...

Страница 176: ...Settings Data Encryption Data Encryption Encryption Data Encryption Encryption Key Setting Description Encryption Sets whether or not encrypt data on the system disk hard disk Off default On Encrypti...

Страница 177: ...d jobs such as Secure Print and Sample Set documents cannot be used with the Auto Job Promote feature Resume Error Job is not available if Enabled is set System Settings Resume Error Job Setting Descr...

Страница 178: ...scription Software Download Sets whether to enable or disable software downloads Enabled default Disabled System Settings RAM Disk Setting Description RAM Disk Sets whether to use a RAM disk You can u...

Страница 179: ...d account information pre registered on the machine The HDD Extension Kit optional is required to select XeroxStdAccounting Verify User Details Sets whether or not to check the login information No de...

Страница 180: ...art Card Logout Authentication Charge Print Charge Print PJLReceiveCommand Charge Print PJL OutputCommand Charge Print Receive Control Charge Print Process Job Login Process Job Login Job Login Succes...

Страница 181: ...entication saved by setting Save Remote Account to Enabled Note This item appears only when HDD Extension Kit optional is installed while Remote Accounts is set in Login Type Use of Smart Card Sets wh...

Страница 182: ...inter in some regions Contact your dealer for details When PrivateChargePrint and Save inChargePrint are set secure print sample set or delayed print are ignored even if you specify them on the print...

Страница 183: ...cuments are deleted Keep for Days Sets the storage period within 1 to 14 days in 1 day increments 7 Days default Delete at Time Sets the time that documents are deleted 3 00AM or 3 00 default Note Set...

Страница 184: ...te Once the FeatureEnhance Kit is enabled the ROM of the installed Security Extension Kit cannot be used by other devices To reset or disable this feature contact our Customer Support Center or your d...

Страница 185: ...nsfer Assurance Level Setting Description Image Log Control Set whether or not to use the image log control feature Normally the printer is used with this feature set to Off Consult your dealer to use...

Страница 186: ...power On End of selections When max reached Schedule Transfer Note When Schedule Transfer is set to Enabled sets hours and minutes in the format set in Machine Clock Time Format Hours can be set from...

Страница 187: ...for its application System Settings EP Service EP Diag Repair EP Service EP Diag Repair DiagnosticRequest EP Service EP Diag Repair Check Connection Repair Request EP Service EP Registration EP Regis...

Страница 188: ...nation Path Proxy Server EPA Server Setup Destination IP Destination Path Port Number Proxy Server Port No Start Registration System Settings Register GCP Register GCP Register GCP Setting Description...

Страница 189: ...ains paper that is one size larger than the size requested and prints documents at 100 zoom ratio Use Closest Size Switches to another paper tray that contains paper of size closest to the size reques...

Страница 190: ...stom 1 to 5 Custom 5 Note Tray 3 to Tray 4 are optional The display only shows the trays that are actually installed on the printer 1 Custom 1 to 5 Custom 5 display the names specified under Custom Pa...

Страница 191: ...cription Tray 1 to Tray 4 Tray 5 Tray 6 Sets the color of the paper loaded in the trays White default Blue Yellow Green Pink Clear Ivory Gray Buff Goldenrod Red Orange 1 Custom 1 to 5 Custom 5 Others...

Страница 192: ...om 1 to 5 Custom 5 This setting will be used by the Auto Tray Selection feature Defaults are as follows Plain 1 Recycled 2 Otherwise the default is Auto Paper Off 1 to 9 Sets the priority order of pap...

Страница 193: ...ase the Auto Tray Selection feature is not used Note Tray 3 Tray 4 and Tray 6 are optional The display only shows the trays that are actually installed on the printer You cannot assign the same priori...

Страница 194: ...paper sizes refer to Setting the Paper Sizes of Trays P 129 Tray 5 Sets the paper size of the paper loaded in tray 5 A3 A4 A4 A5 A5 A6 B4 B5 B5 B6 B6 5 5x8 5 5 5x8 5 7 25x10 5 7 25x10 5 8 5x10 8 5x10...

Страница 195: ...3 Custom 3 Image Quality 4 Custom 4 Image Quality 5 Custom 5 Setting Description Plain Recycled Plain RL 1 Custom 1 to 5 Custom 5 Sets the image quality paper type for each paper A Quality ideal for b...

Страница 196: ...layed under PaperTypePriority Paper Type and Image Quality Up to 8 alphanumeric characters can be used for a name See No 1 2 3 and 4 of 2 and 4 on P 215 Printer Settings Custom Color Name Custom Color...

Страница 197: ...nter tray and shifted slightly to separate it from the previous job This sets the offset function for the center tray Offset per Set default Offset stacking per set Offset per Job Offset stacking per...

Страница 198: ...ightly to separate it from the previous job This sets the offset function for the center tray Offset per Set default Offset stacking per set Offset per Job Offset stacking per job print job Off No off...

Страница 199: ...odd numbered document during 2 side printing Off default The side of the final page is printed in the same way as 1 sided printing and paper is not fed again through the Duplex unit as with 2 sided p...

Страница 200: ...tables below for combinations of sizes that can be automatically detected Note Some size detection modes cannot be used depending on the model of printer you are using For information of paper sizes...

Страница 201: ...16 K Taiwan main land China X X X X X X X X 16 K Taiwan main land China X X X X O X X X 8 K Taiwan mainland China X X X X O X X X Postcard X X X X X X X O Post Card 4x6 X X X X X X X X Photo 2L 5x7 X...

Страница 202: ...X A3 O X X X B6 X X X X B5 O X X X B5 X X X X B4 O X X X 5 5x8 5 O X X X 5 5x8 5 X X X O 7 25x10 5 X X X X 7 25x10 5 O O O O 8x10 X X X X 8x10 X X X X 8 5x11 O X X O 8 5x11 O O O O 215x315mm X X X X...

Страница 203: ...Commercial 10 X X X O Monarch7 3 4 X X X O Printer Settings OCRFontGlyphs Setting Description OCR Font Glyphs It allows you to switch Font Glyph Code 0x5c of OCR B in ESC P or PCL emulation mode Back...

Страница 204: ...gh resolution documents set so that a large buffer size is allocated as print page buffer The actual size of the allocated print buffer can be confirmed by printing the Configuration Report You can al...

Страница 205: ...buffer exclusively for LPD from 1024 to 2048 KB in 32 KB increments The default is 1024K Hard Disk Spooling to the hard disk is performed The hard disk is used as the receiving buffer for spooling Th...

Страница 206: ...rt 1Sided Adjust Paper Regi Tray 1 Tray 4 PrintChart 2Sided Adjust Paper Regi Tray 5 Adjust Paper Regi Tray 6 Setting Description Adjust Side 1 Adjusts the print position of Side 1 in vertical directi...

Страница 207: ...Adjust Finisher Hole Punch Tool Adjust Finisher Fold Assist Crease Setting Description Hole Punch Tool Selects the type of installed hold punches optional 2 4 Hole Punch 2 3 Hole Punch US Note This o...

Страница 208: ...it Delete Data Job Counters Init Delete Data DeleteForm Macro Init Delete Data Delete Font Init Delete Data Secure Print Jobs 1 Setting Description NVM Initializes the NV memory All settings return to...

Страница 209: ...itialization the lamps on the printer s control panel blink Do not turn the printer off while initialization is in progress Print Meter Initializes meter reports Meter readings return to 0 when meter...

Страница 210: ...ing mode for PDF files PDF Bridge default PDF files are processed using the PDF Bridge feature installed on the printer PS PDF files are processed using the PostScript feature Note Printing results wh...

Страница 211: ...either A4 or 8 5 x 11 depending on the option selected under Admin Menu Printer Settings DefaultPaperSize Layout Sets the output layout Auto default Automatically selects the output size and calculate...

Страница 212: ...re Auto Paper Select default Enables the DMS feature Select Paper Tray Disables the DMS feature and selects a paper tray Font Absence Sets the processing when the PostScript font specified in the job...

Страница 213: ...er is performed Compatible Mode Processing according to Microsoft specifications is performed in case of substitute setting or invalid print instruction This option is set to match the output result o...

Страница 214: ...3 1 2 3 Off default On Layout Sets the output layout Auto default Automatically selects the output size and calculates the zoom ratio to print the file as large as possible on the output paper 100 No...

Страница 215: ...cters that are not defined in JIS X0201 are printed as UD 4 Character List 5 When Enabled is set and the print mode is set to HexDump PJL commands are also output by HexDump When language emulation no...

Страница 216: ...d due to the paper jam Alpha numerics indicated in the figure Position of Paper Jams on the Message Paper Jam Solution Reference Pages A Cover A Paper Jams in Cover A P 217 B Cover B Paper Jams in Cov...

Страница 217: ...ore attempting to clear it The paper jam indicator remains lit on the control panel if there are pieces of paper remaining inside the printer Make sure that the power is on when clearing a paper jam D...

Страница 218: ...f the jammed paper reaches the fusing unit proceed to step 4 4 Push down the green handle A1 in the direction of the arrow several times to eject the paper upward 5 Remove the paper in the direction o...

Страница 219: ...the fusing unit pull down the green handle A2 in the direction of the arrow to open the fusing unit cover 4 If paper is jammed inside the fusing unit gently remove the paper while holding down the gre...

Страница 220: ...e jammed paper Note If paper is jammed at the upper position it may be invisible Check inside thoroughly If paper is torn check for any torn pieces of paper inside the machine 4 Push the center of the...

Страница 221: ...ece of paper remains inside the machine 4 Close the Cover C gently 5 If the Tray 6 is installed put the Tray 6 back into position Paper Jams in Cover D Duplex Module The following describes how to cle...

Страница 222: ...ccurring in the Cover E 1 Open the Tray 5 Bypass 2 Pull the release handle of Cover A and open the Cover A 3 Pull the release handle of Cover E and open the Cover E 4 Remove the jammed paper Note If p...

Страница 223: ...r jam occurred first 2 Remove the jammed paper Note If the paper is torn make sure no piece of paper remains inside the machine 3 Push the tray in gently until it stops Paper Jams in Tray 3 When Tande...

Страница 224: ...t 2 Remove the jammed paper Note If paper is torn check for any torn pieces of paper inside the machine 3 If paper is jammed in the paper feed section open the inner cover and remove the paper 4 Push...

Страница 225: ...Tray 6 HCF B1 Optional This section describes how to clear paper jams occurring in Tray 6 HCF B1 optional Note Remedy differs depending on where the paper jam occurs Follow the instructions displayed...

Страница 226: ...e Tray 6 top cover 3 Remove the jammed paper Note If the paper is torn make sure no pieces of paper remain inside Tray 6 4 Close the top cover 5 Gently put Tray 6 back into position Paper Jams in Tray...

Страница 227: ...ow to clear staple jams inside the finisher when the C3 Finisher optional or the C3 Finisher with Booklet Maker optional is installed Note Remedy differs depending on where the paper jam occurs Follow...

Страница 228: ...ansport Paper Jams at the Handle 3a 1 Open the finisher front door 2 Move the handle 3a upwards 1 and remove the jammed paper 2 Note If paper is torn check for any torn pieces of paper inside the mach...

Страница 229: ...torn pieces of appear inside the machine 3 Turn the knob 3b to the left 1 and eject the jammed paper 2 4 Gently pull the paper to remove Note If paper is torn check for any torn pieces of paper inside...

Страница 230: ...o remove 2 Open the finisher front cover 3 Move the handle 3c to the left 4 Remove the jammed paper Note If paper is torn check for any torn pieces of paper inside the machine 5 Return the handle 3c t...

Страница 231: ...de the machine 4 Return the handle 3d to its original position 5 Close the finisher front door Note If the finisher front door is not completely closed a message will appear and the machine remains pa...

Страница 232: ...n the knob 4a to the left 1 and remove all the jammed paper 2 4 Return the booklet unit 4 to its original position 5 Close the finisher front door Note If the finisher front door is not completely clo...

Страница 233: ...s paused Paper Jams in the Folder Unit CD1 The following describes how to clear paper jams inside the folder unit when the Folder Unit CD1 optional is installed Note A remedy differs depending on wher...

Страница 234: ...r of the Folder Unit CD1 is even slightly open Paper Jams at the Handle 2b 1 Make sure that the machine has stopped and open the folder unit door of the Folder Unit CD1 2 Move the handle 2b to the lef...

Страница 235: ...6 1 Clearing Paper Jams 235 Note A message will be displayed and the machine will not operate if the folder unit door of the Folder Unit CD1 is even slightly open...

Страница 236: ...he machine 3 If you cannot remove the paper in step 2 return the handle 2e to its original position 1 and move the handle 2f 2 Turn the knob 2c to the left 3 and then remove the jammed paper 4 Note If...

Страница 237: ...tput tray 2d 1 and move the handle 2g to the right 2 Remove the jammed paper 3 Note If paper is torn check for any torn pieces of paper inside the machine 3 Return the handle 2g 1 and push the Tri fol...

Страница 238: ...cedures to clear the staple jams Contact our Customer Support Center if the problem persists after you have tried the following solutions Important Even if the sheets have been stapled together proper...

Страница 239: ...ion open the finisher front cover 2 With grasping the lever R1 of the staple cartridge holder pull out the holder to the right towards you 3 With grasping the orange lever pull out the staple cartridg...

Страница 240: ...dge into its original position until it clicks into place 8 Close the finisher front door Note If the finisher front door is not completely closed a message will appear and the machine remains paused...

Страница 241: ...ing the lever of the booklet staple cartridge push the booklet staple cartridge downward Then pull out the booklet staple cartridge upwards 4 Push down the metal part of the staple cartridge 5 Remove...

Страница 242: ...he booklet staple cartridge until of the booklet staple cartridge is fitted in of the booklet unit 8 Return the booklet unit to its original position 9 Close the finisher front door Note If the door i...

Страница 243: ...may be a problem with the printer Contact our Customer Support Center or your dealer The printer makes odd noise Is the printer installed on a level surface Install the printer on a level and sturdy...

Страница 244: ...ttings button to exit the menu screen Are protocols set correctly Confirm that the port being used is enabled Also use CentreWare Internet Services to confirm that the protocol settings are configured...

Страница 245: ...nt use Allocate Memory on the control panel to reduce the memory capacity of unused items which increases the capacity of the print page buffer Increasing the buffer capacity can speed up printing Adj...

Страница 246: ...fer to Online help for the print driver On the Image Options tab of your print driver change the print density settings under Image Settings or Tone Balance and then try printing again Refer to Online...

Страница 247: ...and reload it in the tray A drum cartridge is damaged or has deteriorated Depending on its condition the drum cartridge may need replacement Contact our Customer Support Center or your dealer There ma...

Страница 248: ...rmed in the printer On the control panel set the Sleep mode trigger time to more than 60 minutes and let the printer stand with its power on After about an hour the heat inside the printer causes the...

Страница 249: ...nd Weight for Supported Paper P 118 Check if the paper type setting on the print driver or control panel is set correctly Refer to Paper Type P 190 Online help for the print driver The toner save feat...

Страница 250: ...n top of paper in a paper tray Adding paper to a paper tray that still contains paper can cause these types of problems Fan the paper loaded in the tray and reload it into the tray Add paper to the tr...

Страница 251: ...type indicated by the message into paper tray N If the message persists after the correct paper is loaded the machine may not recognize the paper size correctly Make sure the position of the paper gu...

Страница 252: ...type of paper is not loaded in Tray 5 Bypass tray Load paper of the size orientation and type indicated by the message into Tray 5 If the message persists after the correct paper is loaded the machin...

Страница 253: ...rt valid card Print job has been paused due to insufficient funds Use a valid card to continue Note Pressing the Information button will display detailed information on the control panel Job has pause...

Страница 254: ...aple Cartridge P 302 Open Finisher Front Door and reinsert Hole Punch Waste Container R4 The hole punch waste container is full of punch waste Take out the hole punch waste container to discard all pa...

Страница 255: ...move the paper Refer to 6 1 Clearing Paper Jams P 216 Paper Jam Open Cover N and remove paper N A B C or D A paper jam occurred inside this printer Open the cover N and remove the paper Refer to 6 1 C...

Страница 256: ...r unit Open the folder front door and pull out the tri fold output tray 2d swing the handle 2g to the right turn the knob 2c to the left and remove the jammed paper Refer to 6 1 Clearing Paper Jams P...

Страница 257: ...ation and type indicated by the message into Tray 5 After the correct paper is set press the OK button to restart printing or press the Cancel Job button to cancel printing on the control panel Pull o...

Страница 258: ...4 P 37 Setting an IP Address IPv6 P 40 Ready to print Order Toner Close to replace the indicated toner cartridge The rest of printable pages are approximately 1 300 pages for a toner cartridge 1 until...

Страница 259: ...to connect to the machine Staple Jam Open Finisher Front Door and remove jammed staple from R1 A staple jam occurred in the finisher Open the finisher front door pull out the staple cartridge R1 to r...

Страница 260: ...6 Troubleshooting 1 The number of pages that can be printed is greatly affected by printing conditions and document content For details refer to A 3 Life of Consumables and Regular Replacement Parts P...

Страница 261: ...in the list Error Code Cause Remedy 012 210 012 211 012 212 012 213 012 221 012 223 012 224 012 225 012 226 012 227 012 228 012 229 012 230 012 231 012 232 012 233 012 234 012 243 Finisher malfunction...

Страница 262: ...heck whether the network environment is set correctly 016 401 The 802 1x authentication method cannot be processed in the setting of Ethernet 1 Set the authentication method of the machine to the same...

Страница 263: ...r the IP address of the DNS server is set correctly 016 454 Unable to retrieve the IP address from DNS Confirm the DNS configuration and IP address retrieve setting 016 455 Connection to the SNTP serv...

Страница 264: ...set correctly Confirm the forwarding rule for image logs from the server to the machine 016 514 An error occurred during processing of an XPS document If an error occurred while printing from a drive...

Страница 265: ...An error occurred when connecting to the Remote Download server There was no response from the server within the specified time 45 seconds Confirm the network connection Check whether the Remote Down...

Страница 266: ...or more information on the process refer to the manual for ApeosWare Authentication Management 016 557 Authentication Agent internal error occurred Check ApeosWare Authentication Management For more i...

Страница 267: ...the Sample Set feature because the hard disk is not installed To use the Sample Set feature the hard disk must be installed Contact our Customer Support Center 016 708 Unable to annotate because of in...

Страница 268: ...il is sent 2 DNS server was unable to resolve the Internet address the string after by the DNS server when e mail is sent For 1 confirm the e mail address For 2 confirm the DNS server address 016 738...

Страница 269: ...for the PDF Direct Print feature has been set to PS 1 memory is insufficient 3 When Process Mode 408 for the PDF Direct Print feature has been set to PS 1 a PDF file including OpenType fonts is proces...

Страница 270: ...eck whether the network cables are plugged in securely Check whether the IP address of the SMTP server when an IP address is used for server specification 2 Enter the host name of the machine using AS...

Страница 271: ...SL server certificate of the SMTP server You can avoid this error by setting SMTP SSL TLS Communication in SSL TLS Settings to Disabled however the validity of the server cannot be warranted 017 719 S...

Страница 272: ...e for the POP3 server 017 768 The server certificate for the POP3 server is before the valid period Be sure to match the time set on the POP3 server and the machine If the time matches use the valid s...

Страница 273: ...tion server Configure the server certificate Or cancel authentication 018 501 Communications with the CA server set in the machine failed Check the network connection and the address of the CA server...

Страница 274: ...DSREPAIR at the server console on the NetWare server 018 583 A hard disk error occurred on the NetWare server 1 Check the status of the HDD on the NetWare server 2 Check whether the NetWare server is...

Страница 275: ...140 validation mode of the machine If the error still is not resolved contact our Customer Support Center 018 722 The machine cannot connect to Google Cloud Print because of a network error Check that...

Страница 276: ...cause DNS failed to resolve the name Check that the DNS settings are adequate 018 745 The machine cannot connect to Google Cloud Print because of a proxy connection error Check that the proxy server s...

Страница 277: ...tion aggregate server is changed for the EP communication aggregate server configuration contact our Customer Support Center 021 405 An error occurred in the SSL communication with the external server...

Страница 278: ...subnet mask setting If the error still is not resolved after checking the above settings there may be a network failure Consult your system administrator If the network works normally but the error st...

Страница 279: ...are Internet Services If the error still is not resolved after checking the setting the proxy setting file may not be registered Consult your system administrator If the proxy setting file works norma...

Страница 280: ...ing the above settings there may be a network failure or the proxy server settings may be changed or failed Consult your system administrator If the network works normally but the error still is not r...

Страница 281: ...resolved contact our Customer Support Center 021 523 An error occurred while communicating with the EP server Enable the SOAP port switch off the machine power make sure that the display is blank and...

Страница 282: ...emory capacity or hard disk required to use the optional feature is not installed Switch off the machine power and then switch it on again after the display goes out If the error still is not resolved...

Страница 283: ...atible Confirm the print data and try printing again 026 722 The USB memory device is not initialized Initialize the USB memory device on a computer with the following file format and then execute the...

Страница 284: ...Support Center 027 700 The domain section of the recipient s e mail address is a prohibited domain Specify a domain that is not prohibited for the domain section of the recipient s e mail address 027...

Страница 285: ...ver address Or check whether the computer on which the application ApeosWare Flow Service is installed has been registered on the DNS server 027 721 An application interface destination does not exist...

Страница 286: ...server Abnormal change to the job ticket because of network trouble Intentional alteration to the job ticket Execute the print job again If the error still is not resolved contact our Customer Suppor...

Страница 287: ...t our Customer Support Center 047 214 047 215 An error occurred in the machine Switch off the machine power make sure that the display is blank and then switch on the machine power If the same message...

Страница 288: ...than expected Contact our Customer Support Center 077 213 An error occurred in the Duplex Module of the machine Switch off the machine power make sure that the display is blank and then switch on the...

Страница 289: ...tration exceeds the maximum number allowed Delete unnecessary logo data 116 743 The logo data or form cannot be registered because the memory for the form and logo data are insufficient Increase memor...

Страница 290: ...rom the specified is loaded for 2 sided printing 2 The Punching feature of the Finisher has malfunctioned For 1 check whether the specified size paper is loaded in the tray For 2 confirm whether the e...

Страница 291: ...communication is enabled start the address with https instead of http Also if you changed the SSL TLS port number enter a colon before the port number Example https printer1 example com 80 Is your web...

Страница 292: ...ervices to confirm that your domain is included as a permitted e mail domain Are the SMTP server and POP server running normally Contact your network administrator A PDF file attached with Mail Print...

Страница 293: ...k local address Add a scope ID to the link local address When using Internet Explorer 7 with Windows Vista Windows 7 or Windows Server 2008 R2 to specify fe80 203 baff fe48 9010 for access for example...

Страница 294: ...er and specify the destination URL using an FQDN In an IPv6 network environment that does not have a DNS server authentication fails when the computer name is specified in the SMB authentication SMB s...

Страница 295: ...n the Non Genuine mode Also remaining toner cartridge and drum cartridge levels are not displayed Note To disable the Non Genuine mode select Off in Step 4 below 1 On the control panel press the and O...

Страница 296: ...row a toner cartridge into an open flame Remaining toner in the cartridge may catch fire and cause burn injuries or explosion If you have a used toner cartridge no longer needed contact your local Fuj...

Страница 297: ...ches the end of its life Important Make sure that the power is on when replacing the toner cartridges When placing a used toner cartridge on the floor or on a table place a few sheets of paper under t...

Страница 298: ...on the top of the cartridge and pull it out from the printer Important Slide out the toner cartridge gently Otherwise toner may spill from the cartridge 4 Unpack the new toner cartridge and shake it f...

Страница 299: ...es Have a new cartridge ready Replace Drum Cartridge A drum cartridge is at the end of its life The printer will stop and become unable to print Replace the drum cartridge using the procedure under Re...

Страница 300: ...might fall out of the machine and soil the floor 6 Open the box and take the new drum cartridge out of the bag Important Do not place the new drum cartridge in an upright position Return the old drum...

Страница 301: ...rizontally to prevent it from tearing Important Be sure to pull out the tape straight and horizontally If it is pulled out upward it may be torn before it is completely out of the cartridge 10 Push th...

Страница 302: ...le Cartridge R1 is displayed on the display follow the instruction below to replace the staple cartridge with a new one 1 After confirming that the printer is not performing any operation open the fin...

Страница 303: ...rear side into the cartridge 2 6 With grasping the orange lever of the staple cartridge push the staple cartridge into its original position until it clicks into place 7 Close the finisher front door...

Страница 304: ...ft sides of the booklet staple cartridge 1 and open the cover 2 5 Pinch the right and left sides of the empty staple case 1 and pull out the empty staple case from the staple cartridge Important The s...

Страница 305: ...ars empty the hole punch waste container as instructed Important Empty the hole punch waste container when the machine is on Empty the hole punch waste container after the message appears Otherwise th...

Страница 306: ...er 4 Insert the emptied hole punch waste container into its original position until it stops 5 Close the finisher front door Note If the front door is not closed completely a message appears and the m...

Страница 307: ...1 and then while lifting up the release lever 2 gently open the Cover A 3 4 Loosen the screws on both sides of the fusing unit completely Message Action Ready Replace Fusing Unit The fusing unit has r...

Страница 308: ...p the unit 7 Take out a new fusing unit from the box 8 Hold the both sides of the new fusing unit and then place the unit onto the machine Important Hold the fusing unit with both hands so that you do...

Страница 309: ...s at the same time This displays the Consumables Menu 2 Press the until Reset Counter appears 3 Press either the or OK button to select so Fusing Unit is displayed 4 Press either the or OK button to s...

Страница 310: ...s the total number of pages sheets printed to date by computer job owner The count starts from the last time data was initialized Refer to 7 3 Checking the Meter Reading P 314 Auditron Report Print Jo...

Страница 311: ...ternet Services PDF Settings List PDF Settings 1 Lists PDF direct print settings configured using the control panel PCL Setting List PCL Settings 1 Lists PCL print mode settings For details refer to t...

Страница 312: ...are four types of demo prints OfficeUse Sample Graphics Sample A3 Sample 2 Sided Sample You can check the printer s performance on these demo prints KS Settings List KS Settings 1 KR Additional Font K...

Страница 313: ...e menu screen Print Reports is displayed 2 Press the or OK button to select Configuration is displayed Note To print other report or list press the button until the target report or list is displayed...

Страница 314: ...ter is displayed 4 Press the or OK button to select Total is displayed 5 When you are finished checking the meter press the Settings button to return to the Ready to print screen Checking the Meter Re...

Страница 315: ...or OK button to select A process start confirmation screen is displayed 8 Press the OK button Data is initialized Job Owner Name Up to 50 owner names can be printed The print count of the 51st job ow...

Страница 316: ...the Ready to print screen Checking the Meter Reading by Function Job Counter Report This report provides the number of print pages and sheets for jobs that use the 2 pages up and 2 Sided print feature...

Страница 317: ...isplay the menu screen 2 Press the button until Admin Menu is displayed Note If you went past the desired item return to the item by pressing the button 3 Press the or OK button to select Network Port...

Страница 318: ...a subnet mask and gateway address press the Back button and proceed to Step 14 If you want to finish configuring the settings proceed to Step 21 To change the Subnet Mask Gateway Address 13 Press the...

Страница 319: ...e same way you entered the IP address Example 192 168 1 254 and press the OK button to confirm your entry 20 The setup is now complete Press the Settings button to close the menu screen The printer au...

Страница 320: ...CentreWare Internet Services CentreWare Internet Services also can be used to check the status of consumables and the paper levels of the paper trays Note For information on how to use CentreWare Inte...

Страница 321: ...re ports an e mail server the TCP IP environment and the printer s e mail address Configure the Properties below in accordance with your e mail environment Note After configuring the settings be sure...

Страница 322: ...at sign dot hyphen and underline _ up to 128 bytes Mail Notice Status Settings Select the items to be included in notifications Consumables Status Parts Status Paper Tray Status Output Tray Status Jam...

Страница 323: ...tab click Printing Preferences The Printing Preferences dialog box appears 4 Click the Advanced tab 5 Specify On in Notify Job Completion by E mail 6 In Enter E mail Address enter the notification ma...

Страница 324: ...ter 1 On the control panel press the and OK buttons at the same time This displays the Consumables Menu 2 Press OK button to select Serial number of the printer is displayed 3 Press the Settings butto...

Страница 325: ...s the button until Admin Menu is displayed 3 Press the or OK button to select Network Port is displayed 4 Press the button until System Settings is displayed 5 Press the or OK button to select Audio T...

Страница 326: ...select Devices and printer Printer or Printer and FAX depending on the OS 2 Select the printer icon on this printer and then click Properties from the File menu 3 On the Configuration tab click Instal...

Страница 327: ...Print using an Smart card IC Card Reader optional or purchase separately connected to the printer uses the smart card validation for output Output data is accumulated temporarily in the printer in th...

Страница 328: ...ng time number of copies and other data Note The Security Extension Kit optional and the HDD Extension Kit optional must be installed to use this feature To use this feature contact your dealer Image...

Страница 329: ...ange the display language of CentreWare Internet Services change the display language of your web browser For information on how to change the display language of your web browser refer the online hel...

Страница 330: ...ll pages of a print job which deters copying of the document and can be used to trace its copy history For more information refer to the online help for CentreWare Internet Services Important Use of t...

Страница 331: ...Properties tab 3 On the menu on the left click Security Watermark Watermark The Watermark screen is displayed 4 Configure the settings Setting Description Date Format Specifies the pattern for the pr...

Страница 332: ...trator s ID and password enter them and click OK 2 Click the Properties tab 3 On the menu on the left click Security Watermark Secure Watermark The Secure Watermark dialog box appears 4 Configure the...

Страница 333: ...otection Code Specifies whether secure watermark job execution protection is on or off Specifying Prevent Duplication embeds a digital code Off Prevent Duplication Default Secure Watermark Specifies t...

Страница 334: ...b 3 On the menu on the left click Security Watermark Universal Unique ID The Universal Unique ID screen is displayed 4 Configure the settings 5 After all the settings are completed click Apply Setting...

Страница 335: ...figuring the Printer Using CentreWare Internet Services P 42 If you are prompted to enter the administrator s ID and password enter them and click OK 2 Click the Properties tab 3 On the menu on the le...

Страница 336: ...lick Security Force Annotation Create Text String The Create Text String screen is displayed 4 Enter text string to register Note You can enter up to 64 single byte characters 5 After all the settings...

Страница 337: ...ting must be configured in order to output the Audit Log For details about the setting procedure refer to Configuring HTTP Communication Encryption Settings P 342 or the online help for CentreWare Int...

Страница 338: ...s CentreWare Internet Services refer to 1 6 Configuring the Printer Using CentreWare Internet Services P 42 If you are prompted to enter the administrator s ID and password enter them and click OK 2 C...

Страница 339: ...nformation on end of print job Report Information that the reported is printed Change Reference of Device Settings Change of time settings Information that time setting has been changed within the con...

Страница 340: ...use the printer s HTTP server are the SOAP port Internet service HTTP port and IPP port SSL TLS protocol is used for encryption of HTTP communication between a client and the printer To encrypt commun...

Страница 341: ...help for CentreWare Internet Services for information about how to use it to import a certificate issued by another CA Encryption Using IPSec IPSec can be used to encrypt communications with the prin...

Страница 342: ...use CentreWare Internet Services to import existing certificates For details about importing existing certificates refer to the online help for CentreWare Internet Services 1 Launch your web browser...

Страница 343: ...that appears set Public Key Size and configure the Issuer and Days of Validity setting and then click the Apply button Note If you do not want to apply your new settings and want to reset them to the...

Страница 344: ...1 with IP address of your printer Example of Internet address https xxx yyyy zz vvv Configuring Settings to Encrypt Communication Data for Printing with the IPP Port Encrypting HTTP communication mak...

Страница 345: ...Vista Windows 7 or Windows Server 2008 R2 to configure IPSec settings For more information refer to Window Vista Windows 7 or Windows Server 2008 R2 online help Configuring Printer Settings Use Centre...

Страница 346: ...P 42 If you are prompted to enter the administrator s ID and password enter them and click OK 2 Click the Properties tab 3 On the menu on the left click Security Machine Digital Certificate Managemen...

Страница 347: ...t Machine The printer reboots and the settings you configured are reflected This sets the certificate for IPSec Next configure IPSec settings Jump to step 3 of the procedure in the next page Configuri...

Страница 348: ...value 9 For DH Group select G1 or G2 10 Selecting the Enabled check box for PFS enables the PFS feature 11 For Specify Destination IPv4 Address or Specify Destination IPv6 Address enter the IP addres...

Страница 349: ...ted to users who are registered on the printer and administrators only Printing from a Computer Depending on the type of your print job the use of the following features is controlled Auditron Adminis...

Страница 350: ...eWare Internet Services to register user information Note For details about each setting item refer to the online help for CentreWare Internet Services 1 Launch your web browser and access CentreWare...

Страница 351: ...ure the Account Number setting and then click Edit 7 On the screen that appears configure each of the settings and then click Apply Note The user ID and password set on this page are also used by the...

Страница 352: ...nfigure the Allow setting in Allow User to Disable Active Settings 7 Click Apply Authorization group having authorization to temporarily disable active settings is created 8 On the menu on the left cl...

Страница 353: ...to Printer Features by Pre registering Users 353 3 On the Configuration tab click Accounting 4 On the Accounting dialog box that appears configure each item and then click OK 5 Click OK to close the P...

Страница 354: ...of the machine may not support some smart cards Smart Card Settings The system administrator can register smart cards using CentreWare Internet Services Note For details about each setting item refer...

Страница 355: ...or edit the information later Also when you click the Decrypt button the information is reset to the default You should backup the smart card information before encryption You can backup the smart ca...

Страница 356: ...wing explains the case where adjusting the face side 1 sided using Tray 2 1 Press the Settings button on the control panel to display the menu screen 2 Press the button until Admin Menu is displayed 3...

Страница 357: ...the final position 14 Press the button until Adjust Side 1 is displayed 15 Press the or OK button to select Adjust Lead Regi is displayed 16 Press the or OK button to select Actual adjusted value in...

Страница 358: ...displayed 21 Specify the value calculated in the step 14 press the OK button Set the plus value for moving the print image leftward the minus value for moving the print image rightward 22 When the se...

Страница 359: ...witch and the main power switch and unplug it Access to a live machine interior may cause electric shock Cleaning the Exterior of the Printer Clean the exterior of the printer at least once a month To...

Страница 360: ...g the power cord interface cable and all the other cables from the printer 3 Pull out the trays from the printer and remove any paper in them Re wrap the paper and store it away from dust and humidity...

Страница 361: ...using technology using the heat roll Warm up Time 22 seconds or less at 20 C temperature 15 seconds or less when the main power is on at 20 C temperature The same time is required for the Sleep Mode C...

Страница 362: ...ty Feeder optional 56 216 gsm Tandem Tray Module optional 60 216 gsm Important Use only the recommended paper Using paper other than that recommended for the printer can cause printing problems Do not...

Страница 363: ...own 2 Sided Printing Standard CPU PowerPC 1066MHz Dual Memory capacity 2 GB max 2 GB Important The above memory capacity does not guarantee print quality depending on the type and content of print dat...

Страница 364: ...Windows 7 32bit Windows 8 64bit Windows 8 32bit Windows Server 2012 64bit Windows 8 1 32bit Windows 8 1 64bit Windows Server 2003 64bit Windows Server 2012 R2 64bit Windows Vista 64bit Mac OS X 10 5...

Страница 365: ...n standard tray Tray 1 is installed the main unit when Bypass Tray is folded Weight 57 8 kg main unit only including consumables 54 0 kg main unit only excepting consumables Usage Environment During U...

Страница 366: ...op of smaller size paper Important When using 80 gsm paper Staple Capacity 50 sheets 90 gsm or less Paper size Maximum A3 11 x 17 Minimum B5 Position 1 place front back angled stapling 2 places parall...

Страница 367: ...Card 100 x 148 mm Finisher tray Maximum 12x19 305 x 483 mm Minimum B5 Booklet tray Maximum 12x18 305 x 457 mm Minimum B5 Paper Weight Output tray 60 216 gsm Finisher tray 60 216 gsm Booklet tray 60 to...

Страница 368: ...e stapled properly Paper Size Maximum A3 11 x 17 Minimum B5 8 x 10 Position 1 place front back angled stapling 2 places parallel stapling Important When using 80 gsm paper Punch Number of Holes 2 hole...

Страница 369: ...gsm Capacity Tri fold 40 sheets Important When using 64 gsm paper Power Maximum power consumption AC 220 V 10 0 6 A 50 60 Hz common 144 W or less AC 240 V 10 0 6 A 50 60 Hz common 144 W or less AC 11...

Страница 370: ...fonts for PCL5 and HP GL 2 European Stroke fonts European ESC P Roman Sans Serif PDF Arial Arial Italic Arial Bold Arial Bold Italic Courier Courier Italic Courier Bold Courier Bold Italic Symbol Tim...

Страница 371: ...ew Bold Italic Symbol Wingdings Line Printer Times Roman Times Italic Times Bold Times Bold Italic Helvetica Helvetica Oblique Helvetica Bold Helvetica Bold Oblique CourierPS CourierPS Oblique Courier...

Страница 372: ...output sheets US 2 3 Hole Punch Kit for C3 Finisher EC102446 2 3 hole punches output sheets Transport Unit H2 for C3 Finisher QL200091 Transfers paper output from the center tray to the C3 Finisher or...

Страница 373: ...mark feature Force Annotation feature The HDD Extension Kit optional is required Manual Holder EC102239 A holder to keep the machine s guides Embedded IC Card Reader E3300207 for Felica E3300208 for H...

Страница 374: ...es can vary greatly from these values due to paper size and type printing environment and other printing conditions such as the frequency of power ups This is because the indicated number of pages are...

Страница 375: ...a Software Product Manual provided with the printer To access the web site click Fuji Xerox Web Site on the startup window of the Media Software Product Manual The following is the URL of the driver d...

Страница 376: ...optional 1 1 The IC Card Reader may not be supplied with the printer in some regions Contact your dealer for details To enhance the following installed features Number of forms that can be registered...

Страница 377: ...le on the control board and then carefully pull the control board out of the printer Place the control board on a table top or some other flat surface Important When pulling out the control board hold...

Страница 378: ...control board in place 12 Connect the power cord to the printer Turn on the printer s main power switch and power switch 13 Print the Configuration Report and confirm that Hard Disk is included for t...

Страница 379: ...on Kit optional Installation Procedure 1 Press the printer s power switch to turn off the power Note Make sure that there is no indication on the display and Power Saver button is off 2 Open the front...

Страница 380: ...e and then insert the Security Extention Kit ROM straight into the slot with aligning the notch in the ROM with the concavity of the slot Press the ROM card down firmly into the slot Note Make sure th...

Страница 381: ...ant Once you install the Security Extention Kit and enable it with the control panel that Security Extention Kit is not usable on any other printer 11 Press the Settings button on the control panel to...

Страница 382: ...message appears press the Settings button to return to the print screen Important If the Security Extention Kit installed was previously used on another printer the message Serial Number Error appear...

Страница 383: ...the printer s power switch to turn off the power Note Make sure that there is no indication on the display and Power Saver button is off 2 Open the front cover 3 Press the side of the printer s main...

Страница 384: ...e and then insert the TC SC Additional Fonts Kit straight into the slot with aligning the notch in the Kit with the concavity of the slot Press the ROM card down firmly into the slot Note Make sure th...

Страница 385: ...85 Press the control board in as far as it will go 9 Tighten the screws to secure the control board in place 10 Connect the power cord to the printer Turn on the printer s main power switch and power...

Страница 386: ...wer switch to turn off the power Note Make sure that there is no indication on the display and Power Saver button is off 2 Open the front cover 3 Press the side of the printer s main power switch to t...

Страница 387: ...in the right figure and then insert the Korean Additional Fonts Kit straight into the slot with aligning the notch in the Kit with the concavity of the slot Press the ROM card down firmly into the slo...

Страница 388: ...rol board in as far as it will go 9 Tighten the screws to secure the control board in place 10 Connect the power cord to the printer Turn on the printer s main power switch and power switch The instal...

Страница 389: ...ly turned off before switching on the printer again When HDD Extension Kit is installed it can be specified as the save destination of print data from lpd or IPP The hard disk is the fixed save destin...

Страница 390: ...an XPS driver is used on a printer that does not have an XPS feature Printing from Macintosh via USB Connection When you send a print job from the PostScript driver of Macintosh connected via USB and...

Страница 391: ...ether in the vertical position adjustment Adjustment of position per page is not available when Pages Per Sheet N Up is selected Print orientation when printing mixed size documents Three types of com...

Страница 392: ...dministrator before configuring IP address settings In some network environments sub network mask and gateway address settings also must be configured Consult your network administrator about the sett...

Страница 393: ...ding print data on the computer When the LPD Spool setting is No Spooling While a print request is being received from one computer a print request from another computer cannot be received When the co...

Страница 394: ...ication is supported by an address that is not registered Non operational IPv6 addresses may be set automatically for IPv6 addresses IPv6 automatically set addresses IPv6 DNS server address A non oper...

Страница 395: ...ith DocuShare or some other external access service operation is improper when an IPv6 address is specified as the connection destination URL In the IPv6 environment enable the DNS server and specify...

Страница 396: ...vices on Devices ThinPrint Xerox Standard Accounting Users Limits and Access Group Accounts E mail E mail Settings Subject is deleted SMTP Server LDAP LDAP Directory LDAP LDAP User Mappings LDAP LDAP...

Страница 397: ...epending on the document image of a job the data size the processing of multiple jobs other than the Image Log Control feature the Assurance Level setting or the Transfer Image Log Assurance Level set...

Страница 398: ...Login to Remote Accounts Only the services that can be instructed from the display Charge Print and Private Charge Print are restricted by the Login to Remote Accounts feature You cannot restrict the...

Страница 399: ...thentication using the Smart Card Remote Authentication can be performed in an environment where ApeosWare Authentication Management or Active Directory is used Change the default realm name only when...

Страница 400: ...are available Bi directional communication Allows two devices to exchange information with each other In addition to transmission of data such as print requests from a computer it allows transmission...

Страница 401: ...one set of characters of uniform design Grams per Square Meter gsm The weight in grams of one square meter of paper HTTP A protocol used to communicate with a web browser over the Internet Image Enhan...

Страница 402: ...expressed as four numeric hexadecimal values separated by colons This is a next generation IP address that is starting to be used to replace the current IPv4 addresses Job A unit of work processed by...

Страница 403: ...communication protocol for transmitting data on TCP IP network This protocol can be used on the standard TCP IP port monitor ppm A measurement that shows how many pages the printer is capable of prin...

Страница 404: ...Project Agency NetWork It is the standard protocol of the Internet and is supported by a variety of computer platforms from personal computers to mainframes Tone A smoothness of colors represented by...

Страница 405: ...45 overview 42 problems 291 settings 43 Changing an IP Address 317 Changing the Sleep Mode Timer 145 Charge Print 325 Checking Printer Status via E mail 321 Checking the meter reading 314 Checking th...

Страница 406: ...st 311 HP GL 2 Settings List 311 HTTP SSL TLS 164 I IEEE 802 1x 165 Image log 328 Image Log Control 185 397 Image Quality 195 206 Information button 54 Init Delete Data 208 Initialize Hard Disk 327 In...

Страница 407: ...Print Area 171 Print Driver downloading 375 installing 46 obtaining the latest print driver version 375 online help 68 uninstalling 46 Print Menu button 54 Print Order 172 Print position adjustment 39...

Страница 408: ...hinPrint 158 391 TIFF JPEG Logical Printers List 311 TIFF JPEG Settings List 311 Toner cartridge 50 Toner cartridges 297 Tray 1 and 2 47 Tray 3 and 4 Tandem Tray Module 48 Tray 3 and 4 Two Tray Module...

Страница 409: ...button and buttons 32 alphanumeric characters Settings button When StandardPaperSize is 8 5x11 XPS Print Ticket Off Standard Mode Compatible Mode XDW DocuWorks 1Set s Quantity 2SidedPrinting Print Mo...

Страница 410: ...c 5 1275 Seconds increment 5 sec 2 3600 Seconds increment 1 sec 1 65535 1 10 Language English Korean Simp Chinese Trad Chinese Japanese TCP IP Settings IP Mode Dual Stack IPv4 IPv6 IPv4 Settings IPv4...

Страница 411: ...aracters 255 alphanumeric characters 31 alphanumeric characters 31 alphanumeric characters This function may be used when the customer has our maintenance service agreement For more information contac...

Страница 412: ...ded Report 1 Sided 2 Sided Print Area Standard Extended Banner Settings Banner Sheet Off Start Sheet End Sheet Start End Banner Tray Tray 1 Tray 2 Tray 3 Tray 4 Tray 6 Date dd mm yyyy Time Format 12 H...

Страница 413: ...At end of the job Disabled Enabled Disabled Enabled Disabled Enabled Disabled Enabled Software Download Accounting Enabled Disabled Accounting Type Disabled AuthenticationSrvr Local Accounting Networ...

Страница 414: ...RL Heavyweight Cardstock Bond Transparency Labels Punched Letterhead Pre Printed Other 1 Custom 1 2 Custom 2 3 Custom 3 4 Custom 4 5 Custom 5 Tray 6 Plain Recycled Plain RL Heavyweight Cardstock Bond...

Страница 415: ...stom 1 5 Custom 5 Custom Color Name 1 Custom 1 5 Custom 5 Print User ID Off Top Left Top Right Bottom Left Bottom Right Odd Page 2 Sided UnregisteredForms Print Data only Do not print DefaultPaperSize...

Страница 416: ...Delete All PCL Fonts Secure Print Jobs Select User ID 1001 user1 1001 user1 Press OK Delete Adjust Paper Regi Tray 1 Tray 2 Adjust Side 1 Adjust Side 2 Adjust Lead Regi Adjust Side Regi PrintChart 1Si...

Страница 417: ...Press OK to print Select Jobs 1 Taro Doc Print Delete Select Jobs 2 Kenji Doc Press OK Delete Quantity 1 Set s Max 9999 Print Menu button OK button Resetting Fusing Unit Reset completed for Fusing Un...

Страница 418: ...418 Control Panel Menu Tree...

Страница 419: ...DocuPrint 5105 d User Guide Fuji Xerox Co Ltd ME7102E2 1 Edition1 September 2014 Copyright 2014 by Fuji Xerox Co Ltd...

Отзывы: