Software Control:
xT microscope Control Software
4-11
The Scan Menu (Alt + C)
opens the scanning control functions:
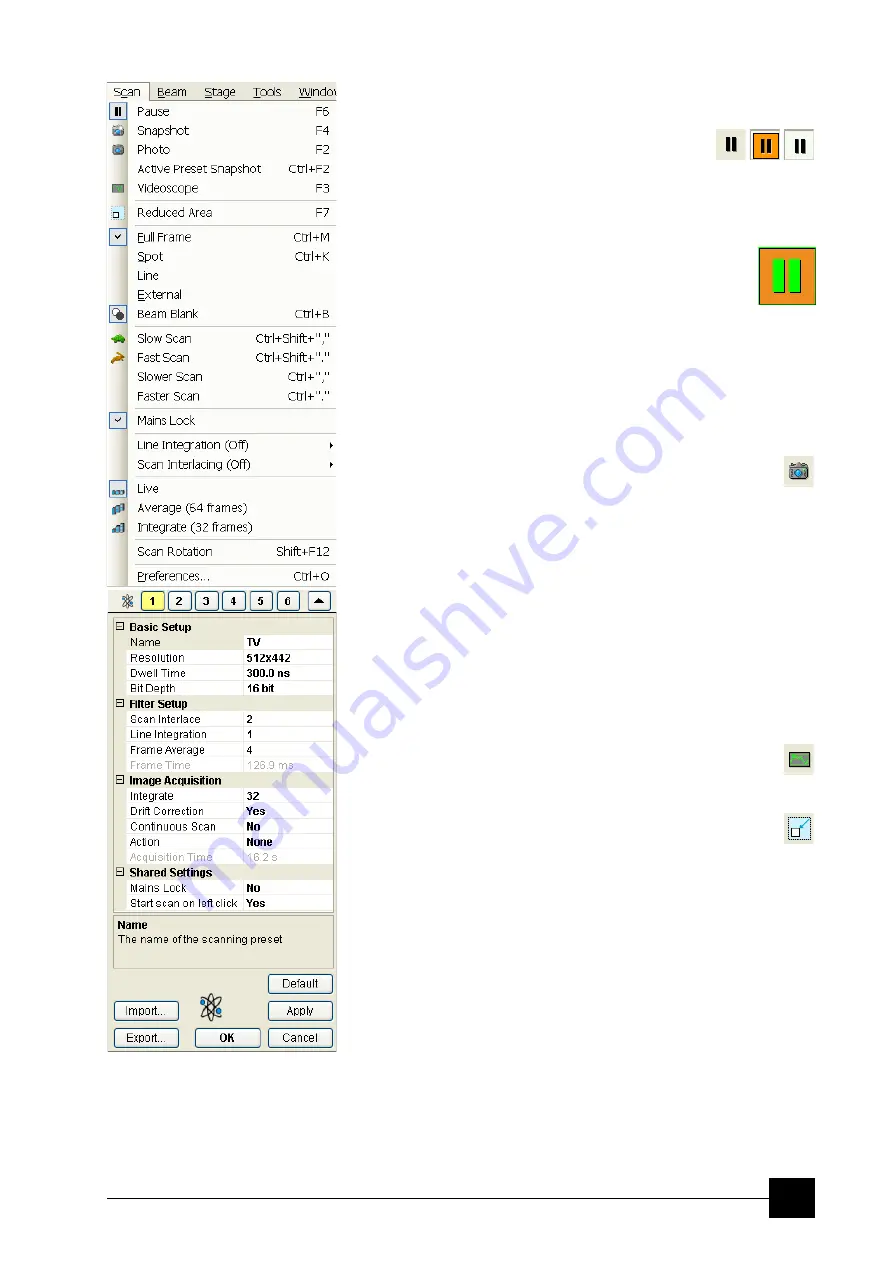
Pause (F6)
pauses the image. This function is used automatically
with Snapshot and Photo functions.
Select Pause or press F6 or click the Pause icon once / twice to stop
scanning at the end of the actual frame / immediately.
When the quad is going to be paused at the end of
the frame the Pause icon is pressed-in and has an orange
background. When the quad is paused the icon remains
pressed-in but its background reverts to normal and
a green box surrounding two vertical green bars appears in the
corresponding quad.
Select Pause or press F6 or click the Pause icon to release the pause
function (the icon button pops out) and to return the scanning to the
previous state.
Clicking the Pause icon while holding the Shift key pauses / resumes
all quads with an electron image at once.
Snapshot (F4) / Photo (F2)
activates a preset scan (see the
Preferences… / Scanning
tab).
The toolbar icon corresponds to the Photo function.
Active Preset Snapshot (Ctrl + F2)
If any of six presets is activated by clicking the numbered button
(becomes yellow), image acquiring starts with corresponding
parameters. Use the toolbar expand / hide arrow to change preset
parameters. These presets could be Exported / Imported with the use
of appropriate buttons. The functionality is available only, if activated
in the
Preferences…
/
General
tab / ).
Note:
Holding the Shift key while clicking the Photo icon / Active Preset
button or when pressing Shift + F2 / Ctrl + Shift + F2 key takes
electron beam Snapshot / Active Preset from all quads at once.
Videoscope (F3)
This function shows the video signal intensity along the actually
scanned horizontal line for correcting the contrast and brightness.
Reduced area (F7)
This mode is useful when focusing and stigmating as the scan speed
is faster in the smaller area. When Reduced area is chosen, the small
green area frame appears at the last known place on the screen, its
area and position are adjustable by the mouse. It is also possible to
adjust scan parameters independently on the full-frame setting.
•
Moving:
Place the mouse cursor over the selected area. The arrow changes
to a 4-ended arrow. Press and drag the selected area to a desired
position and release the mouse button.
•
Changing the size:
Place the mouse cursor over the edge of the selected area. The
cursor changes to a 2-ended arrow, either horizontal or vertical. A
corner can also be used to move two sides. Now drag the side out or
in to obtain the desired size and release the mouse button.
When the Reduced area frame is being manipulated, it turns yellow
until released, then it reverts to green.
Содержание Quanta FEG 250
Страница 8: ...C vi...
Страница 28: ...System Operation Quanta FEG System States 3 10...
Страница 108: ...Alignments 1 Gun Alignment 6 6...
Страница 114: ...Alignments 154 Water Bottle Venting 6 12 154 Water Bottle Venting...
Страница 152: ...System Options Automatic Aperture System 9 4...
Страница 154: ...System Options Nav Cam 9 6 401 NAV CAM AUTOBRIGHTNESS...
Страница 177: ...System Options Cooling Stage Waterless Cooling Stage 9 29...


